background image

Part No. 266251 R0408A

Printed in China © 2008 ICON IP, Inc.

LIMITED WARRANTY

ICON Health & Fitness, Inc. (ICON) warrants this product to be free from defects in workmanship and
material, under normal use and service conditions, for a period of one (1) year from the date of purchase.
There is a twelve (12) year warranty on the resistance mechanism. There is a lifetime warranty on the
frame. This warranty extends only to the original purchaser. ICON's obligation under this warranty is lim-
ited to replacing or repairing, at ICON's option, the product through one of its authorized service centers.
All repairs for which warranty claims are made must be pre-authorized by ICON. If the product is shipped
to a service center, freight charges to and from the service center will be the customer’s responsibility. For
in-home service, the customer will be responsible for a minimal trip charge. This warranty does not extend
to any product or damage to a product caused by or attributable to freight damage, abuse, misuse,
improper or abnormal usage or repairs not provided by an ICON authorized service center; products used
for commercial or rental purposes; or products used as store display models. No other warranty beyond
that specifically set forth above is authorized by ICON.

ICON is not responsible or liable for indirect, special or consequential damages arising out of or in con-
nection with the use or performance of the product or damages with respect to any economic loss, loss
of property, loss of revenues or profits, loss of enjoyment or use, costs of removal or installation or other
consequential damages of whatsoever nature. Some states do not allow the exclusion or limitation of inci-
dental or consequential damages. Accordingly, the above limitation may not apply to you.

The warranty extended hereunder is in lieu of any and all other warranties and any implied warranties of
merchantability or fitness for a particular purpose is limited in its scope and duration to the terms set forth
herein. Some states do not allow limitations on how long an implied warranty lasts. Accordingly, the above
limitation may not apply to you.

This warranty gives you specific legal rights. You may also have other rights which vary from state to state.

ICON HEALTH & FITNESS, INC., 1500 S. 1000 W., LOGAN, UT 84321-9813

ORDERING REPLACEMENT PARTS

To order replacement parts, please see the front cover of this manual. To help us assist you, be prepared to
provide the following information when contacting us:

•  the model number and serial number of the product (see the front cover of this manual)

•  the name of the product (see the front cover of this manual)

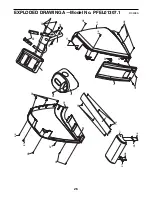
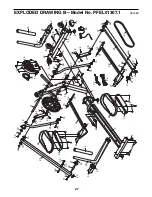
•  the key number and description of the replacement part(s) (see the PART LIST and the EXPLODED 

DRAWING near the end of this manual)

Summary of Contents for 1050 Sts Elliptical

Page 1: ...oducts prizes fitness tips and much more USER S MANUAL QUESTIONS As a manufacturer we are commit ted to providing complete customer satisfaction If you have questions or if parts are damaged or missin...

Page 2: ...TED WARRANTY Back Cover 2 WARNING DECAL PLACEMENT The warning decal shown here has been applied in the location shown If the decal is missing or illegible call the telephone number on the front cover...

Page 3: ...s enough clearance around your elliptical exerciser to mount dismount and use it 5 Inspect and properly tighten all parts regu larly Replace any worn parts immediately 6 Keep children under age 12 and...

Page 4: ...help us assist you note the product model number and serial number before con tacting us The model number and the location of the serial number decal are shown on the front cover of this manual To avo...

Page 5: ...parts of the elliptical exerciser in a cleared area and remove the packing materials Do not dispose of the packing materials until assembly is completed Assembly requires the included hex keys and yo...

Page 6: ...ps the Frame 1 backward attach the Stabilizer to the Frame with the two M10 x 120mm Patch Screws 58 2 Identify the Right Handlebar 36 which is marked with an R sticker and orient it as shown Attach th...

Page 7: ...inset drawing in the Upright Tie the lower end of the wire tie to the Wire Harness 46 Next pull the upper end of the wire tie upward out of the top of the Upright Then untie and discard the wire tie T...

Page 8: ...t and remove the wire tie that holds the Link Tube 30 inside the left Link Arm 25 Leave the Link Tube inside the left Link Arm and then position the Left Pedal Leg 24 and the left Link Arm as shown Ap...

Page 9: ...right Pedal 86 8 25 25 71 63 27 7 7 Insert the axle of the Roller 27 through the right Link Arm 25 make sure that the Roller is on the inner side of the Link Arm Attach the Roller with an M10 x 15mm P...

Page 10: ...2 Screws 79 9 79 79 79 7 10 If there is a shipping bracket not shown insert ed into the underside of the Frame 1 remove and discard the shipping bracket While a second person tips the Frame 1 for war...

Page 11: ...assembly is completed To protect the floor or carpet from damage place a mat under the elliptical exerciser Plug the power supply into the socket at the front of the elliptical exerciser see HOW TO PL...

Page 12: ...ng use turn one or both of the leveling feet beneath the base or beneath the front stabilizer until the rocking motion is eliminated If the elliptical exer ciser flexes during use turn the leveling fo...

Page 13: ...f the pedals to keep your heart rate near target heart rate settings while you exercise The console features a fitness journal which automati cally records and stores your exercise information so that...

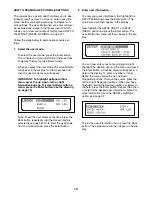
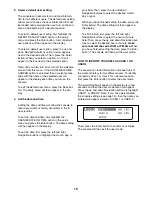
Page 14: ...he user mode at any time press the Back button repeatedly until the manual mode is selected see page 16 To re enter the user mode from the manual mode press the Enter button 2 Enter user information T...

Page 15: ...ht the CHANGE DATE OR TIME option in the setup menu and press the Enter button The date setting will then appear in the display To set the date first press the left and right Navigation buttons to hig...

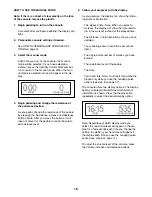
Page 16: ...e display As you exercise the display can show the follow ing workout information The elapsed time Note When you select a workout the display will show the time remain ing in the workout instead of th...

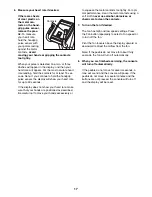
Page 17: ...hands are positioned as described Be careful not to move your hands excessively or to squeeze the metal contacts too tightly For opti mal performance clean the metal contacts using a soft cloth never...

Page 18: ...fferent resistance level and or target rpm is programmed for the next segment the resistance level and or target rpm will flash in the display for a few seconds to alert you The resistance of the peda...

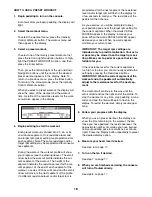
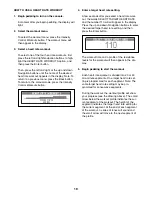
Page 19: ...fter you select a heart rate work out the words SELECT TARGET HEART RATE and the number 110 will will appear in the display Press the up and down Navigation buttons to enter the desired target heart r...

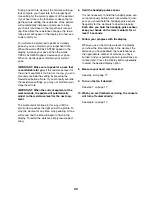
Page 20: ...current segment of the workout ends the pedals will automatically adjust to the resistance level for the next seg ment The workout will continue in this way until the small arrow reaches the right end...

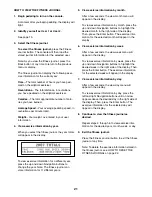
Page 21: ...View exercise information by month After a few seconds the view month menu will appear in the display To view exercise information by month press the up and down Navigation buttons to highlight the d...

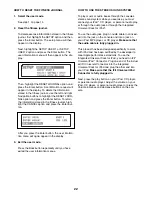
Page 22: ...n repeatedly until you have exited the user information menus HOW TO USE THE STEREO SOUND SYSTEM To play music or audio books through the console s stereo sound system while you exercise you must conn...

Page 23: ...console and keep the console out of direct sunlight HANDGRIP PULSE SENSOR TROUBLESHOOTING If the console does not display your heart rate when you hold the handgrip pulse sensor or if the displayed h...

Page 24: ...ur goal is to strengthen your cardiovascular system you must perform aerobic exercise which is activity that requires large amounts of oxygen for prolonged periods of time For aerobic exercise adjust...

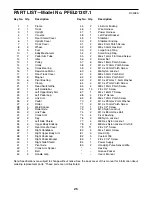
Page 25: ...M8 x 50mm Hex Bolt 53 2 Large Snap Ring 54 2 Small Snap Ring 55 2 M6 x 14mm Flat Head Screw 56 2 Barrel Nut 57 6 M6 x 18mm Patch Screw 58 2 M10 x 120mm Patch Screw 59 2 M10 x 20mm Patch Screw 60 4 M6...

Page 26: ...26 EXPLODED DRAWING A Model No PFEL01307 1 R0408A 5 6 7 17 33 35 35 40 66 79 66 66 66 66 79 79 66 66 83 66 81 67 81 82 82 81 66 4 3 65 65 80 85...

Page 27: ...7 15 15 15 15 28 28 28 28 29 29 48 39 30 30 31 31 32 32 34 34 37 38 25 41 42 43 36 44 44 9 9 45 45 46 47 14 49 50 50 51 52 52 53 53 54 54 55 55 56 56 57 57 58 59 59 74 73 73 74 71 71 60 77 77 61 61 76...

Page 28: ...ponsible or liable for indirect special or consequential damages arising out of or in con nection with the use or performance of the product or damages with respect to any economic loss loss of proper...

Reviews: