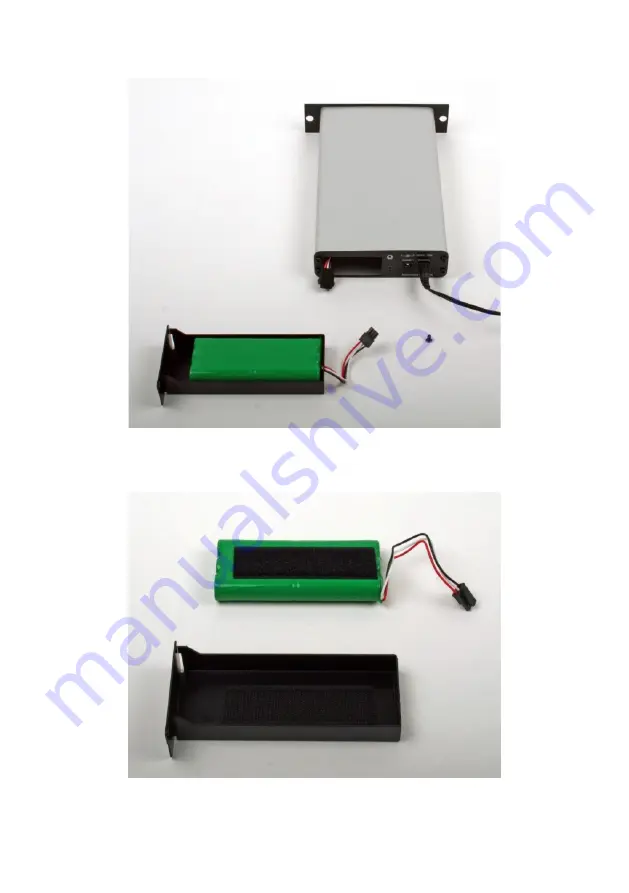
7
5.
Disconnect the battery
6.
Install the new battery by following these steps in the reverse order
Page 1: ...www profitap com C1R 1G C1P 1G C1R 1G 48V C1R 1G BAT 1 LINKGIGABITETHERNET COPPERTAPS PRODUCTMANUAL...
Page 2: ...ilure Propagation 1 1 5 Power 2 1 6 Power Failure 3 1 6 1 Fast Failover 3 1 6 2 Battery Failover 3 1 7 Battery C1R 1G BAT 3 1 7 1 Charging 4 1 7 2 Discharging 4 1 7 3 Maintenance 4 1 7 4 Battery Error...
Page 3: ...48 VDC Terminal block connectors C1R 1G 48V only 1 x Carrying pouch C1P 1G only This package includes If you have any questions you can contact us through our website www profitap com or by email sup...
Page 4: ...1 3 Speed LEDs Two LEDs indicate the speed at which the network link is currently operating at If only the left LED is on the link is operating at 10 Mbps If only the right LED is on the link is opera...
Page 5: ...n the TAP The connection is located on the bottom of the connector Tighten the screw located on the front of the connector to attach the cable B Connect the 0V wire to the V terminal on the terminal b...
Page 6: ...p the link up without renegotiation during the power change event With Fast Failover the network path unavailability lasts between 30 and 300 ms 1 6 2 Battery Failover C1R 1G BAT When a power transiti...
Page 7: ...If any of these conditions occurs the charge is interrupted 1 7 2 Discharging During battery discharge the BATT LED blinks Green when the remaining capacity is over 50 Orange when the remaining capaci...
Page 8: ...state until the battery is replaced In this error state the TAP and battery still operate normally Replace the battery to ensure optimal performance Refer to the Battery replacement chapter 1 7 6 1 7...
Page 9: ...6 2 Move drawer to the right 3 Pull drawer out of the TAP 4 Pull connector out of the TAP...
Page 10: ...7 5 Disconnect the battery 6 Install the new battery by following these steps in the reverse order...
Page 11: ...be powered off completely e g for transportation the procedure is as follows 1 Power the TAP on 2 Take the battery out and disconnect it see chapter 1 7 6 Battery replacement 3 Disconnect the power s...
Page 12: ...tiation of the highest mutual speed When the connection is established the Speed LEDs indicate the network speed Left LED only for 10 Mbps Right LED only for 100 Mbps Both LEDs for 1 Gbps If no mutual...
Page 13: ...les 1 x 90 240 VAC PSU 250 000 hours 0 C to 50 C 22 C to 70 C 10 to 90 non condensing RoHS CE FCC class A IEEE 802 3 Connectors LEDs Power Input Power Consumption Dimensions WxDxH C1R 1G 4 x RJ45 8 pi...
Page 14: ...x 35 mm 5 6 x 1 4 in 1 x 90 240 VAC PSU 0 C to 50 C 22 C to 70 C 10 to 90 non condensing Connectors LEDs Power Input Dimensions WxDxH Front Panel Dimensions WxH C1R 1G 48V 4 x RJ45 8 pin gold plated A...
Page 15: ...and to make changes in the content thereof without obligation of the manufacturer to notify any person of such revision or changes COPYRIGHT This publication including all photographs and illustration...
Page 16: ...13 PROFITAP HQ B V High Tech Campus 9 5656 AE Eindhoven The Netherlands 2019 Profitap v1 7 07 sales profitap com www profitap com...