2
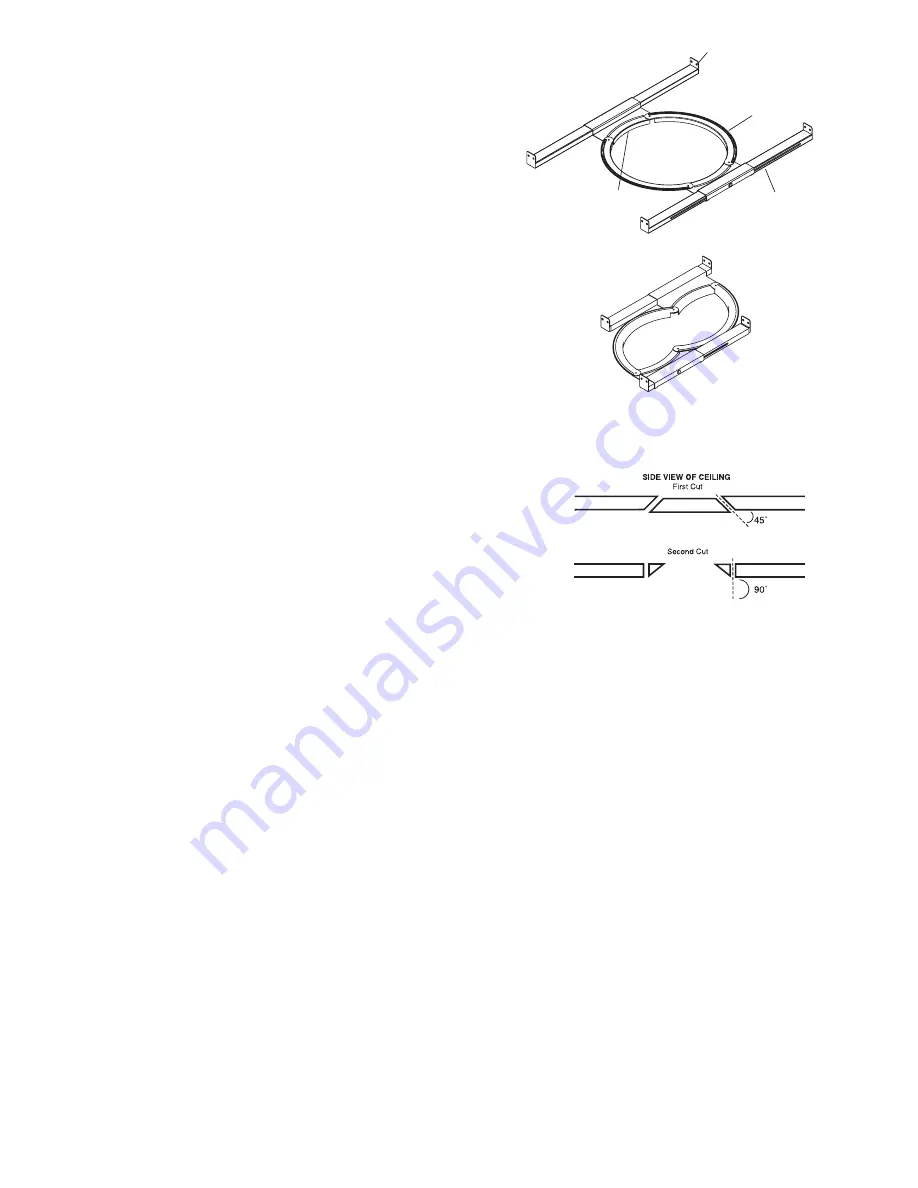
The included PCB-C1000 Mounting Bracket is designed for
both new construction and retrofit installations. The intelligent
folding design facilitates mounting the bracket through a
speaker cut-out, therefore the mounting bracket may be
installed across 16" to 24" on-center joists after drywall is
installed. Always use the PCB-C1000 Mounting Bracket when
installing the C1030 speaker.
Retrofit Installation - Finished Ceilings
Follow the first set of instructions to prepare the mounting
surface for a professional looking installation. Then, follow the
second set of instructions for the mounting bracket installation.
To prepare the mounting surface in a retrofit installation:
1. Find the joists nearest the desired speaker mounting
location. We highly recommend using a good stud-finder tool
for this procedure. If you need to align the speakers to some
other object or molding in the room, be sure to consider the
size of the baffle flange which extends beyond the mounting
hole. Please allow 11/4" space from the joist.
2. Mark the hole. A template for setting the hole is provided in
the box (along with a paint mask insert for use when painting).
Position the template in the desired position and pencil an
outline on the ceiling.
3. Cut the hole.
CAUTION:
This is the most important part
of the entire installation.
If you are not certain whether any
obstructions exist behind the desired mounting area, you
should start by cutting a small hole in the center of your
penciled mounting hole with a drywall saw, cutting at a 45°
angle towards the inside of the hole.
(See Diagram 3)
Cutting
the small hole at this angle will make drywall repair much
easier, using the piece cut out. Once you have determined that
there aren’t any obstructions in your desired mounting location,
cut the finished hole at a 90° angle to the ceiling surface.
To install the mounting bracket in a retrofit:
1. Move the mounting bars in opposite directions, so that the
mounting ring folds down to its narrowest width. Collapse the
mounting bars to their shortest length.
2. With the mounting ring lip facing downward, insert
the mounting bracket into the ceiling cavity through the
previously cut hole in the ceiling drywall.
3. Make sure that the mounting ring is in a perfectly circular
shape by opening the bracket until the arms come in contact
with the stoppers, then set it into the ceiling hole. Push one
of the mounting bar L-shaped edges until it is flush with the
joist, and the bottom of the mounting bar lines up with the
bottom of the joist. Attach the mounting bar to the joist using
appropriate wood screws.
4. Push the other mounting bar L-shaped edge until it is flush
with the same joist, and the bottom of the mounting bar lines
up with the bottom of the joist. Attach the mounting bar to
the joist using appropriate wood screws.
5. Stretch both mounting bars to reach the opposite joist, then
line up the bottoms of each mounting bar with the bottom
of the joist. Attach each mounting bar to the joist using
appropriate wood screws.
6. If the area in the ceiling is not already insulated, add an
adequate amount of insulation material to loosely cover where
the speaker will be positioned, being sure that the speaker wire
remains accessible. If the insulation material used is faced with
foil or paper, position the foil or paper away from the speaker.
4. Stretch both mounting bars to reach the opposite joist, then
line up the bottoms of each mounting bar with the bottom
of the joist. Attach each mounting bar to the joist using
appropriate wood screws.
5. To adjust the position of the mounting ring between the
joists, grab both sides of the mounting ring, where it connects
to the mounting bar, then move the mounting ring into the
desired position.
6. If the area in the ceiling is not already insulated, add an
adequate amount of insulation material to loosely cover where
the speaker will be positioned, being sure that the speaker wire
remains accessible. If the insulation material used is faced with
foil or paper, position the foil or paper away from the speaker.
Adding insulation may also be done after drywall installation.
The protruding lip of the mounting ring will force the drywall
installers to hang the drywall with an appropriate hole cut out
around the mounting ring lip. After the drywall has been hung
and finished, the speakers are then easily installed following the
instructions for mounting in “SPEAKER INSTALLATION” below.
MOUNTING BRACKET INSTALLATION – RETROFIT
(See Diagrams 1, 2 & 3)
Diagram 3
Diagram 2
PCB-C1000 Closed Position
Mounting Ring Lip
Screw Holes
Mounting Ring
Mounting Bar
Diagram 1
PCB-C1000 Open Position


