English 3
3. OPERATION
l
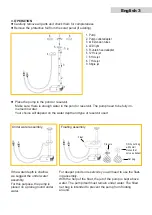
Carefully remove all parts and check them for completeness
l
Remove the protective foil from the solar panel (if existing).
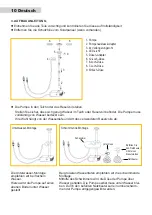
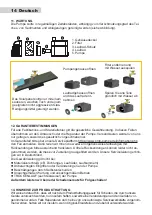
1. Pump
2. Pump outlet adapter
3. 4x Extension tubes
4. LED light
5. Fountain head adapter
6. 12 Hole jet
7. 6 Hole jet
8. 7 Hole jet
9. Single jet
1
2
3
4
5
6
7
8
9
l
Place the pump in the pond or reservoir.
Make sure, there is enough water in the pond or reservoir. The pump need to be fully im-
mersed in water.
Your choice will depend on the water depth and type of reservoir used.
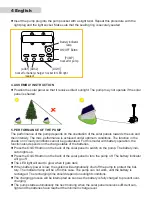
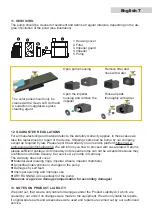
Under water assembly
Floating assembly
Fill the net bag
with small
stones that
serve as ballast
Net bag
Closure
Float
If the water depth is shallow,
we suggest the under water
assembly.
For this purpose, the pump is
placed on a plane ground under
water.
For deeper ponds or reservoirs you will need to use the float-
ing assembly.
With the help of the float, the jet of the pump is kept above
water. The pump itself must remain under water. The filled
net bag is intended to prevent the pump from floating
around.


