background image


22


9.


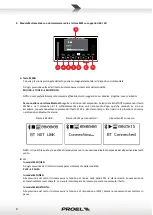
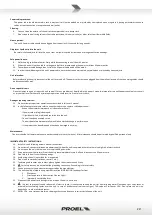
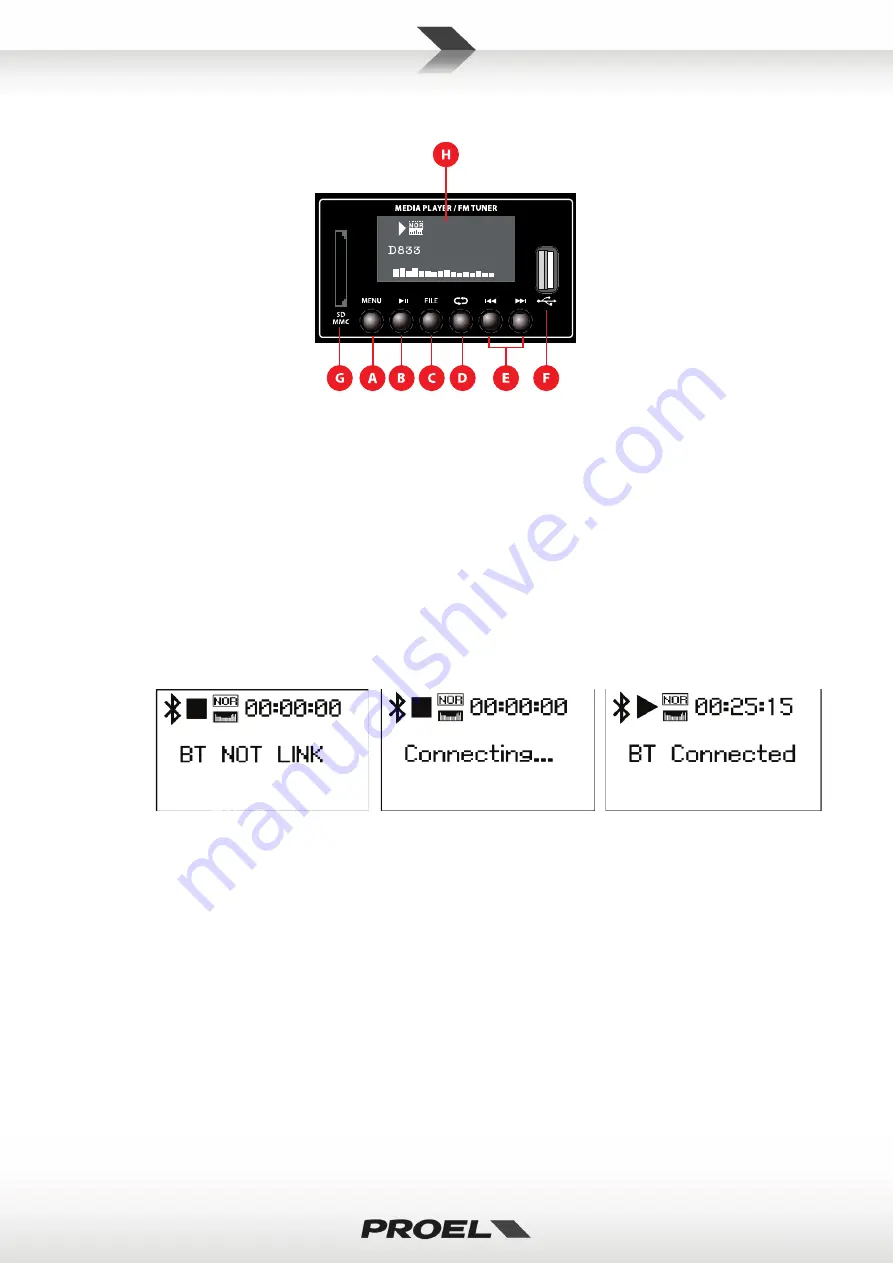
Multimedia Module with radio tuner and MP3 reader on USB/SD support  


A


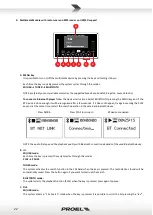
MENU key 

It is possible to turn on/off the multimedia device by pressing the key and holding it down. 


Each time the key is quickly pressed, the system cycles through the modes: 

SD/USB → TUNER → BLUETOOTH


NOTE: preferably use only reliable memories, the suggested brands are: Sandisk, Kingston, Lexar, Verbatim 


To connect a Bluetooth player

 follow the device instructions. Select BLUETOOTH pressing the MENU key and if the 

BT device is close enough it will be recognised after a few seconds. If it does not happen, try again pressing the PLAY 

key and, at the same time, restart the search operation in the external Bluetooth device 


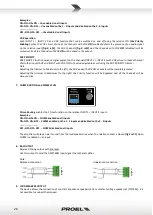
                         Press MODE…                               Press PLAY to connect …                      BT device connected 


NOTE: the audio file type and the playback quality with Bluetooth connection depends of the used Bluetooth device.  


B


>II 

SD/USB mode: 

Each time the key is pressed, the system cycles through the modes: 

PLAY →

PAUSE 


TUNER mode: 

The system activates the search function in the FM band when the key is pressed. The radio stations found will be 

automatically saved. Press the button again if you want to interrupt the search. 


BLUETOOTH mode: 

The system starts the playback function (PLAY) when the key is pressed, press again to pause. 


C


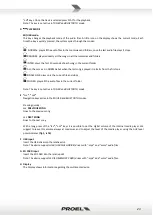
FILE 

SD/USB mode: 

The system enters in “File Search” mode when the key is pressed. It is possible to scroll the list pressing the “

I<<”

 , 

Summary of Contents for ATMP160XL

Page 1: ...ATMP160XL Amplificatore Mixer 160W con Modulo Multimediale Media Player Mixer Amplifier 160W MANUALE UTENTE USER S MANUAL ...

Page 2: ...2 ...

Page 3: ... 4 2 DESCRIZIONE 6 3 FUNZIONI E CONTROLLI PANNELLO FRONTALE 7 4 FUNZIONI E CONTROLLI PANNELLO POSTERIORE 10 5 CONNESSIONI ALTOPARLANTI 13 6 ESEMPI DI POSSIBILI CONNESSIONI 14 7 SPECIFICHE TECNICHE 15 8 CONTENUTO DELLA CONFEZIONE 15 ...

Page 4: ... L apparecchio deve essere posto in modo tale che la sua collocazione o posizione non interferisca con l adeguata ventilazione Per esempio l apparecchio non deve essere collocato su un letto copri divano o superfici simili che possono bloccare le aperture di ventilazione o posto in una installazione ad incasso come una libreria o un armadietto che possono impedire il flusso d aria attraverso le ap...

Page 5: ...o è danneggiato Manutenzione L utente non deve tentare di riparare l apparecchio al di là di quanto descritto nelle istruzioni di funzionamento Ogni altra riparazione deve essere affidata a personale specializzato IMPORTANTI NORME DI SICUREZZA Installare seguendo le istruzioni Il voltaggio d alimentazione dell unità è abbastanza elevato per evitare il rischio di scosse elettriche non installare co...

Page 6: ...amente senza trasformatori è stato possibile realizzare l amplificatore in due sole unità rack riuscendo a contenere sia i pesi che gli ingombri PRINCIPALI FUNZIONI Circuito di protezione sovraccarico e corto circuito diffusori Indicatore d accensione a led Indicatore di livello a led Controllo generale del volume Master Controlli separati del Livello per gli ingressi 1 5 Regolazione toni bassi ed...

Page 7: ...tono BASS svolge un intervento di 10 dB nello spettro delle frequenze dei bassi permettendo di effettuare una corretta equalizzazione del segnale riprodotto 5 INPUT 1 INPUT 4 Controlli di livello ingressi da 1 a 4 6 AUX Controlli di livello ingresso AUX 7 Selettore ingresso AUX Mediante i pulsanti A B e PLAYER si abilita in uscita il rispettivamente l ingresso AUX A B fig 2 rif 4 ed il Modulo mult...

Page 8: ...ò non accadesse provate nuovamente premendo il tasto PLAY e allo stesso tempo fate ripartire la procedura di ricerca nel dispositivo Bluetooth esterno Premere MODE Premere PLAY per connettersi dispositivo BT connesso NOTA il tipo di file audio e la qualità di riproduzione con la connessione Bluetooth dipende dal dispositivo Bluetooth usato B II In modalità SD USB Ad ogni pressione del il tasto il ...

Page 9: ...canzone riparte dalla prima SINGLE ONE riproduce solo il file corrente al termine si ferma FOLDER riproduce tutti i file audio contenuti nella cartella corrente Nota Il tasto non è attivo nella modalità TUNER e BLUETOOT E I I Tasti di navigazione attivi nella modalità SD USB e BLUETOOT Con una pressione veloce I PREVIOUS SONG Passa alla canzone precedente I NEXT SONG Passa alla canzone successiva ...

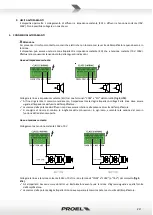
Page 10: ...ck fig 3 Gli ingressi INPUT1 INPUT2 INPUT3 e INPUT4 sono di tipo bilanciato sbilanciato utilizzabili per il collegamento sia di microfoni dinamici a bassa impedenza 30 600Ω sia di microfoni a condensatore con alimentazione phantom a 48V sia di sorgenti audio con uscita del segnale livello linea es sintonizzatore AM FM lettore di cassette lettore CD ecc a Collegamento di una linea Bilanciata all in...

Page 11: ... con conseguente alternarsi del segnale in uscita Nota il contatto pulito non andrà a silenziare gli ingressi che hanno il VOX ad ON Ogni ingresso INPUT 1 INPUT 4 dispone di una funzione VOX inseribile e disinseribile mediante l apposito PIN fig 2 rif 6 quando il circuito VOX di uno dei canali con VOX ad ON abilitato rileva la presenza di un segnale audio sul rispettivo ingresso fig 2 rif 2 i cana...

Page 12: ...n VOX ad OFF di un valore regolabile a piacere mediante il trimmer MIC PRIORITY Nota Regolando il trimmer al valore Minimo verso sinistra i canali AUX e con VOX ad OFF saranno completamente silenziati Regolando il trimmer al valore Massimo verso destra la funzione di Priorità sarà bypassata e tutti i canali saranno sempre attivi 7 CHIME ROUTING e CHIME LEVEL Il Chime Routing abilita la funzione Ch...

Page 13: ...ig 2 rif 4 Al fine di garantire il massimo rendimento l impedenza totale degli altoparlanti collegati alla linea deve essere uguale all impedenza dell uscita dell amplificatore La somma della potenza dei diffusori non deve essere inferiore alla potenza di uscita dell amplificatore Si consiglia di ridurre al minimo la lunghezza delle connessioni in ogni caso aumentare la sezione del cavo in funzion...

Page 14: ...14 6 ESEMPI DI POSSIBILI CONNESSIONI ...

Page 15: ... OUTPUT 1V 600 Ω Controls MASTER VOLUME CONTROL 1 TREBLE TONE CONTROL 1 BASS TONE CONTROL 4 MIC LINE VOLUME CONTROLS 1 AUX VOLUME CONTROL Loudspeakers outputs 100 70V 4Ω Frequency response 80Hz 16khz 3dB Distortion THD 0 5 Pnom 1KHz S N Ratio MIC 70dB LINE 70dB AUX 80dB Power Supply autoswitch 100 240V 50 60Hz Operating temperature 0 40 C Input Output Connectors terminal block RCA Power Consumptio...

Page 16: ...16 ...

Page 17: ...TY INSTRUCTIONS 18 2 DESCRIPTION 20 3 FRONT PANEL CONTROLS AND FUNCTIONS 21 4 REAR PANEL FUNCTIONS AND CONTROLS 24 5 LOUDSPEAKER CONNECTION 27 6 EXAMPLES OF POSSIBLE CONNECTIONS 29 7 TECHNICAL SPECIFICATIONS 30 8 CONTENTS OF THE PACKAGE 30 ...

Page 18: ...s on the product and in owner s manual should be adhered to Heed all warnings Follow all instructions All operating and user s instructions must be followed Sentences preceded by symbol contain important safety instruction Please read it carefully DETAILED SAFETY INSTRUCTIONS Water and moisture This apparatus should not be used near water i e bathtub kitchen sink swimming pools etc Ventilation Thi...

Page 19: ... or skilled personnel When the unit works improperly or it doesn t work at all If power cord or plug is damaged If liquid has spilled or objects have fallen into the unit The unit has been exposed to rain The unit doesn t operate normally or exhibits a marked change in performance If the product has been dropped or has been damaged in any way Maintenance The user shouldn t attempt maintenance not ...

Page 20: ...obtained electronically without transformers it was possible to design the amplifier in only two rack units succeeding in containing the weight and size MAIN FUNCTIONS Speakers overload and short circuit protection circuit Led start up indicator Led level indicator Volume general control Master Controls separated by Level for the 1 5 inputs Low and high pitch adjustment Illuminated knobs Multimedi...

Page 21: ... tone control BASS tone control carries out an 10 dB intervention in the spectrum of low frequencies allowing a correct equalization of the reproduced signal 5 INPUT 1 INPUT 4 Input level control from 1 to 4 6 AUX AUX input level control 7 AUX input selector Pressing the A B and PLAYER buttons respectively enables the AUX A B input fig 2 ref 4 and the Multimedia Module fig 1 ref 9 The enabled inpu...

Page 22: ... the PLAY key and at the same time restart the search operation in the external Bluetooth device Press MODE Press PLAY to connect BT device connected NOTE the audio file type and the playback quality with Bluetooth connection depends of the used Bluetooth device B II SD USB mode Each time the key is pressed the system cycles through the modes PLAY PAUSE TUNER mode The system activates the search f...

Page 23: ...current file and stops FOLDER plays all the audio files in the current folder Note The key is not active in TUNER and BLUETOOTH mode E I I Navigation keys active in the SD USB and BLUETOOTH modes Pressing quickly I PREVIOUS SONG Goes to the previous song I NEXT SONG Goes to the next song With a long press of the I I keys it is possible to set the digital volume of the internal media player We sugg...

Page 24: ...put on Euroblock connector fig 3 The INPUT1 INPUT2 INPUT3 e INPUT4 inputs are of balanced unbalanced type used for the connection of low impedance dynamic microphones 30 600Ω condenser microphones with 48V phantom power supply and audio sources with line level signal output e g AM FM tuner cassette player CD player etc a Connection of a Balanced line to the INPUT fig 3 ref a Connection of a Unbala...

Page 25: ...lternating the signal output Note the dry contact will not mute the inputs that have VOX ON Each INPUT 1 INPUT 4 has a VOX function that can be switched on and off using the PIN fig 2 ref 6 while the VOX circuit of one of the channels with VOX ON enabled detects the presence of an audio signal on the relative input fig 2 ref 2 the AUX channels fig 2 ref 3 and the channels with VOX OFF disabled wil...

Page 26: ...mmer Note Adjusting the trimmer to Minimum to the left the AUX and with VOX OFF channels will be completely muted Adjusting the trimmer to Maximum to the right the Priority function will be bypassed and all the channels will be always active 7 CHIME ROUTING and CHIME LEVEL Chime Routing enables the Chime function on the relative INPUT 1 INPUT 4 inputs Examples ON ON ON ON CHIME enabled on all inpu...

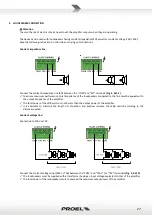
Page 27: ... the loudspeakers connected to the line must be equivalent to the output impedance of the amplifier The total power of the diffusers must not be less than the output power of the amplifier It is advisable to minimise the length of connection and anyhow increase the cable section according to the distance covered Constant voltage line Connection to 100V or 70V Connect the constant voltage line 100V...

Page 28: ...line 100V or 70V between the two COM and 100V or 70V terminals Fig 2 Ref 4 The loudspeakers must be supplied with a transformer having an input voltage equivalent to that of the amplifier The total power of the loudspeakers must not exceed the maximum output power of the amplifier ...

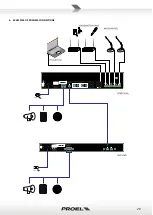
Page 29: ...29 6 EXAMPLES OF POSSIBLE CONNECTIONS ...

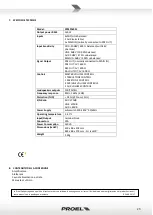
Page 30: ...UT 1V 600 Ω BAL OUTPUT 1V 600 Ω Controls MASTER VOLUME CONTROL 1 TREBLE TONE CONTROL 1 BASS TONE CONTROL 4 MIC LINE VOLUME CONTROLS 1 AUX VOLUME CONTROL Loudspeakers outputs 100 70V 4Ω Frequency response 80Hz 16khz 3dB Distortion THD 0 5 Pnom 1KHz S N Ratio MIC 70dB LINE 70dB AUX 80dB Power Supply 110 240V 50 60Hz Operating temperature 0 40 C Input Output Connectors terminal block RCA Power Consum...

Page 31: ...31 ...
Page 32: ...PROEL S p A World Headquarters Factory Via alla Ruenia 37 43 64027 Sant Omero Te Italy Tel 39 0861 81241 Fax 39 0861 887862 www proel com ...

Reviews: