background image

p.6

SYSTEMS INSTALLATION

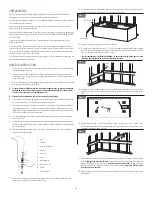
Blower must be installed under the floor or in a nearby cabinet.

A minimum space of 2" around the blower is necessary so that the air can be renewed constantly and 
thus allow air circulation with the ambient air.

During automatic purge, the blower automatically starts a purge of about 1 minute and a 
half, 20 minutes after the blower is off.

SYSTEMS CONNECTION

The electrical connections must be done by a licensed electrician to ensure that your installation is safe 
and complies with the applicable building code in your area. 

Your system must be connected to an independant 110/120 volt circuit, protected by a class A ground 
fault circuit interupter.

*In Canada only: Each electronic component must be connected to the electrical panel by a junction box, 
refer to your local electrical code.

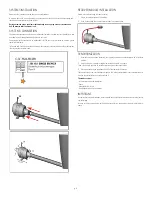
RECEIVER MODULE INSTALLATION

System only activates using the remote control.

1. 

Plug in the cable as show on the drawing.

2. 

Once it’s connected, the remote control is ready for synchronisation.

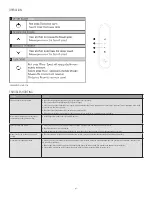
SYNCHRONIZATION

1. 

Once the system has been connected, the remote control must be synchronized with its receiver 
module.

2. 

Switch off the main breaker or unplug the system and switch it on again.

*From this moment, you have 15 secondes to proceed with the synchonization.

3. 

Press simultaneously on the buttons 2 and 3 of the remote for 4 seconds.

The remote contol is now synchronized and ready to use. If the synchronization is not successful the first 
time,you should resynchronize, starting at Step 2.

The remote control :

- Is completely sealed and waterproof.
- Floats.
- Responds within 15 feet.
- Is equipped with extra long batteries.

IMPORTANT

In order to obtain the best reception, we recommend to not install the receiver module next to the faucets 
or metal piping.

Location of the receiver module must be easily accessible from the outside of the bathtub for mainte-
nance.

Summary of Contents for ROUGE ZURICH

Page 1: ...TEM CERTIFICATION ECORESPONSABLE Our products have been certified ecoresponsible recognizing Produits Neptune s initiatives towards limiting its environmental footprint CONSUMER CHOICE Produits Neptune is the proud recipient of the consumer choice award Save these instructions for further use ...

Page 2: ... 5 meters 5 ft of the bathtub Never leave children unattended in the bathtub To avoid damaging the finish of the bathtub do not use abrasive cleaners The water temperature must not exceed 40 C 104 F Bathtub water in excess of these temperatures may be hazardous to one s health It is important to mix the essential oils before introducing them into the bathtub Mix the essential oils with emulsifiers...

Page 3: ...that the bathtub is always resting on all four legs while minimizing the space between the skirt and the floor the skirt can rest on the floor but shall in no way support the weight the bathtub 8 Lock the bathtub legs into position by tightening the adjoining nut once an accurate acceptable level is confirmed 9 Lay the bathtub on its side having previously laid cardboard packaging the ground to pr...

Page 4: ...al scratches can usually be removed by using an automotive polishing compound such as NuFinish or Meguiar s mirror glaze MAJOR DAMAGE REPAIR Major damage including chips and cracks in your bathtub can often be repaired by a qualified technician Your Produits Neptune dealer can put you in contact with such a qualified professional TROUBLESHOOTING PROBLEM SOLUTION Water remains around the bathtub ri...

Page 5: ...lled if adjustments are needed Fits with 1 males 1 females or 1 threaded bathtub drains Reusable cap for more than one test air pressure if necessary Made in Canada INSTALLATION TIPS Use 5 hole saw to cut sub floor not included Cutting template included Secure Deck Flange with 6 screws not included Do not cut the brass tailpiece as this may cause a leak DROP IN DRAIN INSTALLATION KIT FOR YOUR FREE...

Page 6: ...NSTALLATION System only activates using the remote control 1 Plug in the cable as show on the drawing 2 Once it s connected the remote control is ready for synchronisation SYNCHRONIZATION 1 Once the system has been connected the remote control must be synchronized with its receiver module 2 Switch off the main breaker or unplug the system and switch it on again From this moment you have 15 seconde...

Page 7: ... blower Most of the noise from your Rouge Air or Mass Air system actually comes from the movement of the water Check that the blower is firmly secured Make certain that there are no obstructions close to the intake of the blower and that it has an adequate supply of fresh air Blower runs but no air comes out through the jets Check that the main air hose from the blower to the manifold is properly ...

Page 8: ...n finish parts PARTS Limited 1 year warranty against manufacturing defects SYSTEMS Limited 10 year warranty parts and labor against manufacturing defects jets pipes fittings electronic control pads blowers black box remote controls wir ing etc and leaks related to manufacturing defects Limited 5 year warranty against manufacturing defects related to colored trims inside the bathtub IMPORTANT When ...

Reviews: