


2 5 22
FIG(5)
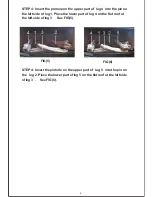
STEP 4: Insert the pinhole on the upper part of log 4 into the pin on
the left side of log 1. Place the lower part of log 4 on the flat roof at
the left side of log 3 See FIG(5).
STEP 4: Insert the pinhole on the upper part of log 5 into the pin on
the log 2. Place the lower part of log 5 on the flat roof at the left side
of log 3 . See FIG(6).
FIG(6)
Summary of Contents for QL300RYLA
Page 18: ...1 8 ILLUSTRATED PARTS BREAKDOWN QL300RYLA QN300RYLA QL300RYLA W QN300RYLA W ...
Page 19: ...1 9 PARTS LIST QL300RYLA QN300RYLA QL300RYLA W QN300RYLA W ...
Page 20: ...2 0 ILLUSTRATED PARTS BREAKDOWN QL300RYLA QN300RYLA QL300RYLA W QN300RYLA W ...
Page 21: ...2 1 PARTS LIST QL300RYLA QN300RYLA QL300RYLA W QN300RYLA W ...
Page 23: ...2 3 Q SERIES LOG SET INSTALLATION INSTRUCTIONS ...


