


© Pro-Ject Audio Systems · Pro-Ject Debut RecordMaster II · Revision 2020.10.12
6
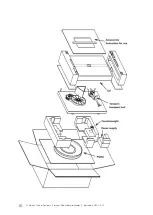
Connect the low voltage plug from the power supply to the socket (14) on the rear of the record player before
connecting the power supply to the mains.
Fitting the lid
Fit the lid (dust cover 10) carefully over the hinge prongs and adjust the screws (12) until the lid stays open
where you want it to without being too stiff to open or close.
Switching on and off, changing replay speed
The turntable is equipped with a three-position switch for ON/OFF and electronic speed change. To play
records at 33 r.p.m. press this switch (19) to the left side. To play records at 45 r.p.m. press this switch (19)
to the right side. To be able to play 78 r.p.m. the flat drive belt has to be removed and the round drive belt
has to be fitted around the sub-platter (4) and the larger diameter part of the motor pulley (2). To do so, the
platter (5) has to be removed.
After the round drive belt has been fitted, pressing the ON/OFF switch to the right selects 78 r.p.m.
Useful tips
The record player should be positioned on a low-resonance surface such as wood or multiple layer ply board
to avoid structural vibrations disturbing replay.
Adjusting the azimuth
** The cartridge needle must be vertical in the record groove in order to trace the groove wall modulations
correctly.
A small screw at the bearing end of the arm allows incorrect azimuth to be corrected if your needle is not
mounted exactly perpendicular to the cartridge body (which is often the case).
Slacken off the screw just enough to be able to revolve the arm tube without applying force. Please note: do
not remove the screw completely!
With the aid of a good magnifying glass adjust the needle until it is vertical in the groove (i.e. perpendicular
to the record's surface). Ideally this should correspond to the top surface of the cartridge body being parallel
to the record surface.
When you are satisfied that the needle is vertical retighten the screw carefully.