19
14
HOW TO USE PRESET PROGRAMS
Insert the key fully into the console.
See HOW TO TURN ON THE POWER on
page 12.
Select one of the preset programs.
When the key is in-
serted, the manual mode
will be selected. To se-
lect a preset program,
press the Program
Select button repeatedly
until a “P 5,” “P 6,” “P 7,” or “P 8” appears in the
Distance/Incline display.
When a preset program is selected, the Speed
display will flash the maximum speed setting of
the program for a few seconds. The Time/Pace
display will show how long the program will last.
The matrix will show
the first seven speed
settings of the program.
Note: The diagrams
numbered 5 through 8
on the left side of the
console show how the
speed and incline will change during the preset
programs. For example, diagram number 8 shows
that during preset program 8, the speed will grad-
ually increase during the first half of the program
and then gradually decrease during the last half;
the incline will remain constant.
Press the Start button or the Speed + button to
start the program.
A moment after the button is pressed, the tread-
mill will automatically adjust to the first speed and
incline settings of the program. Hold the handrails
and begin walking.
Each program is divided into several time seg-
ments of different lengths. One speed setting and
one incline setting are programmed for each seg-
ment. Note: The same speed setting and/or in-
cline setting may be programmed for two or more
consecutive segments.
The speed setting for the
first segment is shown in
the flashing Current
Segment column of the
matrix. (The incline set-
tings are not shown in
the matrix.) The speed
settings for the next
seven segments are
shown in the seven columns to the right.
When only three seconds remain in the first seg-
ment of the program, both the Current Segment
column and the column to the right will flash and a
series of tones will sound. If the speed and/or in-
cline of the treadmill is about to change, the Speed
display and/or the Distance/Incline display will
flash to alert you. When the first segment ends,
all
speed settings will move one column to the left
.
The speed setting for the second segment will then
be shown in the flashing Current Segment column
and the treadmill will automatically adjust to the
speed and incline settings for the second segment.
Note: If all of the indicators in the Current Segment
column are lit after the speed settings have moved
to the left,
the speed settings may move downward
so that only the highest indicators appear in the
matrix. If some of the indicators in the Current
Segment column are not lit when the speed set-
tings move to the left again, the speed settings will
move back up.
The program will continue in this way until the
speed setting for the last segment is shown in the
Current Segment column of the matrix and the
last segment ends. The walking belt will then slow
to a stop.
If the speed or incline setting is too high or too low
at any time during the program, you can manually
override the setting by pressing the Speed or
Incline buttons. Every few times a Speed button is
pressed, an additional indicator will light or darken
in the Current Segment column. (If any of the
columns to the right of the Current Segment col-
umn have the same number of lit indicators as the
Current Segment column, an additional indicator
may light or darken in those columns as well.)
Note: When the next segment of the program
begins, the treadmill will automatically adjust
to the speed and incline settings for the next
segment.
3
2
1
Current Segment
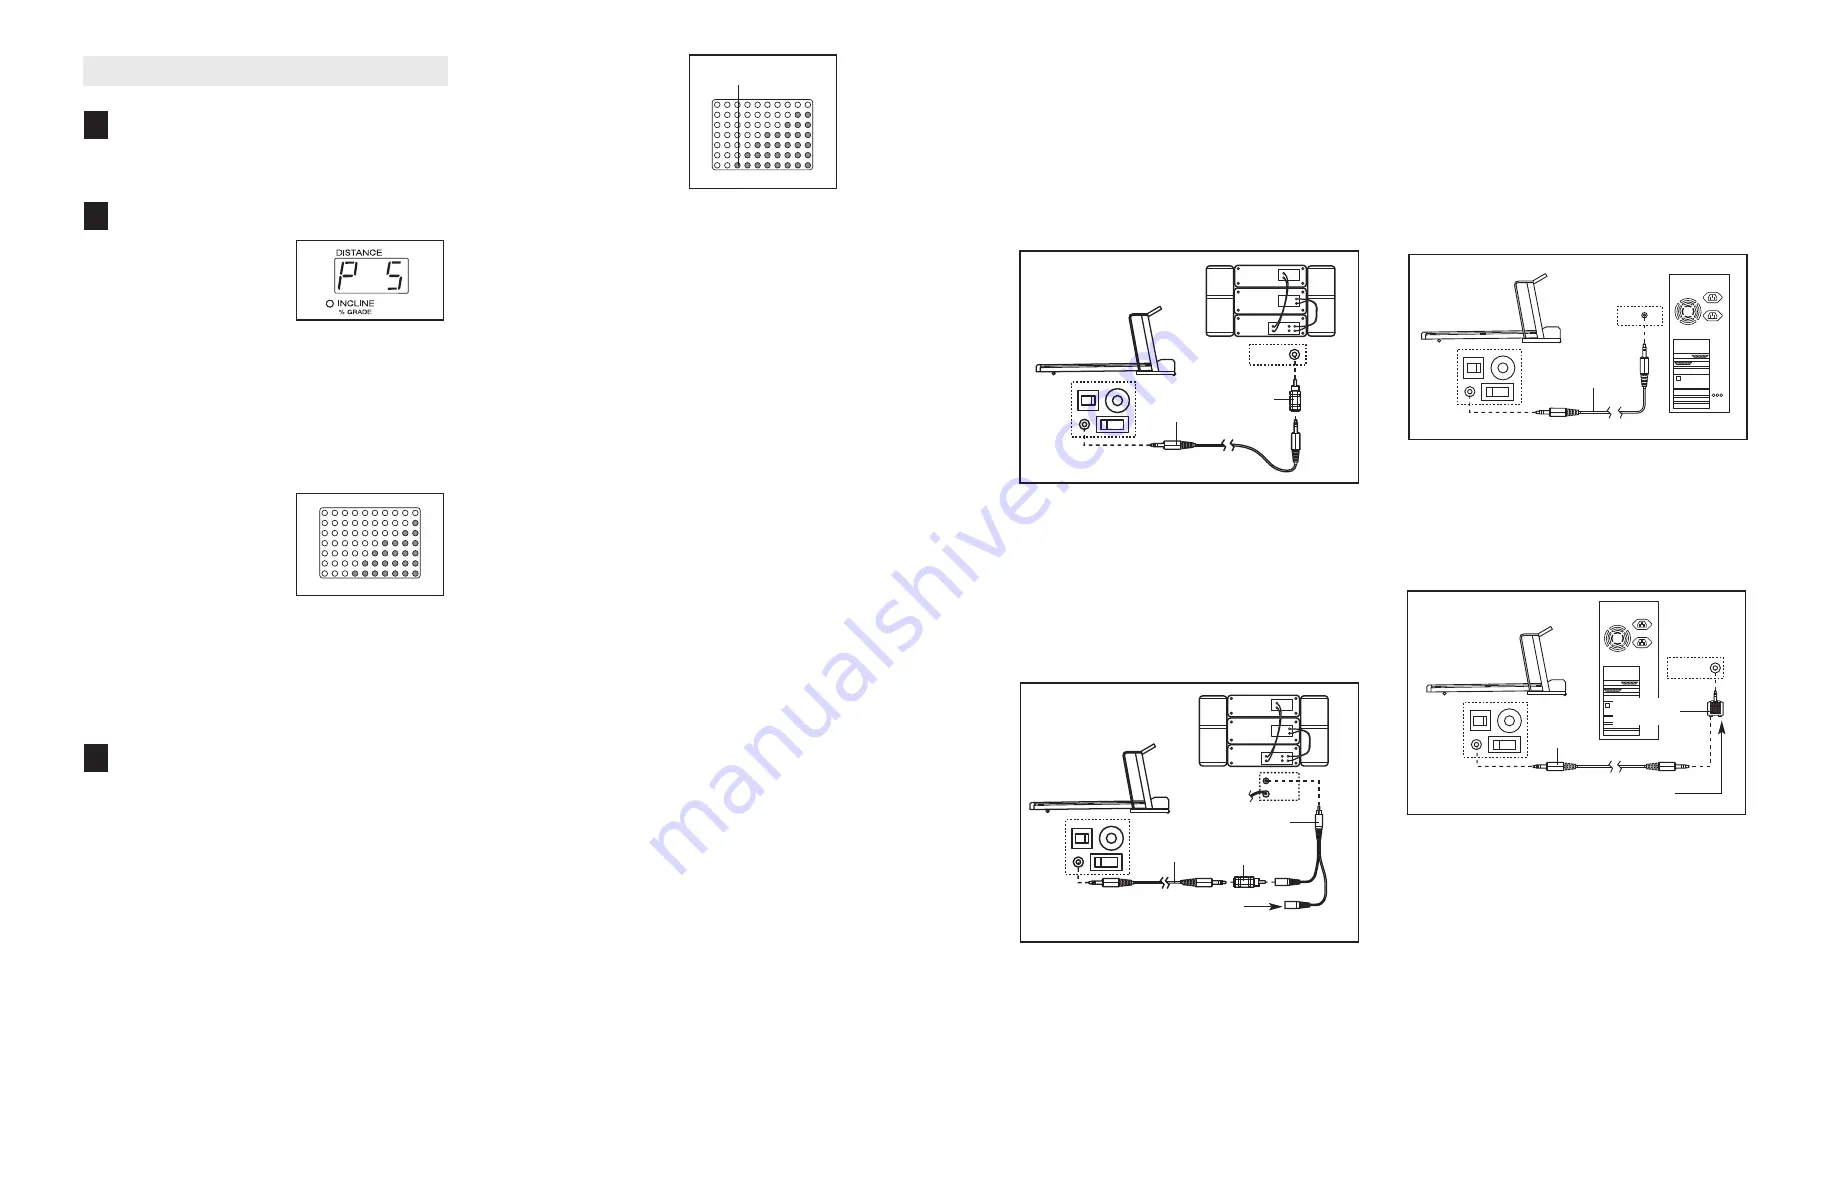
HOW TO CONNECT YOUR HOME STEREO
Note: If your stereo has an unused LINE OUT jack,
see instruction A below. If the LINE OUT jack is
being used, see instruction B.
A. Plug one end of the audio cable into the jack on the
front of the treadmill near the power cord. Plug the
other end of the cable into the adaptor. Plug the
adaptor into the LINE OUT jack on your stereo.
B. Plug one end of the audio cable into the jack on the
front of the treadmill near the power cord. Plug the
other end of the cable into the adaptor. Plug the
adaptor into an RCA Y-adaptor (available at elec-
tronics stores). Next, remove the wire that is cur-
rently plugged into the LINE OUT jack on your
stereo and plug the wire into the unused side of the
Y-adaptor. Plug the Y-adaptor into the LINE OUT
jack on your stereo.
HOW TO CONNECT YOUR COMPUTER
Note: If your computer has a 3.5 mm LINE OUT
jack, see instruction A. If your computer has only a
PHONES jack, see instruction B.
A. Plug one end of the audio cable into the jack on the
front of the treadmill near the power cord. Plug the
other end of the cable into the LINE OUT jack on
your computer.
B. Plug one end of the audio cable into the jack on the
front of the treadmill near the power cord. Plug the
other end of the cable into the splitter. Plug the split-
ter into the PHONES jack on your computer. Plug
your headphones or speakers into the other side of
the splitter.
LINE OUT
CD
VCR
Amp
LINE OUT
Audio
Cable
Adaptor
A
LINE OUT
Audio
Cable
A
CD
VCR
Amp
LINE OUT
Audio
Cable
RCA
Y-adaptor
Wire removed from
LINE OUT jack
B
Adaptor
PHONES
Audio
Cable
B
Splitter
Headphones/Speakers


