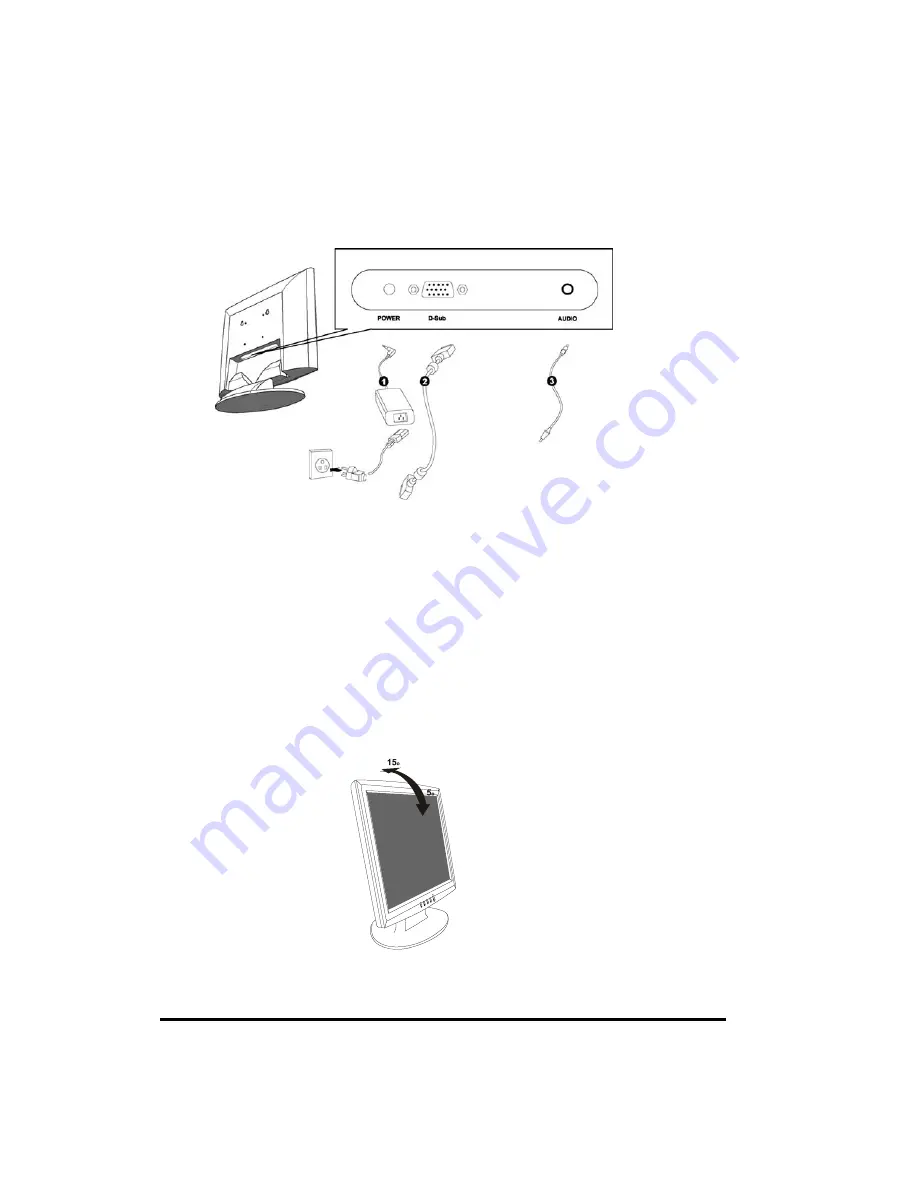
Princeton LCD1700 Reference Manual Download Page 7

Setting Up 

WARNING

     When you disconnect the cord /cables, be sure to hold the connector and not the 

cable itself. 


1.


Connect one end of the power adapter  (

n

) to the monitor and the other end to the 

connector of the power cord. 

2.


Connect one end of the VGA cable  (

o

) to the monitor and connect the other end to the 

graphics card adapter on your computer. Tighten by turning clockwise the two thumb 
screws to ensure proper grounding.  

3.


Connect one end of the audio cable  (

p

) to audio-in connector of the monitor and the 

other end to the computer’s audio-out connector. 


Display Angle 

Tilting 

For viewing clarity, you can tilt the LCD forward (up to -5 degrees) or backward (up to 15 
degrees.) 


CAUTION

     In order to protect the LCD, be sure to hold the base whenever you adjust it, and 

do not

 touch the screen. 

Summary of Contents for LCD1700

Page 1: ...R E F E R E N C E M A N U A L LCD1700 ations this...

Page 2: ...ating instructions Improper adjustment of other controls may result in damage and will often require extensive work by a qualified technician to restore the product to normal operation If the product...

Page 3: ...an experienced radio TV technician for help This device complies with Part 15 of the FCC Rules Operation is subject to the following two conditions 1 This device may cause harmful interference and 2 t...

Page 4: ...3...

Page 5: ...with your LCD monitor are following items y 17 TFT liquid crystal monitor y D sub 15 pin signal cable for analog input y Audio cable y AC power cable y Power adapter y User s manual Product Features...

Page 6: ...button is used to increase the value of the selected OSD control option 5 0 This button is used to decrease the value of the selected OSD control option Quick Adjustment Function When the OSD Menu is...

Page 7: ...r end to the graphics card adapter on your computer Tighten by turning clockwise the two thumb screws to ensure proper grounding 3 Connect one end of the audio cable p to audio in connector of the mon...

Page 8: ...cally for optimal display status z H POSITION Pressing moves the display image to the right Pressing moves the display image to the left z V POSITION Pressing moves the display image upward Pressing m...

Page 9: ...SA DPMS to fulfill the requirements in the NUTEK specification 80329994 96 Time settings are adjusted from the system unit by software From indicated inactivity to Power Saving Position Off the to tot...

Page 10: ...SA75 37 500 75 000 31 500 6 800X600 SVGA 35 156 56 250 36 000 7 800X600 SVGA 37 879 60 317 40 000 8 800X600 VESA72 48 077 72 188 50 000 9 800X600 VESA75 46 875 75 000 49 500 10 1024X768 VESA60 48 363...

Page 11: ...t Ratio 450 1 max 400 1 typical 350 1 min Brightness 250 Cd m2 typical Response Time 16ms typical Display Color 16M Viewing Angle 150o L R 125o U D Input Signal Video R G B Analog 0 7V peak peak Sync...

Page 12: ...no condensation Altitude To 10 000 Feet Storage Conditions Temperature 20o C 60o C 4o F 140o F Humidity 10 90 no condensation Dimensions HxWxD 408 5 x 390 x 195 mm Weight Net 5 3 Kg Certifications C U...

Page 13: ...to change without notice Princeton Digital USA Corp is not responsible for printing or clerical errors Windows is a registered trademark of Microsoft Corporation Apple and MacintoshTM are registered t...

Reviews: