background image

Initial Setup Guide cBlade ES

3-14

Release 5.0

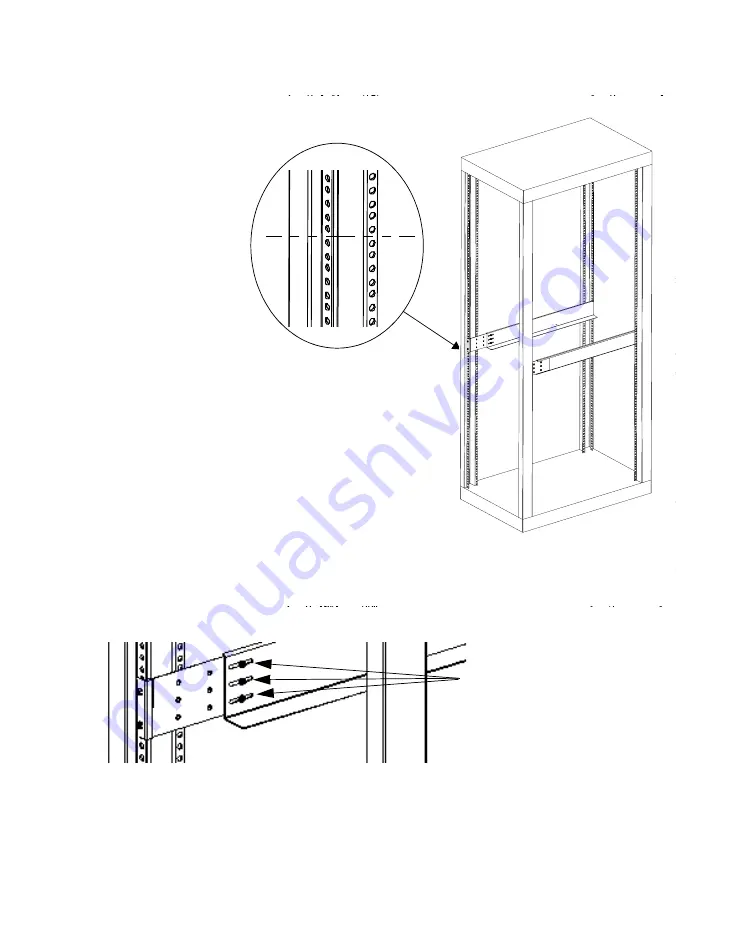
Figure 3.8 Installing the Side Rails in a Rack

Figure 3.9 Side Rail Detail 

Align bottom of the
side rail with the center
of the 1/2 inch gap
between holes

to fit the rack’s dimensions.

Tighten the three bolts to 

Adjust the side rails 

lock the rails in place.

Summary of Contents for BladeFrame BF200

Page 1: ...PRIMERGY BladeFrame BF200 Initial Setup Guide cBlade ES Document Number 430 S00021 May 2006 Release 5 0...

Page 2: ......

Page 3: ...stered trademarks and Xeon is a trademark of the Intel Corporation or its subsidiaries in the United States or other countries Sun Sun Microsystems the Sun Logo Solaris and the Java logo are trademark...

Page 4: ......

Page 5: ...ntent 1 5 Site Preparation Space Requirements 2 2 BladeFrame BF200 Dimensions 2 2 Operating Requirements 2 3 Power Requirements 2 5 Environmental Requirements 2 7 Important Notes 2 8 Notes on Safety 2...

Page 6: ...ting the BladeFrame BF200 BladeLatch 3 21 Installing the cBlades 3 22 Identifying the pBlades 3 24 Installing the pBlades 3 24 Connecting the BladeFrame BF200 to a Power Source Connecting the BladeFra...

Page 7: ...Blade With a Linux or Windows Laptop 5 10 Checking the Status of Your System 5 14 Connecting Network Cables to the cBlades 5 15 Configuring the cBlades to Join a Network 5 17 Modifying External Manage...

Page 8: ...Initial Setup Guide cBlade ES vi...

Page 9: ...lity of the BladeFrame BF200 including details about installing configuring and administering the system are contained in the BladeFrame BF200 technical documentation The products and components descr...

Page 10: ...deFrame BF200 technical documentation assumes that you have system administration experience with the Linux or UNIX operating systems and that you understand server technology You should also have a w...

Page 11: ...or window element appearing in a GUI It also highlights default values in PAN Manager man pages Example In the Users page Italic font Text that is emphasized Example Do not connect the power text Tex...

Page 12: ...th a data center s storage area network SAN environment This book also describes how to integrate a fibre channel tape backup system into your PAN PAN Manager Administrator s Guide Describes the tasks...

Page 13: ...vailable in HTML and PDF format from the online bookshelf You can open the bookshelf using the Documentation link located along the upper right border of the PAN Manager graphical user interface GUI I...

Page 14: ...d also like to hear your suggestions for additional topics you want included in our documentation If you have enhancement requests or technical questions regarding the use of any Fujitsu Siemens Compu...

Page 15: ...nd provides an overview of the remainder of the book For detailed conceptual information about the BladeFrame BF200 hardware software and architectural concepts see PRIMERGY BladeFrame Technical Overv...

Page 16: ...a daughter card that contains an 8 port Giganet switch BladePlane The BladePlane is the spine that connects all of the physical components of the BladeFrame BF200 and provides the fast transfer rate...

Page 17: ...aration for BladeFrame BF200 installation Initial Setup Guide BladeFrame BF200 hardware installation Fujitsu Siemens Computers customer support or your authorized support vendor Initial Setup Guide Bl...

Page 18: ...ectivity PAN Manager Administrator s Guide Establishing access control PAN Manager Administrator s Guide Creating LPANs PAN Manager Administrator s Guide Creating pServers PAN Manager Administrator s...

Page 19: ...ibes connecting the BladeFrame BF200 to a power source powering on the BladeFrame BF200 and providing an optional redundant input power source Making Network and SAN Connections Describes how to conne...

Page 20: ...Initial Setup Guide cBlade ES 1 6 Release 5 0...

Page 21: ...reparation This chapter describes how to prepare your site prior to installing a BladeFrame BF200 This chapter includes the following sections Space Requirements Power Requirements Environmental Requi...

Page 22: ...re 2 1 illustrates them Table 2 1 BladeFrame BF200 Dimensions Component Shipping Dimensions L x W x H Component Dimensions L x W x H Shipping Weight Component Weight Chassis 36 x 21x 31 in 91 4 x 53 3...

Page 23: ...eFrame BF200 Each BladeFrame BF200 is 13U high up to three BladeFrame BF200 units can be installed in a 42U high rack Each BladeFrame BF200 requires additional space at the front and rear for operatio...

Page 24: ...e space for air flow Placing the back of the BladeFrame BF200 directly against a wall hinders access to the circuit breakers and restricts required air flow Extra space is not needed for cables Cablin...

Page 25: ...Z single phase Input current Maximum current rating 16 amps RMS at 200 208 230 volts Input power System power 930 watts min to 3200 watts max varies with configuration BTU rating System total 3175 BTU...

Page 26: ...hnical information BTU rating System total 1 750 BTU hour min to 16 390 BTU hour max varies with configuration Connector type North America NEMA L6 20P Connector type International IEC 309 16 amp Para...

Page 27: ...air flow direction is from front to back with no air filters Air movers are sensed for rotational operation and reported to PAN Manager in case of failure Ambient temperature is also monitored and can...

Page 28: ...ormed by authorized qualified staff Any unauthorized openings and improper repairs could expose the user to risks electric shock energy hazards fire hazards and could also damage the equipment Please...

Page 29: ...t the power socket on the device or the grounded mains outlet is freely accessible The ON OFF button does not disconnect the device from the mains voltage To completely disconnect it from the mains vo...

Page 30: ...nd contact your customer service center Proper operation of the device in accordance with IEC 60950 EN 60950 is only ensured if the casing is completely assembled and the rear covers for the installat...

Page 31: ...n the system board in accordance with the instructions in the technical manual for the system board Note about the Laser The CD DVD drive is classified for laser class 1 according to IEC 60825 1 Cauti...

Page 32: ...revent mechanical damage as well as premature wearing of the CDs DVDs by observing the following suggestions Only insert the CDs DVDs in the drive when needed and remove them after use Store the CDs D...

Page 33: ...e following notes CAUTION Switch the server off and pull the power plug out of the grounded contact power socket Do not clean any interior parts yourself leave this job to a service technician Do not...

Page 34: ...not installed and used in strict accordance with the instructions may cause harmful interference to radio communications However there is no warranty that interference will not occur in a particular...

Page 35: ...rver only in its original packaging or in a packaging which protects it from knocks and jolts Do not unpack the server until you are done transporting If you need to lift or transport the server ask o...

Page 36: ...ndustrial public power supply networks for the type A connector The power supply for the rack should be divided amongst the three phases of a three phase power connection Environmental Protection Envi...

Page 37: ...government regulations Do not throw batteries and accumulators into the household waste They must be disposed of in accordance with local regulations concerning special waste All batteries containing...

Page 38: ...n Tel 49 5251 8 18010 Fax 49 5251 8 18015 The device may not be disposed of with household rubbish This appliance is labelled in accordance with European Directive 2002 96 EC concerning used electrica...

Page 39: ...Installing the Hardware This chapter describes how to install the BladeFrame BF200 hardware and covers the following topics Unpacking the BladeFrame BF200 Installing the BladeFrame BF200 Hardware Inst...

Page 40: ...y instructions in Important Notes If you need to lift or transport the server ask other people to help you Do not unpack the server until all transport maneuvers are completed Do not expose the server...

Page 41: ...allet contains the chassis and accessories Inside the box you will find the following items BladeFrame BF200 chassis Two side rails for mounting the chassis in a rack Two snap on trim strips for the c...

Page 42: ...orts up to six high end 4 way Processing Blades with processor speeds of 2 8 GHz or greater This high end pBlade configuration would exceed the 20 amp chassis s power supply so that PAN Manager softwa...

Page 43: ...x 44 5 x 57 8 cm 145 lb 65 25 kg 92 lb 41 4kg 30 amp chassis 38 x 21 x 31 in 96 5 x 53 3 x 78 7 cm 31 x 17 5 x 22 75 in 78 7 x 44 5 x 57 8 cm 150 lb 68 kg 92 lb 41 4 kg cBlade 31 5 x 7 x 26 in 80 x 1...

Page 44: ...Side Rails Installing the Chassis Air Flow Requirements CAUTION Please observe the safety precautions and references to rack installation in the section Important Notes At least two people are needed...

Page 45: ...rx including plugwashers Accessory kit 852 000011 including 18 10 32 x 3 8 Phillips screws 1 Remove the side rails from the chassis shipping carton The side rails are adjustable in length using rail e...

Page 46: ...rail For mounting the left side rail in the PRIMECENTER Rack the provided support bracket must first be mounted on the rear left support upright The bracket must be mounted level with the lower edge...

Page 47: ...d Please proceed as follows Figure 3 5 Inserting the cage nuts 7 Insert the cage nut as shown in the figure with the bottom part of the cage in the appropriate mounting hole of the support upright 1 8...

Page 48: ...ews 12 Repeat the steps with the right rail to be mounted on the right support uprights Note If you are installing more than one BladeFrame BF200 in your rack leave a 1U gap between each chassis see F...

Page 49: ...applicable To install the side rails 1 Take the original manual of the rack manufacturer regarding the mechanical installation and or the climatic conditions to assistance Caution With the installatio...

Page 50: ...inch rack do the following The mounting holes in an EIA standard rack are in 1U groups groups of three holes two holes being 5 8 inch apart and then a 1 2 inch gap to the next group of holes and so on...

Page 51: ...talling more than one BladeFrame BF200 in your rack leave a 1U gap between each chassis see Figure 3 7 This allows for the subsequent installation of redundant power supplies For more detail on instal...

Page 52: ...e 3 8 Installing the Side Rails in a Rack Figure 3 9 Side Rail Detail Align bottom of the side rail with the center of the 1 2 inch gap between holes to fit the rack s dimensions Tighten the three bol...

Page 53: ...ssis on the side rails Caution At least two people are needed to position the server in the rack Do not lift the chassis using the door 4 Push the chassis back into the rack until the four mounting ho...

Page 54: ...of all blades and filler blades before you install it in the rack For more information see Removing Filler Blades 3 Insert the chassis on the side rails Note Fujitsu Siemens Computers recommends that...

Page 55: ...oling requirements Figure 3 10 Air Flow Maximum ambient air intake temperature is 95o F 35o C There must be unrestricted air intake and exhaust Ideally there should be no doors on the cabinet If there...

Page 56: ...8 Release 5 0 A total of 16 square inches of air flow per BladeFrame BF200 3 x 16 square inches for a cabinet containing three BladeFrame BF200 chassis must be available through the door directly in f...

Page 57: ...cBlades and pBlades into the correct type of slot as follows The blade slots are numbered from left to right when viewed from the front of the chassis cBlades are installed in the end slots cBlade c1...

Page 58: ...11 Removing Filler Blades To remove filler blades 1 Push on the end of the filler blade s finger pull mechanism The finger pull mechanism swivels out as Figure 3 11 shows Figure 3 11 Finger pull mech...

Page 59: ...pBlade Operating the BladeFrame BF200 BladeLatch All blades feature the BladeFrame BF200 BladeLatch which ensures that a blade is properly seated in the BladeFrame BF200 chassis To correctly seat a bl...

Page 60: ...ack install both cBlades in the chassis To install a cBlade 1 Remove a cBlade from its shipping carton 2 Align the top and bottom cBlade rails with the chassis rails in the first cBlade slot see Figur...

Page 61: ...elf The cBlades require more force than the pBlades 4 Push the BladeLatch firmly back into the face of the bezel until it stops 5 Release the BladeLatch and allow it to spring back until it is flush o...

Page 62: ...This takes the form S26361 K1xxx Vyyy and is found on the product ID label that is located on the lower front left side of the pBlade chassis Proceed with installing the pBlades after you identify th...

Page 63: ...rough 7 The BladeLatch is at the bottom as Figure 3 15 shows Figure 3 15 Installing a Blade 4 Push the pBlade into the BladeFrame BF200 until its BladeLatch pops out from the face of the blade Note Do...

Page 64: ...3 26 Release 5 0 Note If the BladeLatch handle will not remain flush with the face of the BladeLatch it is defective Return the blade to Fujitsu Siemens Computers 7 Repeat for each pBlade You can now...

Page 65: ...ng the PAN defaults This chapter includes Connecting the BladeFrame BF200 to a Power Source Powering on the BladeFrame BF200 Providing Redundant Input Power The last chapter in this book assumes the f...

Page 66: ...connect the four BladeFrame power cords to the NEMA L6 20 receptacles from your 200 208 Volt 30 amp power source For the BladeFrame BF200 electrical specifications see Table 2 2 Indicator Lights Each...

Page 67: ...t Powering On To power on the BladeFrame BF200 turn on the circuit breakers on the back of the BladeFrame BF200 When powering up the blades progress through the following three states Standby The blad...

Page 68: ...amber light until they are booted as pServers After a pBlade has successfully booted the indicator light changes to steady blue Table 4 2 Boot Sequence Event Light Indication 1 The cBlades receive fu...

Page 69: ...draw more power than 2 way pBlades Table 4 3 and Table 4 4 list the electrical specifications for both options Table 4 3 Electrical Specifications 20 Amp BladeFrame BF200 Parameter Description Rating...

Page 70: ...anel at the rear of the BladeFrame BF200 chassis See Figure 4 1 and Figure 4 2 for locations on the 20 amp and 30 amp chassis options Parameter Description Rating Value Input Voltage Voltage range 200...

Page 71: ...h and Receptacle 20 Amp Option Figure 4 2 Power Switch and Cable 30 Amp Option The 20 amp chassis option uses a detachable power cable that fits into the power receptacle Secure the power cable with t...

Page 72: ...at shrink tubing This shield lead is connected to the same ground lug in the L6 30P connector to which the Green Yellow wire is connected The shield is terminated to the BladeFrame BF200 chassis end o...

Page 73: ...ame BF200 chassis to the ON position To power off the BladeFrame BF200 turn the breaker switch at the rear of the chassis to the OFF position 3 When the BladeFrame BF200 is powered on the indicator li...

Page 74: ...curs automatically when one source is interrupted A Static Transfer Switch STS provides the redundant input power Install the STS in the rack immediately above or below the BladeFrame BF200 See Figure...

Page 75: ...5 and Figure 4 6 Figure 4 5 STS Positions 20 Amp Option Figure 4 6 STS Positions 30 Amp Option BladeFrame ES 20 Amp Option STS STS Front of Rack Rear of Rack STS mounted above BladeFrame ES STS mount...

Page 76: ...cable marked Input Source B to another independent AC power source See Figure 4 8 Note Do not connect the STS Input Source A cable and the Input Source B cable to the same AC power source For full ST...

Page 77: ...onnecting the BladeFrame BF200 to a Power Source Release 5 0 4 13 Figure 4 8 Static Transfer Switch Input Sources Static Transfer Switch Input Source A Input Source B To BladeFrame ES Power Receptacle...

Page 78: ...Initial Setup Guide cBlade ES 4 14 Release 5 0...

Page 79: ...e document Installing cBlade Software Release 5 0 This chapter describes how to connect your BladeFrame BF200 to storage area network SAN resources and to an IP network This chapter includes Preparing...

Page 80: ...oviders make the SAN and network connections when the BladeFrame BF200 is initially installed However there may be circumstances such as moving the BladeFrame BF200 or rewiring your SAN or network tha...

Page 81: ...Ethernet card in your BladeFrame BF200 In addition the Gigabit Ethernet cable must meet the following requirements Cable types cBlade fibre Duplex LC cables 62 5 125 micron optical cables cBlade copp...

Page 82: ...meet the following requirements Cable type Standard 10 100BaseT Ethernet cable Cat 5 straight through Connectors For the BladeFrame BF200 RJ 45 Verifying External Addresses and Host Names If your Bla...

Page 83: ...ron optical cables Connectors For the BladeFrame BF200 cBlade LC type connectors For the SAN Switch LC type connectors Length no requirement Note To ensure proper operation see your SAN documentation...

Page 84: ...ade Before you begin plugging resource connections into a cBlade familiarize yourself with the cBlade connection layout The cBlade connection panel is located at the rear of the BladeFrame BF200 see F...

Page 85: ...and SCSI4 Two Gigabit Ethernet connections ETH1 and ETH2 One serial port One 10 100BaseT management port ETH0 which is only used to access PAN Manager Figure 5 2 shows the cBlade connection panel layo...

Page 86: ...e This port number is required when you configure Ethernet interfaces on your BladeFrame BF200 or when you need to reconnect cables that have been unplugged For each Ethernet cable note the following...

Page 87: ...ole on each cBlade To open a console on each cBlade you connect either locally with a directly connected laptop Windows or Linux operating system or remotely with a Telnet or SSH session via a termina...

Page 88: ...tions Connecting to a cBlade With a Linux or Windows Laptop If you choose to use a directly connected laptop use a terminal emulation program such as HyperTerminal on Windows or Minicom on Linux Table...

Page 89: ...g your serial port and configuring Minicom for your serial device To enable your serial port and configure Minicom 1 Boot your laptop 2 Enable your serial port in the BIOS as your laptop boots 3 After...

Page 90: ...rminal concentrator 1 Select a terminal concentrator port for each connection to your cBlades 2 Configure the ports as described in Table 5 1 For help in configuring ports see your terminal concentrat...

Page 91: ...To set mode char and toggle bin in your Telnet client 1 Escape to the Telnet shell by entering CTRL The Telnet shell prompt appears 2 Enter display The Telnet settings appear 3 Enter mode char The cB...

Page 92: ...Blades as root 2 Check system status using the PAN Manager bframe command bframe The bframe command displays information similar to the following MyBladeFrame 20AMPS 200VOLTS Power Domains A B C D SLT...

Page 93: ...o the cBlades 1 Open a console on each Control Blade 2 Plug 10 100BaseT Ethernet cables into the management ports on each cBlade see Figure 5 5 Figure 5 5 Connecting to the Management Port C2 SERIAL P...

Page 94: ...nector on the cBlade panel as shown in Figure 5 1 The SFP connectors are factory installed and are not hot swappable If you have problems with the SFP connectors contact Fujitsu Siemens Computers cust...

Page 95: ...ises if the same address already exists on your network Use the extnet command to change the default address of the external interfaces on the BladeFrame BF200 if a conflict exists Table 5 2 shows the...

Page 96: ...he network mask IP address 4 The prompt displays Activate external network configuration y n Type y to configure the new addresses entered in the preceding step or type n to discard the addresses 5 Ve...

Page 97: ...lade EX model may join a PAN For more information on multiple BladeFrame BF200s in a PAN see PAN Manager Administrator s Guide Modifying Internal Management IP Addresses Each pServer that you configur...

Page 98: ...roadcast address of the internal management network 4 The prompt displays Activate internal network configuration y n Type y to configure the new addresses you entered in the preceding step or type n...

Page 99: ...BladeFrame BF200s with the cBlade EX model may join a PAN For more information on BladeFrame BF200s in a PAN see PAN Manager Administrator s Guide Note The intnet command does not update the Network...

Page 100: ...helpful to retain an indication of the cBlade number as in cb1new_cBlade1_name and cb2new_cBlade2_name 4 Save the etc hosts file 5 At the Linux prompt create a new file cp etc sysconfig network etc sy...

Page 101: ...c egenera ConfigFiles ifcb on Control Blade 1 for the network ifca and network ifcb files respectively 14 If the network files are found remove them from Control Blade 2 15 Reboot Control Blade 1 Rebo...

Page 102: ...nts Arbitrated loop where the storage devices are connected in a logical loop This requires little configuration Switched fabric where the storage devices communicate through one or more switches For...

Page 103: ...BF200 port s To connect a Fibre Channel cable to a cBlade 1 Select the Fibre Channel cable that you want to connect to a cBlade 2 Align the latches on the LC connector Figure 5 8 with the slot in the...

Page 104: ...ors are factory installed and are not hot swappable If you have problems with the SFP connectors contact Fujitsu Siemens Computers customer support or your authorized service provider 3 Plug the secon...

Page 105: ...nnection setup steps as described in PRIMERGY BladeFrame SAN Integration Guide Note If you want to add a large number of SAN devices after your BladeFrame BF200 initial configuration shut down both cB...

Page 106: ...re well seated If you still do not receive a reply contact Fujitsu Siemens Computers customer support or your authorized service provider for assistance Testing SAN Connectivity To test BladeFrame SAN...

Page 107: ...rol Blades to obtain a time setting from external Network Time Protocol NTP servers Modifying the Date Time and Time Zone To ensure that the system hardware clock is set correctly log on to a cBlade a...

Page 108: ...Blade Synchronizing With External Time Sources If you want to synchronize the time on the BladeFrame BF200 with the rest of your network optional you can set up both Control Blades to set their time f...

Page 109: ...5 Restart the NTP service by entering the following etc rc d init d ntpd restart 6 Repeat Step 2 through Step 5 for the other Control Blade If you will be adding more than one BladeFrame BF200 to a P...

Page 110: ...Initial Setup Guide cBlade ES 5 32 Release 5 0...

Page 111: ...dby 4 3 BladeFrame active blade state 4 4 airflow 2 4 placement 2 4 powering on 4 3 recognized 4 4 standby 4 4 blue light 4 3 breaker switches 4 9 C cabling connecting the network 5 15 Gigabit Etherne...

Page 112: ...ng 5 21 HyperTerminal 5 10 I ifconfig command 5 18 5 21 indicator light 4 2 IP addresses external management 5 17 internal management 5 19 L LED indicator meanings 4 2 4 3 4 4 powering on 4 3 lilo boo...

Page 113: ...site prep host names 5 4 IP addresses 5 4 slave cBlade 5 14 spacing recommended front 2 3 rear 2 3 specifications electrical 20 amp 4 5 electrical 30 amp 4 6 spine 20 amp 4 5 30 amp 4 5 spring nut 3...

Page 114: ...Initial Setup Guide cBlade ES Index 4...

Page 115: ...tsu com Copyright Fujitsu Technology Solutions 2009 Hinweise zum vorliegenden Dokument Zum 1 April 2009 ist Fujitsu Siemens Computers in den alleinigen Besitz von Fujitsu bergegangen Diese neue Tochte...

Reviews: