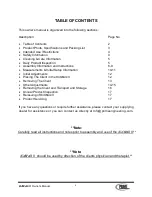
background image

KidWalk 

II

  Owner’s Manual


13 

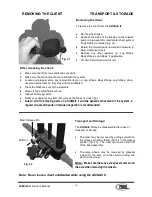
Removing the client: 

 
To remove the client from the 

KidWalk 

II


 

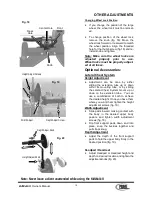
Set the wheel locks. 

 

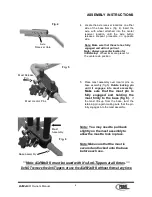
Squeeze  the  sides  of  the  buckles  on  the 
front  pads  on  hip  assembly  (and  lateral 
chest system if used) to release (fig. A). 

 

Rotate  the  front  pads  upward  and  outward 
to allow clearance to exit. 

 

Remove any other restraint i.e.: Leg Wraps, 
Body Wraps, Leg Straps, if applicable. 

 

Lift client forward and out of unit.
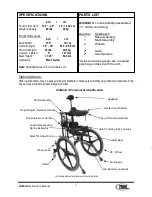
 

REMOVING THE CLIENT 


Fig. A 

Note:  Never leave a client unattended while using the 

KidWalk 

II

.


After removing the client: 


 

Make sure that all screws are tight. 

 

Make sure that all components are still with 
the system. 

 

Locate  and  properly  store  any  removable 
items,  i.e.  Leg  Wraps,  Body  Wraps,  Leg 
Straps,  when  used  and  store  them  so  they 
stay with the 

KidWalk II

 

Store the 

KidWalk II 

out of the elements. 

 

Wipe off any spilled fluids or food. 

 

Inspect all moving parts. 

 

Notify  your  dealer  of  any item that  you  see 
that does not look right.


 

Due to all of the moving parts on a 
KidWalk II and the dynamics of the 

system a regular visual and hands on 

inspection is recommended. 

Summary of Contents for KidWalk II

Page 1: ...neering A Division of Axiom Industries Inc 11_13KWII_OM_JLD Note Read Owner s Manual before use Distributed in the United Kingdom and Republic of Ireland by James Leckey Design 19C Ballinderry Road Li...

Page 2: ...ments 12 Placing The Client in the KidWalk II 12 Removing The Client 13 Other Adjustments 14 15 Removing the Client and Transport and Storage 16 Annual Product Inspection 17 Reissuing of KidWalk II 17...

Page 3: ...bly 2 Wheels 2 Axles 2 Axle Spacers Axles and axle spacers are in sealed poly bag enclosed with the unit PARTS LIST Anti tippers 24 Wheel Headpad Mast Tilt Adjust Knob Axle Receiver Locations Swivel S...

Page 4: ...device that is intended to as sist in teaching proper gait with the clients feet on the floor The KidWalk II fits children aged approximately 5 12 years old with a maximum client weight of 40 kg 90 l...

Page 5: ...n it s locked position at all times during use 2 Ensure all adjustment knobs and bolts are in place and secure 3 Check all upholstery for signs of wear and tear 4 Check that the wheels are moving free...

Page 6: ...KidWalk II Owner s Manual 6 Assembly Information for your KidWalk II Dynamic Mobility Device...

Page 7: ...Wheels 3 Mag Wheels Standard Remove axles from plastic bag Insert an axle into a wheel from the recessed bearing side fig 3 push in button at end of axle to allow the axle to slide through the wheel b...

Page 8: ...xle position 5 Place mast assembly over locator pins on base assembly fig 5 Rotate locking pin until it engages into mast assembly Make sure that the mast pin is fully engaged and holding the mast fir...

Page 9: ...e Fig 7 Note If you have accessories that are not listed in this manual the instructions for their installation and use will be packed with them Assembly for optional accessories Lateral Chest System...

Page 10: ...A written record is recommended to be maintained of all clinical set ups for this product See Page 4 Recommended set up order for the KidWalk II 1 Take client s measurements 2 Adjust seat height 3 Ad...

Page 11: ...Handle To raise the seat using the Fine Adjustment place your hand in the handle and squeeze the Lower Fine Tune handle fig 9 Each time you fully activate the Fine Tune handle the seat will rise up a...

Page 12: ...he bounce and moving it away from the client toward the rear post will increase the bounce Once this adjustment is done make sure that you tighten the knob to hold it in place fig 12 Placing the Clien...

Page 13: ...g A Note Never leave a client unattended while using the KidWalk II After removing the client Make sure that all screws are tight Make sure that all components are still with the system Locate and pro...

Page 14: ...rward or rearward as required and re tighten both knobs Note Make sure that both screws that hold the seat are secure Changing Wheel Position To move the wheels into a different location pull outward...

Page 15: ...tem mount up or down on the extension tube You can use a combination of both to achieve the desired height Once you have them where you want them tighten the height adjustment screws fig 19 Width Adju...

Page 16: ...properly store any removable items i e Leg Wraps Body Wraps Leg Straps when used and store them so they stay with the KidWalk II Store the KidWalk II out of the elements Wipe off any spilled fluids or...

Page 17: ...possible 7 Check that the mast tilt adjustment mechanism is working correctly Reissuing KidWalk II Most KidWalk II s are ordered and sized to meet the needs of a specific individual Before reissuing a...

Page 18: ...8263 Fax 800 800 3355 International Contact numbers Phone 1 559 276 0991 Fax 1 559 276 3544 Email Info primeengineering com Website www Primeengineering com 11_13KWII_OM_JLD Distributed in the United...

Reviews: