Primare A30.3 User Manual Download Page 8

>

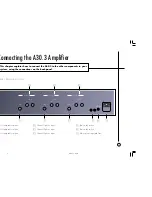
Connecting the A30.3 Amplifier

4

P O W E R   C O N N E C T I O N

Warning

: Before connecting power check that the required supply voltage,

indicated on the back panel, corresponds to your local AC supply. If a

different voltage is stated on the type plate do not connect the amplifier to the

mains power, and seek advice from your dealer.

Connect the mains power using the enclosed mains cable.

Note:

 Always disconnect the amplifier from the mains power before

connecting or disconnecting any of the cables.

O U T P U T S

Loudspeaker outputs

Connect the loudspeakers for each channel to the corresponding terminals.

The terminals can accept speaker cables terminated with 4mm banana plugs,

spade terminals, or bare wires. To connect bare wires unscrew the terminal,

pass the bare wire through the hole in the terminal bolt, and clamp the wire in

place by screwing the terminal back down.

I N P U T S

Connect the A30.3 to each channel of the preamplifier or processor using the

corresponding phono inputs, using high quality phono leads.

R E M O T E   L I N K

To power the A30.3 on and off remotely from a Primare P30 Processor

connect the REMOTE output from the P30 Processor to one of the REMOTE

LINK sockets on the A30.3, using a twin core cable terminated in 3.5mm jack

plugs. The second REMOTE LINK socket can be used to daisy-chain the

remote output to further A30 series amplifiers.

To use the remote link switch the REMOTE SW switch to the down position.

§2 Connecting

3/11/00, 1:01 pm

4

Summary of Contents for A30.3

Page 1: ...i Primare A30 3 Amplifier User Guide 3 11 00 1 01 pm 1 ...

Page 2: ...pen the cabinet There are no user serviceable parts inside Repairs should be carried out by qualified service personnel only FCC Warning This equipment generates and can radiate radio frequency energy and if not installed and used correctly in accordance with our instructions may cause interference to radio communications or radio and television reception It has been type tested and complies with ...

Page 3: ...T H E A 3 0 3 A M P L I F I E R 1 H E A 3 0 3 W I T H O T H E R P R I M A R E T S 1 C A L S P E C I F I C A T I O N 2 g the A30 3 Amplifier N E L C O N N E C T I O N S 3 C O N N E C T I O N 4 S 4 4 L I N K 4 3 11 00 1 01 pm 3 ...

Page 4: ...3 11 00 1 01 pm 4 ...

Page 5: ...ening at high volume levels ality delivers its power at an outstanding quality level making it as eproducing high quality recorded music as for home cinema Remote power on off For convenience the A30 3 can be powered on and off via a remote link cable avoiding the need to switch it on or off separately from the preamplifier in the system U S I N G T H E A 3 0 3 W I T H O T H E R P R I M A R E P R ...

Page 6: ... I F I C A T I O N ower per channel 120W into 8V 200W into 4V mpedance 0 03Ω ts 1V for 120W into 8Ω pedance 10kΩ y response 10Hz 100kHz 3dB 0 08 noise line 100dB nsumption 1000W ns WxDxH 430 x 385 x 100mm 3 11 00 1 01 pm 2 ...

Page 7: ...N N E C T I O N S D Channel 1 phono input E Channel 2 phono input F Channel 3 phono input CHANNEL 3 INPUT SPEAKER REMOTE SW REMOTE 12V DC LINK CHANNEL 1 INPUT SPEAKER CHANNEL 2 INPUT SPEAKER D E F H G I C B A l 1 loudspeaker outputs l 2 loudspeaker outputs l 3 loudspeaker outputs G Remote link sockets H Remote link switch I Mains power input and fuse 3 11 00 1 01 pm 3 ...

Page 8: ...ed with 4mm banana plugs erminals or bare wires To connect bare wires unscrew the terminal bare wire through the hole in the terminal bolt and clamp the wire in y screwing the terminal back down T S the A30 3 to each channel of the preamplifier or processor using the onding phono inputs using high quality phono leads R E M O T E L I N K To power the A30 3 on and off remotely from a Primare P30 Pro...

Page 9: ...5 ndex onnections 3 3 4 4 kers 4 or use with 4 s 4 R remote link 4 REMOTE switch 4 T technical specification 2 3 11 00 1 01 pm 5 ...

Page 10: ...3 11 00 1 01 pm 6 ...

Reviews: