background image

Victory ES Series

 www.pridemobility.com

    9

I I .   S A F E T Y

GENERAL

MANDATORY! Do not operate your new scooter for the first time without completely

reading and understanding this owner’s manual.

Your scooter is a state-of-the-art life-enhancement device designed to increase mobility. Pride provides an

extensive variety of products to best fit the individual needs of the scooter user. Please be aware that the

final selection and purchasing decision regarding the type of scooter to be used is the responsibility of the

scooter user, who is capable of making such a decision, and his/her healthcare professional (i.e., medical

doctor, physical therapist, etc.).

The contents of this manual are based on the expectation that a mobility device expert has properly fitted

the scooter to the user and has assisted the prescribing healthcare professional and/or the authorized Pride

Provider in the instruction process for the use of the product. 

There are certain situations, including some medical conditions, where the scooter user will need to practice

operating the scooter in the presence of a trained attendant. A trained attendant can be defined as a family

member or care professional specially trained in assisting a scooter user in various daily living activities.

As you begin using your scooter during daily activities, you will probably encounter situations in which

you will need some practice. Simply take your time and you will soon be in full and confident control as

you maneuver through doorways, on and off elevators, up and down ramps, and over moderate terrain.

Below are some precautions, tips, and other safety considerations that will help you become accustomed

to operating the scooter safely. 

MODIFICATIONS

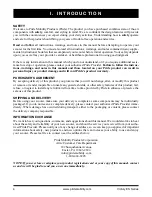
Pride has designed and engineered your scooter to provide maximum mobility and utility. A wide range

of accessories is available from Pride to further customize your scooter to better suit your needs and/or

preferences. However, under no circumstances should you modify, add, remove, or disable any feature,

part, or function of your scooter.

WARNING! Do not modify your scooter in any way not authorized by Pride. Do not use

accessories if they have not been tested or approved for Pride products.

REMOVABLE PARTS

WARNING! Do not attempt to lift or move your scooter by any of its removable parts,

including the armrests, seat, or shroud. Pride recommends use of only solid, non-

removable frame components such as scooter securement points or the front and rear

frame weldments to lift or move your scooter.

WARNING! Lifting the scooter should be accomplished with no fewer than three people,

one at the front and two at the rear of the unit.

PRE-RIDE SAFETY CHECK

Get to know the feel of your scooter and its capabilities. Pride recommends that you perform a safety check

before each use to make sure your scooter operates smoothly and safely.

Summary of Contents for Victory ES Series

Page 1: ...Including Models Victory ES9 and Victory ES10 SERIES VICTORY ES ...

Page 2: ...is owner s manual and on the scooter to identify warnings and important information It is very important for you to read them and understand them completely WARNING Indicates a potentially hazardous condition situation Failure to follow designated procedures can cause either personal injury component damage or malfunction On the product this icon is represented as a black symbol on a yellow triang...

Page 3: ... 3 C O N T E N T S I INTRODUCTION 4 II SAFETY 5 III YOUR SCOOTER 19 IV BATTERIES AND CHARGING 23 V OPERATION 28 VI COMFORT ADJUSTMENTS 30 VII DISASSEMBLY AND ASSEMBLY 33 VIII BASIC TROUBLESHOOTING 35 IX CARE AND MAINTENANCE 37 X WARRANTY 41 ...

Page 4: ...ery of this product you promise that you will not change alter or modify this product or remove or render inoperable or unsafe any guards shields or other safety features of this product fail refuse or neglect to install any retrofit kits from time to time provided by Pride to enhance or preserve the safe use of this product SHIPPING AND DELIVERY Before using your scooter make sure your delivery i...

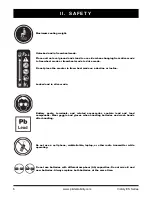
Page 5: ...read and understand them completely Pinch Crush points created during assembly Corrosive chemicals contained in battery EMI RFI This product has been tested and passed at an immunity level of 20 V m Explosive conditions exist Read and follow the information in the owner s manual Do not remove anti tip wheels Keep tools and other metal objects away from battery terminals Contact with tools can caus...

Page 6: ...eel mode Battery posts terminals and related accessories contain lead and lead compounds Wear goggle and gloves when handling batteries and wash hands after handling Do not place the scooter in freewheel mode on a decline or incline Do not use a cell phone walkie talkie laptop or other radio transmitter while operating Do not use batteries with different amp hour Ah capacities Do not mix old and n...

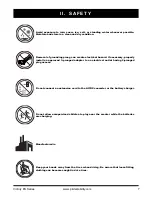
Page 7: ...l hazard If necessary properly install an approved 3 pronged adapter to an electrical outlet having 2 pronged plug access Do not connect an extension cord to the AC DC converter or the battery charger Do not allow unsupervised children to play near the scooter while the batteries are charging Keep your hands away from the tires when driving Be aware that loose fitting clothing can become caught in...

Page 8: ...or information on proper disposal and recycling of your Pride product and its packaging Use only AGM or Gel Cell batteries to reduce the risk of leakage or explosive conditions Class II equipment Scooter does not conform to ISO 7176 19 for transport of an occupied scooter in a motor vehicle Indicates tie down points on the scooter Scooter information label ...

Page 9: ...u will probably encounter situations in which you will need some practice Simply take your time and you will soon be in full and confident control as you maneuver through doorways on and off elevators up and down ramps and over moderate terrain Below are some precautions tips and other safety considerations that will help you become accustomed to operating the scooter safely MODIFICATIONS Pride ha...

Page 10: ...nregulated air source could overinflate them resulting in a burst tire NOTE If the tire on your scooter lists the psi rating only use the following conversion formulas to find the bar or kPa rating bar psi x 0 06895 kPa psi x 6 89476 WEIGHT LIMITATIONS Your scooter is rated for a maximum weight capacity Refer to the specifications table for information Keep in mind that the maximum weight capacity...

Page 11: ...ifications do not under any circumstances exceed the incline guidelines or any other specifications Doing so could cause instability in your scooter Handicap public access ramps are not subject to government regulation in all countries and therefore do not necessarily share the same standard percent of slope Other inclines may be natural or if man made not designed specifically for scooters Tests ...

Page 12: ...s greatly reduces the possibility of a tip or fall BRAKING INFORMATION Your scooter is equipped with these powerful brake systems Regenerative Uses electricity to rapidly slow the vehicle when the throttle control lever returns to the center stop position Disc Park Brake Activates mechanically after regenerative braking slows the vehicle to near stop or when power is removed from the system for an...

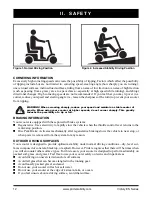
Page 13: ... of handling greater obstacles Pride recommends that you do not attempt to negotiate a curb that has a height greater than 2 in 5 cm Doing so could cause instability in your scooter CURB Figure 3 Correct Curb Approach Figure 3A Incorrect Curb Approach CURB INCLEMENT WEATHER PRECAUTIONS Exposure of your scooter to inclement weather conditions should be avoided whenever possible If sud denly caught ...

Page 14: ...he manual freewheel lever inadvertently be released while driving the scooter STAIRS AND ESCALATORS Scooters are not designed to travel up or down stairs or escalators Always use an elevator WARNING Do not use your scooter to negotiate steps or escalators DOORS Determine if the door opens toward or away from you Use your hand to turn the knob or push the handle or push bar Drive your scooter gentl...

Page 15: ...g a frozen battery may result in damage to the battery WARNING Connect the battery harnesses in the proper manner RED cables must be connected to positive battery terminals posts BLACK cables must be connected to negative battery terminals posts Protective caps should be installed over all battery terminals REPLACE cables immediately if damaged BATTERY DISPOSAL AND RECYCLING If you encounter a dam...

Page 16: ...y cause the scooter to tip REACHING AND BENDING Avoid reaching or bending while driving your scooter Bending forward creates the risk of accidental throttle control lever contact Bending to the side while seated creates the risk of tipping It is important to maintain a stable center of gravity and keep the scooter from tipping Pride recommends that the scooter user determine his her personal limit...

Page 17: ...ds that you do not expose your scooter to open flames WARNING Replace worn or damaged upholstery immediately to reduce the risk of fire hazard WARNING Be aware that washing of upholstered items may reduce the resistance to flammability of the fabric ELECTROMAGNETIC AND RADIO FREQUENCY INTERFERENCE EMI RFI WARNING Laboratory tests have shown that electromagnetic and radio frequency waves can have a...

Page 18: ... in any way not authorized by Pride WARNING The electrically powered mobility vehicle itself can disturb the performance of other electrical devices located nearby such as alarm systems NOTE For further information on EMI RFI visit the Resource Center on www pridemobility com If unintended motion or brake release occurs turn your scooter off as soon as it is safe to do so Contact your authorized P...

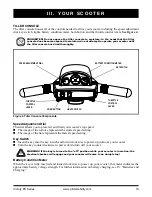
Page 19: ...Speed Adjustment Dial This dial allows you to preselect and limit your scooter s top speed The image of the tortoise represents the slowest speed setting The image of the hare represents the fastest speed setting Key Switch Insert the key into the key switch and turn it clockwise to power up turn on your scooter Turn the key counterclockwise to power down turn off your scooter WARNING If the key i...

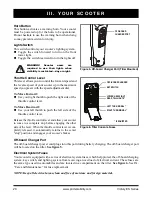
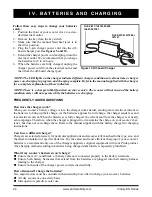
Page 20: ...ase the throttle control lever and allow your scooter to come to a complete stop before engaging the other side of the lever When the throttle control lever is com pletely released it automatically returns to the center stop position and engages your scooter s brakes Figure 5 Off board Charger Port Tiller Mounted OFF BOARD CHARGER PORT Figure 6 Tiller Console Fuses KEY SWITCH OFF BOARD CHARGER REA...

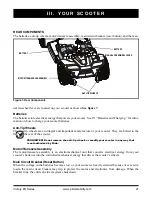
Page 21: ...are bolted to the frame at the rear of the scooter PROHIBITED Do not remove the anti tip wheels or modify your scooter in any way that is not authorized by Pride Motor Transaxle Assembly The motor transaxle assembly is an electromechanical unit that converts electrical energy from your scooter s batteries into the controlled mechanical energy that drives the scooter s wheels Main Circuit Breaker R...

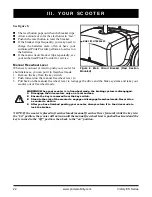
Page 22: ...tion the scooter will not run until the manual freewheel lever is pushed backward and the key is turned to the off position then back to the on position MAIN CIRCUIT BREAKER I I I Y O U R S C O O T E R See figure 8 The reset button pops out when the breaker trips Allow a minute or so for the electronics to rest Push in the reset button to reset the breaker If the breaker trips frequently you may n...

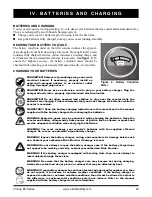
Page 23: ...Pride recommends that you do not charge the batteries while the scooter is occupied MANDATORY Read the battery charging instructions in this manual and in the manual supplied with the battery charger before charging the batteries WARNING Explosive gases may be generated while charging the batteries Keep the scooter and battery charger away from sources of ignition such as flames or sparks and prov...

Page 24: ... voltage is low the charger works harder sending more electrical current to the batteries to bring up their charge As the batteries approach a full charge the charger sends less and less electrical current When the batteries are fully charged the current sent from the charger is at nearly zero amperage Therefore when the charger is plugged in it maintains the charge on your scooter s bat teries bu...

Page 25: ... maximum range or distance per charge Rarely will you have ideal driving conditions smooth flat hard driving surfaces with no wind or curves Often you will face hills pavement cracks uneven and loosely packed surfaces curves and wind all of which affect the distance or running time per battery charge Below are a few suggestions for obtaining the maximum range per battery charge Always fully charge...

Page 26: ...ttery harnesses by depressing the tabs and then pulling them straight up See figure 11 4 Disconnect the battery cables from the battery terminals by sliding back the terminal boots and unscrewing the nut from the bolt See figure 13 5 Remove the old batteries from the battery wells 6 Place a new battery in each battery well Face the battery terminals of each battery away from the seat post See figu...

Page 27: ...al draining followed by full recharging to establish the critical chemical balance that is essential to a deep cycle battery s peak performance and long life Follow these steps to properly break in your scooter s new batteries for maximum efficiency and service life 1 Fully recharge any new battery prior to its initial use This charging cycle brings the battery up to about 88 of its peak performan...

Page 28: ...floorboard PRE RIDE ADJUSTMENTS AND CHECKS Is the seat at the proper height See VI Comfort Adjustments Is the seat fixed securely in position Is the tiller at a comfortable setting and locked securely in place See VI Comfort Adjustments Is the key fully inserted into the key switch and turned clockwise to the on position Does the horn work properly Is your proposed path clear of people pets and ob...

Page 29: ...lete stop 2 Power down your scooter and remove the key from the key switch 3 Disengage the seat rotation lever and rotate the seat until you are facing toward the side of your scooter 4 Make certain that the seat is fixed securely in position 5 Carefully and safely get out of the seat and stand to the side of your scooter 6 You can leave the seat facing to the side to facilitate boarding your scoo...

Page 30: ...ller handle 2 Insert the threaded end of the mirror holder into the opening and rotate it clockwise until snug 3 If necessary rotate the nut clockwise to secure the mirror in place To adjust the mirror 1 Position yourself in a seated driving position fac ing forward 2 Adjust the mirror left right up or down until you have a good line of sight behind you ARMREST WIDTH ADJUSTMENT The armrest width c...

Page 31: ...the seat into place SEAT HEIGHT ADJUSTMENT The seat can be repositioned to several different heights See figure 18 1 Remove the seat and or shroud from your scooter See VII Disassembly and Assembly 2 Remove the seat height adjustment bolt 3 Raise or lower the upper seat post to the desired seat height 4 While holding the upper seat post at that height match up the locating holes in the upper seat ...

Page 32: ...e positioning belt and then reinstall the bolts and belt back into the seat bottom 5 Tighten the bolts Figure 19 Positioning Belt To adjust the positioning belt for operator comfort 1 Insert the metal tab on the right side of the belt into the plastic housing on the opposite strap until you hear a click See figure 19 2 Pull the strap on the right side of the belt until it is secure but not so tigh...

Page 33: ...hysical capability Ask for assistance when necessary while disassembling or assembling your scooter 1 Remove the seat by lifting it straight up and off of the scooter If you encounter resistance when removing the seat disengage the seat rotation lever and swivel the seat back and forth while lifting up on the seat 2 Gently pull the battery shroud up and off of the scooter See figure 21 3 Disconnec...

Page 34: ...you align the frame hooks of the front section with the lower frame tube of the rear section See figure 24 3 Once the frame hooks are over the lower frame tube lower the front section com pletely This will engage the frame lock up 4 Reinstall the frame lock up pin WARNING Ensure that the frame lock up pin is properly installed and that the pin safety latch is secured before driving the scooter 5 R...

Page 35: ... both battery harnesses and the front to rear harness are firmly connected See VII Disassembly and Assembly Be sure the power down timer feature has not been activated See V Operation FAULT CODE CONDITION SOLUTION 1 Battery charge is low Charge batteries as soon as possible 2 Battery charge is too low Charge batteries 3 The scooter s battery voltage is too high to operate the scooter or the charge...

Page 36: ... have both of your scooter s batteries load tested by your authorized Pride Provider You may also perform the load test yourself Battery load testers are available at most automotive parts stores Follow the directions supplied with the load tester See IV Batteries and Charging or the specifications table for information about your scooter s bat tery type What if the battery condition meter dips wa...

Page 37: ...astic and metal parts of your scooter Avoid using products that may scratch the surface of your scooter If necessary clean your product with an approved disinfectant Make sure the disinfectant is safe for use on your product before application WARNING Follow all safety instructions for the proper use of the disinfectant and or cleaning agent before applying it to your product Failure to comply may...

Page 38: ...emove the key from the key switch 2 Elevate the side of the scooter of which you are removing the tire Place wooden blocks under the frame to elevate the scooter 3 Remove the drive wheel nut and washer from the axle See figure 25 4 Pull the wheel off the axle 5 Slide the new wheel back onto the axle Make sure the axle key is in the axle slot WARNING Failure to ensure that the axle key is properly ...

Page 39: ...n insert lock nuts should not be reused as it may cause damage to the nylon insert resulting in a less secure fit Replacement nylon insert lock nuts are available at local hardware stores or through your authorized Pride Provider STORING YOUR SCOOTER If you plan on not using your scooter for an extended period of time it is best to 1 Fully charge its batteries prior to storage 2 Disconnect the bat...

Page 40: ...es and reduces the possibility of flat spots developing on the areas of the tires contacting the ground DISPOSAL OF YOUR SCOOTER Your scooter must be disposed of according to applicable local and national statutory regulations Contact your local waste disposal agency or authorized Pride Dealer for information on proper disposal of packag ing metal frame components plastic components electronics ba...

Page 41: ...evel usually occurs due to abusive and excessive strain on the scooter ONE YEAR LIMITED WARRANTY For one 1 year from the date of purchase Pride will repair or replace at our option to the original pur chaser free of charge any of the following parts found upon examination by an authorized representative of Pride to be defective in material and or workmanship Bearings Bushings Rubber Components Pla...

Page 42: ...ty service must be performed by an authorized Pride Provider Do not return faulty parts to Pride without prior written authorization All transportation costs and shipping damage incurred while submit ting parts for repair or replacement are the responsibility of the purchaser Please contact your authorized Pride Provider for information on the current cost associated with a service visit There is ...

Page 43: ......

Page 44: ... INFMANU4213 ...

Reviews: