background image

Athena                                                                                   www.pridemobility.com                                                                                                         33

9. Place the batteries back into the power base.

10. Connect the battery quick disconnects according to the battery wiring diagram label located on the frame.

See figure 18.

11. Reconnect the battery door latches.

12. Reinstall or rotate the leg rests back to position.
13. Charge the batteries. See VI. “Batteries and Charging.”

When to See Your Quantum Rehab Dealer for Service

The following symptoms could indicate a serious problem with your power chair. If necessary, contact your

Quantum Rehab Dealer. When calling, have the model number, serial number, nature of the problem and the

trouble code if available.

Motor noise

Frayed harnesses 

Cracked or broken connectors

Uneven wear on any of the tyres

Jerky motion

Pulling to one side

Bent or broken wheel assemblies

Does not power up

Powers up, but does not move

Corrective Maintenance

If the battery condition meter does not light up when you turn on the power:

Check the harness connections. Make sure they are tight.

Check the circuit breaker. Reset it if necessary.

Check the battery connections.

If the above conditions prove normal, you can load test the batteries with a battery load tester. These testers are

available at automotive parts stores. Disconnect both batteries before load testing and follow the directions that

come with the load tester. If either one of the batteries fails the load test, replace both of them. If your power

chair still does not power up, contact your Quantum Rehab Dealer.

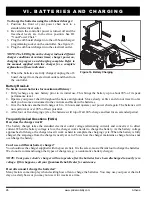
Figure 18. Battery Wiring Diagram

To replace the batteries:

1. Turn off the power to the controller.

2. Pull the manual freewheel levers up for drive mode.

3. Remove or rotate the leg rests to the side.

4. Release the battery door latches at the back of the power

chair.

5. Locate the battery quick disconnects on the frame and

disconnect both of them. See figure 18.

6. Remove the batteries from the power base.

7. Disconnect the battery wiring harness from each battery.

8. Reinstall the battery wiring harness on each new battery.

Make sure that you connect the red wire to the positive (+)

battery terminal and the black wire to the negative (-)

battery terminal.

WARNING! Make sure you tighten the fasteners

so that the connections are secure.

V I I .   C A R E   A N D   M A I N T E N A N C E

Summary of Contents for ATHENA

Page 1: ...ATHENA 32 Wedgwood Road Bicester Oxon OX26 4UL ...

Page 2: ...RNING Indicates a potentially hazardous condition situation Failure to follow designated procedures can cause either personal injury component damage or malfunction On the product this icon is represented as a black symbol on a yellow triangle with a black border MANDATORY These actions should be performed as specified Failure to perform mandatory actions can cause personal injury and or equipment...

Page 3: ...lity com 3 I INTRODUCTION 4 II SAFETY 5 III YOUR POWER CHAIR 17 IV ASSEMBLY 21 V COMFORT ADJUSTMENTS 22 VI BATTERIES AND CHARGING 25 VII CARE AND MAINTENANCE 29 VIII WARRANTY 34 APPENDIX I SPECIFICATIONS 35 C O N T E N T S ...

Page 4: ...d may void the warranty PURCHASER S AGREEMENT By accepting delivery of this product you promise that you will not change alter or modify this product or remove or render inoperable or unsafe any guards shields or other safety features of this product fail refuse or neglect to install any retrofit kits from time to time provided by Pride to enhance or preserve the safe use of this product SHIPPING ...

Page 5: ...w unsupervised children to play near the power chair while the batteries are charging Maximum seating weight Keep your hands away from the tyres when driving Be aware that loose fitting clothing can become caught in drive tyres Use correct tie down points for controller harness to prevent the harness from getting caught in the drive tyres pinched in the seat frame or damaged when passing through d...

Page 6: ...nged adapter to an electrical outlet having 2 pronged plug access Wear safety goggles Corrosive chemicals contained in battery EMI RFI This product has been tested and passed at an immunity level of 20 V m Explosive conditions exist Use only AGM or Gel Cell batteries to reduce the risk of leakage or explosive conditions Keep tools and other metal objects away from battery terminals Contact with to...

Page 7: ... Black wire to Black Negative Terminal Post Pinch Crush points created during assembly Contains Lead Do not remove anti tip wheels No step No standing Keep off Indicates that power chair with similarly labeled seating system conforms to ISO 7176 19 for transport of an occupied power chair in a motor vehicle Indicates power chair securement points Battery charger for indoor use only ...

Page 8: ...Disposal and recycling Contact your Quantum Rehab Dealer for information on proper disposal and recycling of your Pride product and its packaging Locked and in drive mode Unlocked and in freewheel mode Place unit on level ground and stand to one side when changing from drive mode to freewheel mode or freewheel mode to drive mode I I S A F E T Y ...

Page 9: ... take your time and you will soon be in full and confident control as you manoeu vre through doorways on and off of lifts up and down ramps and over moderate terrain Below are some precautions tips and other safety considerations that will help you become accustomed to oper ating your power chair safely Modifications Pride has designed and engineered your power chair to provide maximum mobility an...

Page 10: ...cline Information More and more buildings have ramps with specified degrees of inclination designed for easy and safe access Some ramps may have turning switchbacks 180 degree turns that require you to have good cornering skills on your power chair Proceed with extreme caution as you approach the downgrade of a ramp or other incline Take wide swings with your power chair s front wheels around any ...

Page 11: ...attempt to personally place your power chair in freewheel mode while seated on it Ask an attendant for assistance if necessary WARNING Do not place your power chair in freewheel mode while on an incline or decline This could cause the chair to roll uncontrollably on its own Braking Information Your power chair is equipped with two powerful brake systems Regenerative uses electricity to rapidly slo...

Page 12: ...ld be avoided whenever possible If suddenly caught up in rain snow severe cold or heat while operating your power chair proceed to shelter at the earliest opportunity Thoroughly dry your power chair before storing charging or operating your power chair PROHIBITED Operating in rain snow salt mist spray conditions and on icy slippery surfaces can have an adverse affect on the electrical system Maint...

Page 13: ... you may find it necessary to use a vehicle mounted lift system or elevation product to aid in transportation Pride recommends that you closely review the warnings instructions specifications and safety information set forth by the manufacturer of the lift elevation product before using that product WARNING Not all lift systems elevation products are rated for use with an occupied mobility device ...

Page 14: ...oss the pelvis as determined by your healthcare provider Anchor points of the positioning belts should be located so that a projected side view angle of the pelvis is between 45 75 of horizontal depending on the user s weight posture and seat cushion thickness WARNING If you require a positioning belt to safely operate your power chair make sure it is fastened securely in order to reduce the possi...

Page 15: ...ch lean or bend while seated on your power chair it is important to maintain a stable centre of gravity and keep the power chair from tipping Pride recommends that the power chair user determine his her personal limitations and practice bending and reaching in the presence of a qualified healthcare professional WARNING Do not bend lean or reach for objects if you have to pick them up from the floo...

Page 16: ... make sure cigarettes are completely extinguished before disposal Electromagnetic and Radio Frequency Interference EMI RFI WARNING Laboratory tests have shown that electromagnetic and radio frequency waves can have an adverse affect on the performance of electrically powered mobility vehicles Electromagnetic and Radio Frequency Interference can come from sources such as cellular phones mobile two ...

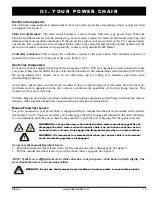
Page 17: ...y includes the armrests seatback and seat base The power base assembly includes two motor brake assemblies two drive wheels two anti tip wheels two castor wheels two batteries and wiring harnesses POWER BASE ASSEMBLY SEAT ASSEMBLY DRIVE WHEEL CASTOR WHEEL Figure 5 The Athena Power Chair CONTROLLER REMOTE PLUS SHOWN FRONT RIGGINGS SWING AWAY LEG RESTS SHOWN SEAT BASE SEATBACK ARMREST JOYSTICK ...

Page 18: ... Figure 7 The Athena Power Base Rear View Battery Door Down MOTOR BRAKE ASSEMBLY MAIN CIRCUIT BREAKER ANTI TIP WHEEL ANTI TIP WHEEL BATTERY DOOR FRONT SHROUD BATTERY DOOR LATCH LOCATION BATTERY DOOR LATCH MANUAL FREEWHEEL LEVER CONTROLLER CONNECTOR I I I Y O U R P O W E R C H A I R ...

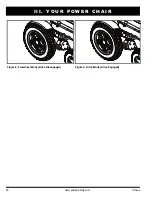
Page 19: ...e rear anti tip wheels work in opposition to the drive wheels to eliminate the possibility of the chair losing traction This creates a safer more secure ride STS also helps in day to day operating conditions This unique suspension system helps to harness the motors torque to make smoother transitions in speed during acceleration or deceleration Manual Freewheel Levers For your convenience your pow...

Page 20: ...20 www pridemobility com Athena Figure 8 Freewheel Mode Drive Disengaged Figure 9 Drive Mode Drive Engaged I I I Y O U R P O W E R C H A I R ...

Page 21: ... power base ensuring the harness cannot be pinched in the seat hinge See figure 10 3 Plug the controller harness into the connector See figure 6 4 Secure the controller harness to the armrest receiver with wire ties MANDATORY Prevent controller harness damage Avoid routing the controller harness on the outside of the armrest pad Route the harness under the armrest or toward the inside of the armre...

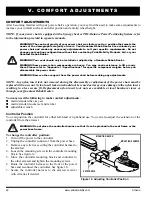
Page 22: ...sert lock nut removed during the disassembly or adjustment of the power chair must be replaced with a new nut Nylon insert lock nuts should not be reused as it may cause damage to the nylon insert resulting in a less secure fit Replacement nylon insert lock nuts are available at local hardware stores or through your Quantum Rehab Dealer You may need the following to make comfort adjustments metric...

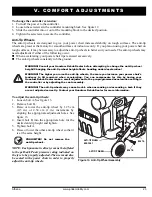
Page 23: ...t affects handling under deceleration WARNING The higher you raise the anti tip wheels the more you increase your power chair s tendency to tilt rearward when accelerating You can compensate for this by having your Quantum Rehab Dealer make a small adjustment to the pre programmed acceleration setting in the controller or by adjusting the seat assembly WARNING The anti tip wheels may cause trouble...

Page 24: ...n both the left and right seat hinges 2 Insert the screw through the supplied washer through the positioning belt and into the seat base for each side of the power chair seat 3 Tighten both screws NOTE If your power chair is equipped with an optional seating system please refer to the user manual provided with the seat for instruction on positioning belt installation or contact your Quantum Rehab ...

Page 25: ...cess PROHIBITED Never use an extension lead to plug in your battery charger Plug the charger directly into a properly wired standard electrical outlet PROHIBITED Do not allow unsupervised children to play near the power chair while the batteries are charging Pride recommends that you do not charge the batteries while the power chair is occupied MANDATORY Read the battery charging instructions in t...

Page 26: ...should use the charger supplied with the power chair It is the safest most efficient tool to charge the batteries We do not recommend using other types of chargers e g an automotive battery charger NOTE Your power chair s charger will not operate after the batteries have been discharged to nearly zero voltage If this happens call your Quantum Rehab Dealer for assistance How often must I charge the...

Page 27: ... or Gel Cell batteries to reduce the risk of leakage or explosive conditions Why do my new batteries seem weak Deep cycle batteries employ a much different chemical technology than that used in car batteries nickel cadmium nicads or in other common battery types Deep cycle batteries are specifically designed to provide power drain down their charge and then accept a relatively quick recharge AGM a...

Page 28: ...g and excessively hot conditions and never attempt to charge a frozen battery A cold or frozen battery should be warmed for several days prior to recharging What about public transport AGM and Gel Cell batteries are designed for application in power chairs and other mobility vehicles allowing safe transport on aircraft buses and trains as there is no danger of spillage or leakage We suggest you co...

Page 29: ...Rehab Dealer Power chairs that are frequently exposed to sources of water such as incontinence should be inspected often for corrosion and electronic components may need to be replaced frequently Temperature Some of the parts of your power chair are susceptible to extreme changes in temperature Always keep your power chair between the temperatures of 8 C 18 F and 50 C 122 F In extremely cold tempe...

Page 30: ...tum Rehab Dealer if necessary Ensure that all parts of the controller system are securely fastened to your power chair Do not overtighten any screws Check for proper tyre inflation Pneumatic tyres should be inflated to the psi bar kPa air pressure rating indicated on the tyre If a tyre does not hold air see your Quantum Rehab Dealer for replacement of the tube Check the brakes This test should be ...

Page 31: ...he plastic and metal parts of your power chair Avoid using products that may scratch the surface of your power chair If necessary clean your product with an approved disinfectant Make sure the disinfectant is safe for use on your product before application WARNING Follow all safety instructions for the proper use of the disinfectant and or cleaning agent before applying it to your product Failure ...

Page 32: ...Battery Replacement A battery wiring diagram is printed on a decal located on the battery door See figure 18 Refer to the specifications table in Appendix I Specifications for correct battery specifications MANDATORY Battery posts terminals and related accessories contain lead and lead compounds Wear goggles and gloves when handling batteries and wash hands after handling WARNING Do not replace ba...

Page 33: ...et it if necessary Check the battery connections If the above conditions prove normal you can load test the batteries with a battery load tester These testers are available at automotive parts stores Disconnect both batteries before load testing and follow the directions that come with the load tester If either one of the batteries fails the load test replace both of them If your power chair still...

Page 34: ...tteries are covered by a twelve month warranty from the original manufacturer NOT COVERED UNDER WARRANTY The following parts are classed as wear items which may under normal wear and tear require replacing These items are not therefore covered under warranty tyres positioning belts bulbs upholstery plastic shrouds motor brushes fuses and batteries Warranty will also be refused if damage is deemed ...

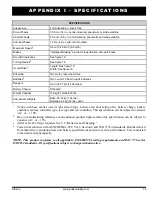
Page 35: ... capacity NOTE This product conforms to all applicable ANSI RESNA testing requirements and ISO 7176 series EN12184 standards All specifications subject to change without notice SPECIFICATIONS Suspension Full Suspension Sport Trac Drive Wheels 35 5 cm 14 in centre mounted pneumatic or solid available Castor Wheels 25 4 cm 9 in front articulating pneumatic and solid available Anti tip Wheels 10 cm 4...

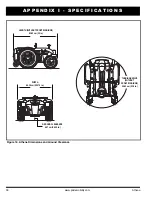
Page 36: ...Athena Dimensions and Ground Clearance LENGTH WITHOUT FRONT RIGGINGS 83 82 cm 33 in WIDTH 64 38 cm 25 375 in GROUND CLEARANCE 6 67 cm 2 625 in A P P E N D I X I S P E C I F I C A T I O N S TURNING RADIUS WITHOUT FRONT RIGGINGS 59 69 cm 23 5 in ...

Page 37: ...Athena www pridemobility com 37 N O T E S ...

Page 38: ...38 www pridemobility com Athena N O T E S ...

Page 39: ......

Page 40: ...at the factory Date Inspected Inspector Quality Control Athena Inclusion of all Parts Joystick Serial Number Controller Serial Number Left Motor Serial Number Right Motor Serial Number Fit and Finish Performance INFMANU3755 Product Serial Number ...

Reviews: