background image

26

www.pridemobility.com

      Quantum Jazzy 1650 Series

V .   C O M F O R T   A D J U S T M E N T S

Heavy Duty Drop-in Leg Rests

You can adjust the forward/back position, as well as the
length of the heavy duty drop-in leg rests.

To adjust the forward/back position:
1. Remove the adjustment bolt from the side rail. See fig-

ure 15.

2. Move the leg rest hanger in or out to the desired posi-

tion.

3. Align the adjustment holes in the leg rest hanger with

those in the side rail.

4. Reinstall the adjustment bolt to secure the leg rest hanger.

To adjust the leg rest length:
1. Remove the adjustment screws from the leg rest exten-

sion. See figure 15.

2. Slide the leg rest up or down to the desired length.
3. Align the adjustment holes in the leg rest extension and

reinstall the adjustment screws.

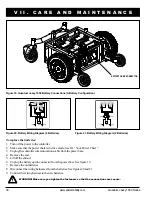
Figure 15. Heavy Duty Drop-In Leg Rests

LEG REST
ADJUSTMENT SCREWS

LEG REST HANGER

ADJUSTMENT BOLT

Anti-Tip Wheels

The anti-tip wheels are designed to give your power chair increased stability on rough surfaces.  The anti-tip wheels are
preset at the factory for smooth surfaces or indoor use only.  If you plan on using your power chair on rough surfaces, it
may be necessary to adjust the anti-tip wheels to better suit your needs. The anti-tip wheels may need adjustment if the
following occurs:

!

When coming to a stop, your power chair tips forward excessively.

!

The anti-tip wheels constantly rub the ground.

WARNING! Consult your authorized provider/specialist before attempting to change the anti-tip

wheel height! Changing the anti-tip wheel height affects handling under acceleration!

WARNING! The higher you raise the anti-tip wheels, the more you increase your power chair’s

tendency to tilt forward while decelerating. You can compensate for this by having your authorized

provider/specialist make a small adjustment to the pre-programmed deceleration setting in the

controller or by moving the seat assembly farther to the back of your power chair.

PROHIBITED! Do not remove the anti-tip wheels.

NOTE: Each drive tire must be inflated to 35 psi (2.4 bar) if equipped with pneumatic tires and the user must
also be seated in the power chair in order to properly adjust the anti-tip wheels.

Summary of Contents for Quantum Jazzy series

Page 1: ...QUANTUM JAZZY Including Models Quantum 1650 2SPVHD Quantum 1650 3SPVHD Jazzy 1650 2EHD Jazzy 1650 3EHD S E R I E S 1 800 800 8586 US 1 888 570 1113 Canada...

Page 2: ...he symbols below are used throughout this owner s manual and on the power chair to identify warnings and important information Itisveryimportantforyoutoreadthemandunderstandthemcompletely WARNING Indi...

Page 3: ...50 Series www pridemobility com 3 I INTRODUCTION 4 II SAFETY 6 III YOUR POWER CHAIR 16 IV ASSEMBLY 21 V COMFORT ADJUSTMENTS 23 VI BATTERIES AND CHARGING 28 VII CARE AND MAINTENANCE 32 VIII WARRANTY 38...

Page 4: ...emove or renderinoperableorunsafeanyguards shields orothersafetyfeaturesofthisproduct fail refuse orneglecttoinstallany retrofit kits from time to time provided by Pride to enhance or preserve the saf...

Page 5: ...eb site at www pridemobility com From our home page select Owners Club to enter a page dedicated to current and potential Pride product owners You willgainaccesstointerviews stories recreationideas da...

Page 6: ...ive conditions This product has been tested and passed at an immunity level of 20 V m Read and follow the information in the owner s manual Maximum seating weight Unlocked and in freewheel mode Place...

Page 7: ...e operating Avoid exposure to rain snow ice salt or standing water whenever possible Maintain and store in a clean and dry condition Removal of grounding prong can create electrical hazard If necessar...

Page 8: ...llneed somepractice Simplytakeyourtimeandyouwillsoonbeinfullandconfidentcontrolasyoumaneuverthroughdoorways on and off of elevators up and down ramps and over moderate terrain Belowaresomeprecautions...

Page 9: ...h the downgrade of a ramp or other incline Takewideswingswithyourpowerchair sfrontwheelsaroundanytightcorners Ifyoudothat thepowerchair srear wheels will follow a wide arc not cut the corner short and...

Page 10: ...freewheel mode while seated on it Ask an attendant for assistance if necessary WARNING Do not place your power chair in freewheel mode while on an incline This could cause the chair to roll uncontrol...

Page 11: ...oidthatsurface Inclement Weather Precautions Exposureofyourpowerchairtoinclementweatherconditionsshouldbeavoidedwheneverpossible Ifsuddenlycaught up in rain snow severe cold or heat while operating yo...

Page 12: ...e manufacturerofthelift elevationproductbeforeusingthatproduct WARNING Never sit on your power chair when it is being used in connection with any type of lift elevation product Your power chair was no...

Page 13: ...power chair by any of its removable parts including the armrests seat foot riggings controller and shrouds Preventing Unintended Movement WARNING If you anticipate being seated in a stationary positio...

Page 14: ...eat to prevent the power chair from tipping forward during transfer WARNING Avoid putting all of your weight on the power chair armrests and do not use the armrests for weight bearing purposes such as...

Page 15: ...intendedmovementordamagetothecontrolsystem Everyelectrically poweredmobility vehiclehasanimmunity orresistance toEMI Thehighertheimmunitylevel thegreatertheprotectionagainstEMI This product has been t...

Page 16: ...cally the seat assembly includesthearmrests seatback andseatbase Thepowerbaseassemblyincludestwomotor brakeassemblies twodrive wheels two anti tip wheels two caster wheels two batteries and the electr...

Page 17: ...rivetrain Two motor mid wheel Batteries Two 12 volt deep cycle Group 24 Four 12 volt deep cycle NF 22 batteries extended range package Battery Charger 8 amp off board Weight Capacity Quantum 1650 Seri...

Page 18: ...he motors are heavily strained e g fromexcessiveloads thethermalfusewillreducetheamountofcurrentgoingtotheelectroniccontrollerby 60 Thecurrentwillautomaticallyreturnto100 whenthefusecoolstowithinitsno...

Page 19: ...w pridemobility com 19 BATTERY CONNECTORS THERMALFUSE Figure 7 Quantum Jazzy 1650 Series Electrical Components 4 battery configuration shown POWERMODULE BATTERY CONNECTORS MOTORS POWERBASEFRAME I I I...

Page 20: ...et an error code nine flashing lights on the controller To clear this code turn off the controller and place the power chair in drive mode Then turn on the controller The error message should be clear...

Page 21: ...ing in a less secure fit Replacement nylon insert lock nuts are available at local hardware stores or through your authorized provider specialist Seat Installation Thepowerchairseatisattachedtothepowe...

Page 22: ...seat is at the desired height 4 Insert the ball detent pins into each receiver 5 Install the armrests if necessary See figure 10 6 Loosen the setscrews on the controller mount See figure 13 7 Slidethe...

Page 23: ...hair components are heavy You may need assistance to lift or carry them Please refer to the specifications table for specific component weights before you disassemble the power chair WARNING Remove th...

Page 24: ...1 Remove the armrest from the armrest lock 2 Loosenthehardwarethatfastenthearmrestlocktothe seat base side rail See figure 11 3 Slide the armrest lock forward or rearward along the seat base side rai...

Page 25: ...thearmrestwithwireties 9 Plug the controller cable back into the power base Foot Platform Height Adjustment The foot platform height is easily adjusted to several different heights To raise or lower t...

Page 26: ...wheels are preset at the factory for smooth surfaces or indoor use only If you plan on using your power chair on rough surfaces it may be necessary to adjust the anti tip wheels to better suit your n...

Page 27: ...on the inner locknut of the anti tip bracket located in front of the shock strut See fig ure 16 2 Turnthelocknutcounterclockwisetoloosen 3 Placethe1 2 in wrenchontheadjustablecamlocated on the other s...

Page 28: ...st recharge your power chair s batteries with the supplied charger Do not use an automotive type battery charger WARNING Read the battery charging instructions in this manual and in the manual supplie...

Page 29: ...or five charging cycles the batteries will top off at 100 charge and last for an extended period Frequently Asked Questions FAQs How does the charger work Thebatterychargertakesthestandardelectricalou...

Page 30: ...hyourpowerchair WARNING Corrosive chemicals contained in battery Use only AGM or Gel Cell batteries to reduce the risk of leakage or explosive conditions Why do my new batteries seem weak Deep cycleba...

Page 31: ...e Disconnect the battery harnesses and store the power chair in a warm dry environment Avoid temperature extremes such as freezing and excessively hot conditions and never attempt to charge a frozen b...

Page 32: ...wer chair to your authorized provider specialist Power chairs that are frequently exposed to sources of water such as incontinence should be inspected often for corrosion and electronic components may...

Page 33: ...st if necessary Ensurethatallpartsofthecontrollersystemaresecurelyfastenedtoyourpowerchair Donotovertightenanyscrews Check for proper tire inflation There should be 35 psi 2 4 bar in each tire If a ti...

Page 34: ...talframecomponents plasticcomponents electronics andbatteries Cleaning and Disinfection Useadampclothandmild non abrasivecleansertocleantheplasticandmetalpartsofyourpowerchair Avoidusing products that...

Page 35: ...e wheel back onto the axle Make sure the key is in the axle slot 10 Reinstallthedrivewheelnutandwasherontothewheelaxleandtighten 11 Inflate the pneumatic tire to 35 psi 2 4 bar 12 Remove the power cha...

Page 36: ...urn off the power to the controller 2 Make sure that the power chair is in drive mode See III Your Power Chair 3 Unplugthecontrollercommunicationscablefromthepowerbase 4 Remove the seat 5 Liftoffthesh...

Page 37: ...arnesses Cracked or broken connectors Uneven wear on any of the tires Jerkymotion Pullingtooneside Bent or broken wheel assemblies Does not power up Powers up but does not move Corrective Maintenance...

Page 38: ...gging mounting brackets 18 MONTH LIMITED WARRANTY Foreighteen 18 monthsfromthedateofpurchase Pridewillrepairorreplaceatouroptiontotheoriginalpurchaser free of charge any of the following parts found u...

Page 39: ...through heavy use is not covered SERVICE CHECKS AND WARRANTY SERVICE Warrantyservicemustbeperformedbyanauthorizedprovider specialist DonotreturnfaultypartstoPridewithoutprior writtenauthorization Allt...

Page 40: ...40 www pridemobility com Quantum Jazzy 1650 Series N O T E S...

Page 41: ...Quantum Jazzy 1650 Series www pridemobility com 41 N O T E S...

Page 42: ...42 www pridemobility com Quantum Jazzy 1650 Series N O T E S...

Page 43: ......

Page 44: ...Control Quantum Jazzy 1650 Series Inclusion of all Parts JoystickSerialNumber ControllerSerialNumber LeftMotorSerialNumber RightMotorSerialNumber Fit and Finish Performance Product Serial Pride keeps...

Reviews: