J
et 2 HD
www.pridemobility.com
19
V . C O M F O R T A D J U S T M E N T S
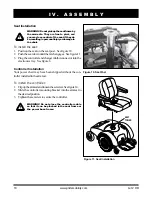
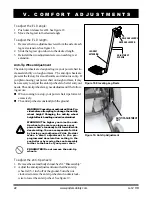
Figure 12. Seat Height Adjustment
NUT
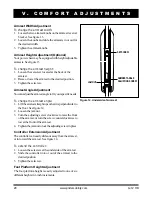
Figure 13. Armrest Width and Height
Adjustment
ARMREST KNOB
COMFORT ADJUSTMENTS
After you have become familiar with your power chair’s opera-
tion, you may find the need to adjust the seat. There are some
adjustments you can make to increase your comfort such as seat
height and angle, armrest height and angle, footrest height and
angle, and controller position.
WARNING! If your power chair was configured
at your authorized Pride Provider, please consult
your healthcare professional before changing
the seat position or making any other adjust-
ment. Some adjustments may degrade you
power chair’s performance and safety by chang-
ing its center of gravity.
WARNING! Some power chair components are
heavy. You may need assistance to lift or
carry them. Please refer to the specifications
table for specific component weights before
you disassemble the power chair.
WARNING! Prevent injury. Remove the
occupant from the power chair before making
any adjustments.
You may need the following to make comfort adjustments:
!
metric/standard socket set and ratchet
!
adjustable wrench
!
thread lock
Seat Height Adjustment
You can change the seat height manually.
To change the seat height:
1. Remove the seat. See VI. “Disassembly.”
2. Remove the nut and bolt from the seat post. See figure 12.
3. Raise or lower the seat post to the desired position.
4. Install the nut and bolt into the seat post.
5. Install the seat.
SETSCREW
BOLT
NOTE: Any nylon insert lock nut removed during the dis-
assembly or adjustment of the power chair must be replaced
with a new nut. Nylon insert lock nuts should not be re-
used as it may cause damage to the nylon insert, resulting
in a less secure fit. Replacement nylon insert lock nuts are
available at local hardware stores or through your autho-
rized Pride Provider.


