background image

Riser Recliner Series                                         www.pridemobility.com                                                                         13

RISER RECLINER SERIES

“CLICK”

IV. ASSEMBLY/DISASSEMBLY

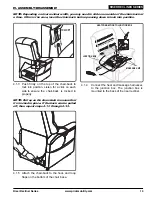
NOTE: Depending on riser recliner width, you may need to slide on one side of the chair-back at

a time. If this is the case, level the chair-back before pressing down to lock into position.

4.1.3 Push firmly on the top of the chair-back to

lock into position. Listen for a click on each
side to ensure the chair-back is locked in
properly.

NOTE: Pull up on the chair-back to ensure that

it is locked in place. If the back can be pulled

off, then repeat steps 4.1.1 through 4.1.3.

4.1.5 Attach the chair-back to the hook and loop

flaps on the bottom of the chair base.

4.1.4

Connect the heat and massage harnesses
to the junction box. The junction box is
mounted to the back of the riser recliner. 

HEAT CONNECTION TO JUNCTION BOX

MASSAGE UNIT

JUNCTION BOX

Summary of Contents for 200KD

Page 1: ...INFMANU1768 S E R I E S Pride Mobility Products Ltd 32 Wedgwood Road Bicester Oxon OX26 4UL UK www pridemobility com RISER RECLINER...

Page 2: ...llow designated procedures can cause either personal injury component damage or malfunction On the product this icon is represented as a black symbol on a yellow triangle with a black border MANDATORY...

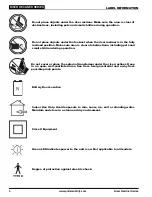
Page 3: ...ll of the symbols may be used on your riser recliner model Pinch Crush Points Hazard Do not place objects or appendages in the path of moving parts Read and follow the information in the owner s manua...

Page 4: ...objects under the riser recliner Make sure the area is clear of obstructions including pets and small children during operation Degree of protection against electric shock Do not place objects under...

Page 5: ...E AND OPERATION TEMPERATURES 7 EMI RFI 8 SHIPPING AND DELIVERY 8 MOTOR VEHICLE TRANSPORT 8 III YOUR RISER RECLINER 9 BODY COMPONENTS 9 ELECTRICAL COMPONENTS 11 IV ASSEMBLY DISASSEMBLY 12 RISER RECLINE...

Page 6: ...r Pride product can result in personal injury or product damage and will void Pride s product warranty PURCHASER S AGREEMENT By accepting delivery of this product you promise that you will not change...

Page 7: ...MODIFICATIONS Pride has designed and engineered your riser recliner to provide maximum comfort and utility However to prevent personal injury and or damage to your riser recliner you should not modify...

Page 8: ...ss B product meaning the riser recliner uses RF energy only for its internal function Therefore its RF emissions are very low and are not likely to cause any interference in nearby electronic equipmen...

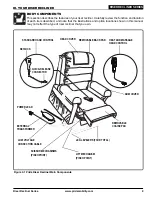
Page 9: ...on locations shown in this manual may not reflect the type of riser recliner that you own III YOUR RISER RECLINER Figure 3 1 Pride Riser Recliner Main Components HEAD COVER STANDARD HAND CONTROL REMOV...

Page 10: ...moving the mattress it is recommended that you store it in the bag provided NOTE If your riser recliner is equipped with a removable back and or chaise pad and has the heat and massage option disconne...

Page 11: ...ctions of the riser recliner Refer to V Operation for more information The hand control may be equipped with a quick release connector Fig 3 5 which enables the user to detach the hand control from th...

Page 12: ...r Set up If your riser recliner is not a KD model proceed to Riser Recliner Placement RISER RECLINER SET UP KD models will arrive in the knock down position Fig 4 1 Figure 4 1 Knock Down KD Position F...

Page 13: ...chair back to lock into position Listen for a click on each side to ensure the chair back is locked in properly NOTE Pull up on the chair back to ensure that it is locked in place If the back can be p...

Page 14: ...problem at any point during the set up and positioning of your riser recliner stop and contact your authorised Pride Dealer immediately To avoid personal injury and or product damage do not plug the u...

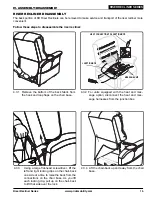
Page 15: ...the hook and loop flaps on the chair base 4 3 4 Lift the chair back up and away from the chair base 4 3 3 Using a large flat head screwdriver lift the left and right locking clips on the chair back on...

Page 16: ...cissor mechanisms Keep hands and feet clear of these areas Always leave the riser recliner in an upright and closed position when not in use Do not sit or stand on the footrest Do not drop into the ri...

Page 17: ...the riser recliner reaches a height where you can stand up comfortably Figure 5 2 Heat and Massage Hand Control HEAT BUTTON UP BUTTON UNLOCK LED LOCK UNLOCK BUTTON LOCK LED DOWN BUTTON MASSAGE SETTIN...

Page 18: ...sity of the massage function Fig 5 2 1 Press the INTENSITY button once to set the massage option to low 2 Press the INTENSITY button again to set the massage option to the next of three available sett...

Page 19: ...Fig 5 1 The keylock feature is intended to disable all functions of the hand control to prevent unintended movement when the riser recliner is occupied but sta tionary as well as when the riser reclin...

Page 20: ...ates allow the riser recliner to remain in a stationary position for 10 minutes to allow the motor to cool then resume normal operation If you notice the motors overheating frequently contact your aut...

Page 21: ...r You can find the serial number in two locations one is near the rear of the motor on the steel lift mecha nism and the second is attached to the frame below the scissor mechanisms The model number f...

Page 22: ...o not smoke cigarettes while seated in or using your riser recliner although the riser recliner has passed the necessary testing requirements for cigarette smoking You must adhere to the following saf...

Page 23: ...t to replace only the part of the steel lift mechanism that may be defective NOT COVERED UNDER WARRANTY The following parts are classed as wear items which may under normal wear and tear require repla...

Page 24: ...cliner Exceeding the weight capacity voids your Pride Riser Recliner warranty APPENDIX A RISER RECLINER WEIGHT CAPACITY Model Number Rated Weight Capacity LC101 C10KD C15KD 147 kg 23 stone 325 lbs All...

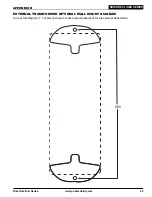
Page 25: ...Series www pridemobility com 25 RISER RECLINER SERIES APPENDIX B EXTERNAL TRANSFORMER OPTIONAL WALL MOUNT DIAGRAM Cut out this diagram 1 1 scale and use to mark area of placement for the external tra...

Page 26: ...This page intentionally left blank...

Page 27: ...llow designated procedures can cause either personal injury component damage or malfunction On the product this icon is represented as a black symbol on a yellow triangle with a black border MANDATORY...

Page 28: ...INFMANU1768 S E R I E S Pride Mobility Products Ltd 32 Wedgwood Road Bicester Oxon OX26 4UL UK www pridemobility com RISER RECLINER...

Reviews: