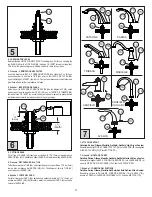
Price Pfister 806 Series Instruction Sheets Download Page 5

5

8.  ATTACHING SPOUT

Georgetown or Carmel:

Place LOWER WASHER (8B) over ANCHOR (8F), then SPOUT BASE (8E), and 

UPPER WASHER (8D). Carefully align these three items and assemble and align 

QUICK CONNECT SPOUT (8A) onto ANCHOR (8F) and tighten LONG SET SCREW 

(8C). Place BUTTON (8G).

8.  Français :  MONTAGE DU BEC

Georgetown, ou Carmel :

Placez la RONDELLE INFÉRIEURE (8B) sur L’ANCRAGE (8F), puis la BASE DU 

BEC (8E), et la RONDALLE SUPÉRIEURE (8D). Alignez soigneusement le tout et 

montez et alignez le BEC À CONNEXION RAPIDE (8A) sur L’ANCRAGE (8F) et serrer 

la VIS DE FIXATION LONGUE (8C). Poser le CAPUCHON (8G).

8.  Español:  CONEXIÓN DE EL SURTIDOR

Georgetown, ó Carmel:

Ponga la RONDANA INFERIOR (8B) sobre el ANCLA (8F), la BASE DE LA DUCHA 

(8E), y la RONDANA SUPERIOR (8D). Cuidadosamente alinee estas tres piezas y 

ensamble y alinee la DUCHA DE CONEXIÓN RÁPIDA (8A) al ANCLA (8F) y apriete 
el TORNILLO DE PRISIONERO LARGO (8C). Coloque el BOTÓN (8G).

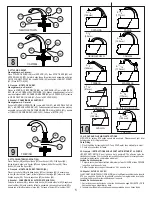
10.  AIR GAP AND FLUSHING INSTRUCTIONS

AIR GAPS for various RT6 series spouts are as shown. Please consult your local 

building code for Air Gap restrictions.

Flush Fitting:

1. Flush the 

fi

 tting by running both HOT and COLD water lines until water is clear. 

2.  Check all connections for leaks.

10.  Français :  INSTRUCTIONS SUR L’ECART ANTI-RETOUR ET LA PURGE

L’ÉCART ANTI-RETOUR pour les becs de la gamme RT6 s’effectue selon les 

illustrations ci-dessus. Pour connaître les restrictions s’appliquant a l’écart anti-retour, 

consulter le règlement de construction municipal.

Vaciado De Los Accesorios :

1.  Purger le raccord en faisant jaillir en même temps l’eau CHAUDE et l’eau FROIDE 

jusqu’à ce que l’eau soit claire.

2. Véri

fi

 er tous les raccords pour s’assurer qu’il n’y a pas de fuite.


10. Español:  ALTURA Y VACEO

Los BOQUETES (INTERVALOS DE AIRE) para los diferentes surtidores de la serie 

RT6 son según se ilustra. Es importante consultar los reglamentos locales de 

construcción para veri

fi

 car las restricciones al respecto.

Vaciado De Los Accesorios:

1.  Vaciar los accesorios haciendo correr las dos líneas de agua CALIENTE y FRÍA 

hasta que el agua salga limpia y clara.

2.  Inspeccionar todas las conexiones para asegurarse de que no hayan fugas.

10

9.  ATTACHING TREVISO SPOUT (9A)

Place Washer (9B) and Spout Base (9C) over Anchor (9D).  With Spout (9A) 

facing forward, align onto Anchor (9D) and tighten with Set Screw (9E). Place 

Button (9F) onto the Spout (9A).

9.  Français :  MONTAGE DU BEC TREVISO (9A)

Placer la rond elle (9B) et la base du bec (9C) sur l’ancrage (9D). S’assurer que 

le bec (9A) tourné vers l’avant, joint et alignez sur l’ancrage (9D) et serer la vis de 

fi

 xation longue (9E). Poser le capuchon (9F) sur du bec (9A).

9.  Español:  CONEXIÓN DE EL SUTRIDOR TREVISO (9A)

Coloque la rondana (9B) y la base de la ducha (9C) sobre el ancla (9D). Asegúrese 

que el surtidor (9A) esté mirando al frente, ensamble y alinee sobre el ancla (9D) y 

apriete con el tornillo prisionero lorgo (9E). Coloque el boton (9F) al surtidor (9A).

8A

GEORGETOWN

CARMEL

8B

8C

8D

8E

8F

8G

8A

8B

8C

8D

8E

8F

8G

AVALON

5-

3

/

16

(148mm)

5-

1

/

2

(140mm)

6-

11

/

16

(170mm)

3-

3

/

16

(81mm)

6-

13

/

16

(173mm)

2-

1

/

2

(35mm)

6-

3

/

8

(171mm)

5-

3

/

4

(146mm)

6-

1

/

8

(155mm)

MARIELLE

TRIBECA

CATALINA

CARMEL 

PARISA

GEORGETOWN

ASHFIELD

ASHFIELD HIGH ARC

9A

9D

9C

9F

9E

9B

TREVISO

6-

15

/

32

"

(165mm)

TREVISO

Summary of Contents for 806 Series

Page 1: ...eld Wave Handles Catalina Decorative Lever Treviso Decorative Lever Marielle Decorative Lever Avalon Decorative Lever Bec Manettes Décoratif Manettes Décoratif Ashfield Poignées en Foime de Vague Ashfield Levier Décoratif Catalina Levier Décoratif Treviso Levier Décoratif Marielle Levier Décoratif Avalon Surtidor Manijas Decorativas Manijas Decorativas Ashfield Manivelas Ondeadas Ashfield Palanca ...

Page 2: ...va llave de agua de Price Pfister un mínimo de 25 PSI de presión de agua es recomendable HERRAMIENTAS NECESARIAS Tenazas Linterna Toalla Destornillador Phillips Llaves de ajuste Destornillador de Tuercas de encaje 1 PTFE Cinta de Plomería Masilla de Plomería Su llave de Price Pfister es fácil de instalar cuando se usan algunas herramientas básicas y cuando se siguen las instrucciones ilustradas en...

Page 3: ... be sure to remove cartridges from the bodies DO NOT disassemble cartridge unit 1 To connect Valve Inlets use 1 2 I D Copper Tubbing 5 8 O D and Solder ReĆinstall cartridges into valves once heat has dissipated from the body TO CONNECT INLET SUPPLIES Quick Connect 2 Use any Quick Connect Flexible tubing with a 1 2 Ć14 NPSM thread Not Supplied Français POUR RACCORDER LES ROBINETS AU TÉ tube en cuiv...

Page 4: ...s DÉCOUPAGE DE LA TIGE Tailler lasommet de la TIGE 6A en laissant dépasser une saillie de 1 16 po 2mm tout au plus au dessus de l ANCRE 6B 6C Chanfreiner et limer la TIGE 6A avant de poser l ANCRE 6B 6 Español CORTE DEL CAÑO Cortar el trompo del CAÑO 6A dejando una saliente máxima de 1 16 2mm por encima del ANCLA 6B 6C Biselar y quitar las rebabas del CAÑO 6A antes de colocar el ANCLA 6B 6 7 ATTAC...

Page 5: ...Purger le raccord en faisant jaillir en même temps l eau CHAUDE et l eau FROIDE jusqu à ce que l eau soit claire 2 Vérifier tous les raccords pour s assurer qu il n y a pas de fuite 10 Español ALTURA Y VACEO Los BOQUETES INTERVALOS DE AIRE para los diferentes surtidores de la serie RT6 son según se ilustra Es importante consultar los reglamentos locales de construcción para verificar las restricci...

Page 6: ...S 13A Reverse the above procedure for handle removal Treviso and Avalon Decorative Lever Trim Attach HANDLE HUBS 13A onto STEMS 13E and secure with SCREW 13F Reverse the above procedure for handle removal Ashfield and Marielle Handle Attachment Place Seal Rings 13G against the bottom of Hubs 13H Thread handles onto End Bodies 13J by holding the Lever 13K in place and tighten Hubs 13H Reverse the a...

Page 7: ...out en Chrome 7 CATALINA 931 980 971 940 975 026 975 600 950 194 960 016 950 195 CARMEL PARISA GEORGETOWN TRIBECA MARIELLE 975 026 975 026 941 044 971 702 940 047 960 048 Catalina 960 010 Parisa Georgetown Carmel Treviso 960 058 Tribeca 940 027 971 013 971 014 941 900 971 703 950 895 971 491 940 496 940 495 910 055 910 055 949 005 949 005 910 055 949 005 940 981 Porcelain White Porcelaine Blanche ...

Page 8: ...ca y sobre el Acabado Limitada de por Vida Cubre las funciones y el acabado por el tiempo en que usted sea propietario de su casa Las Aplicaciones Comerciales Limitan la Duración de las Garantías Price Pfister suministra las siguientes Garantías para sus productos Es posible que se requiera la presentación de una Prueba de compra para obtener cualquiera de los beneficios indicados a continuación G...

Reviews: