background image

42

MBOX® 2016 DUAL OUTPUT HARDWARE MANUAL

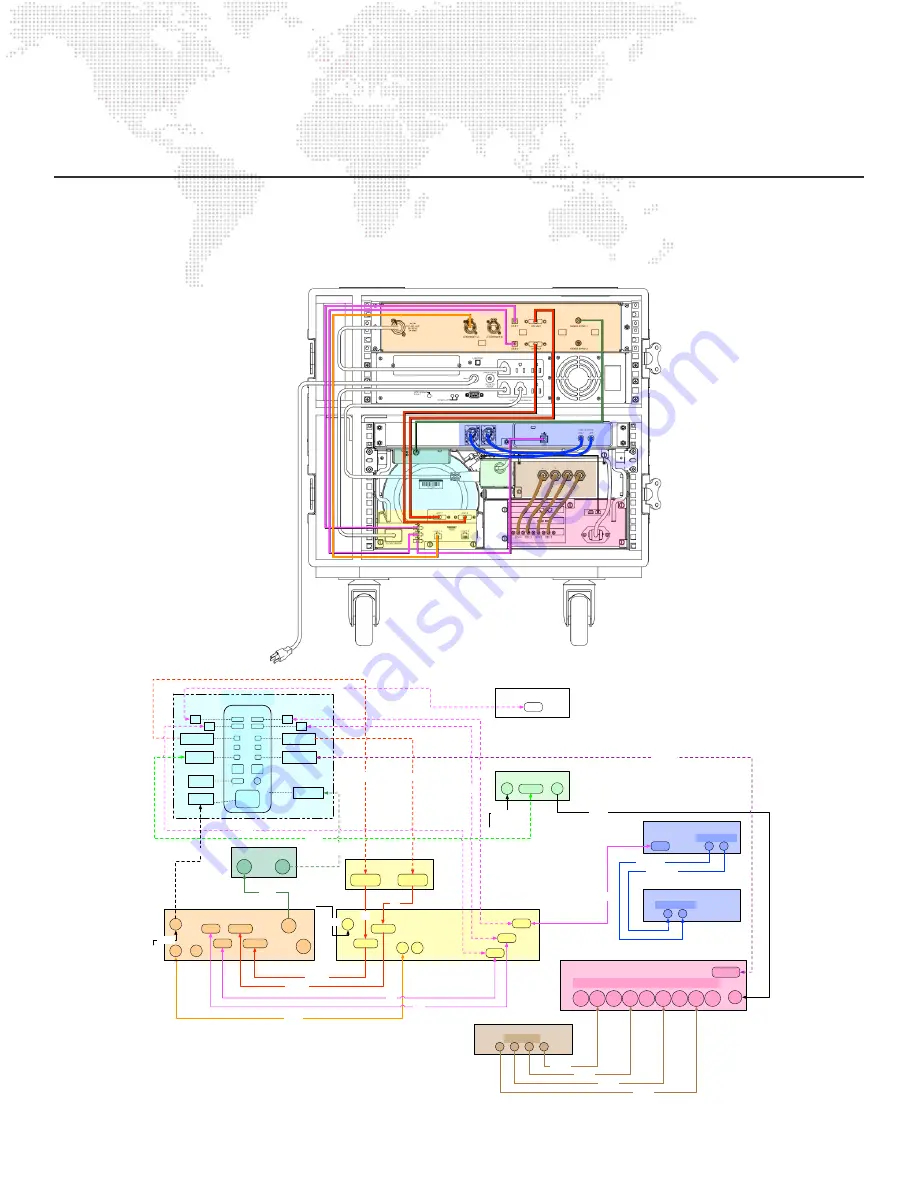
INTRA-RACK CONNECTIONS


Diagrams

This diagrams below show the cable connections between equipment in the Mbox 2016 Dual Output rack.  For added 
clarity, colors have been assigned to specific equipment and signal types.

Sonnet xMac Front Panel

USB

Focusrite Scarlett 2i2 Rear Panel

R

L

1/4” TS Connectors

USB

                                   Sonnet xMac Rear Panel A

DVI 1

DVI 2

Enet 

1

Enet 

2

USB 1

USB 2

USB 3

AC 

IN

Sonnet xMac Rear Panel B

(PCI Card Cage)

Out 

4

In 4

Out 

3

In 3

Out 

2

In 2

Out 

1

In 1

Ref

DIN Coax Connectors

(These are ordered from RIGHT to LEFT when viewed from the rear!!)

AC 

IN

T-Bolt

Ethernet

Video In Panel (Front of Sonnet xMac)

1

2

3

4

BNC Connectors

Focusrite Scarlett 2i2 Front Panel

L

R

XLR3M Connectors

Mbox I/O Module Rear Panel

Enet 

A

Enet 

B

AC 

IN

DVI 1

DVI 2

Sync 

1

USB 1

USB 2

Sync 

2

Audio Out Right

Audio Out Left

Video In 1

Video In 2

Video In 3

Video In 4

Genlock Controller

Sync 

In

Sync 

Out

Relay Unit

AC 

IN

FW800

AC 

OUT

AC Power

AC Power

AC Power

MacPro Connections

USB 2

USB 3

USB 1

USB 4

TB 2

TB 1

TB 4

TB 3

TB 6

TB 5

Enet 1

Enet 2

HDMI

IEC

MDP to DVI Adapter

for DVI 1

MDP to DVI Adapter

for DVI 2

Thunderbolt cable to

Sonnet PCIe Bridge

Thunderbolt to

FireWire Adapter

IEC cable from

Rear Panel 

HDMI cable to 

Rear Panel

USB

USB

USB

USB

Sync Cable from 

bottom of MacPro

AC Power

FW800

Video DVI 1

Video DVI 2

Sync

USB

USB

USB

Thunderbolt

Mbox 2016 Dual Output Cable Connections

Note: Dashed lines denote cables that run from the Mac Pro to items in the rack.

Solid lines denote cables that run from connections on the rear of the rack to other

connections on the rear of the rack.

Sync In

DVI Bulkhead

Bulkhead 1

Bulkhead 2

MDP to DVI

MDP to DVI

DVI

DVI

USB

USB

USB

USB

AC Power

Summary of Contents for MBOX 2016

Page 1: ...MBOX 2016 DUAL OUTPUT MEDIA SERVER HARDWARE MANUAL rev A 2016 DUAL OUTPUT HARDWARE WWW PRG COM ...

Page 2: ...red trademarks of their respective companies This manual is for informational use only and is subject to change without notice Please check www prg com for the latest version PRG assumes no responsibility or liability for any claims resulting from errors or inaccuracies that may appear in this manual Mbox 2016 Dual Output Hardware Manual Version as of September 20 2017 rev A PRG part number 02 980...

Page 3: ...r Up Procedure 12 Chapter 2 Dual I O Module Operation Overview Function 14 Connected Display Devices and EDID Overview 15 Switching Between Standard EDID or Capturing EDID 17 Possible Issues with EDID and the I O Module 19 Frequency Selection 21 SDI Output Overview 21 Configuration 21 Genlock Generator Lock Overview 23 Genlock and the Dual I O Module 23 DMX and Ethernet Overview 25 DMX 25 Ethernet...

Page 4: ...Routine Maintenance Cleaning or Replacing the Air Filter 36 Removing the Computer 37 Removing the PCIe Card Cage 38 PCIe cards Overview 39 Replacing PCIe Cards 39 Additional Peripherals Overview 39 Appendix B Intra rack Connections Intra rack Connections Diagrams 42 ...

Page 5: ...v MBOX 2016 DUAL OUTPUT HARDWARE MANUAL REVISION HISTORY This manual has been revised as follows Version Release Date Notes revA September 20 2017 Initial Release ...

Page 6: ...soles and Martin M Series consoles Additional Documentation For more information about DMX512 and sACN protocols refer to the following documents available from the American National Standards Institute ANSI at www ansi org ANSI E1 11 2008 R2013 Entertainment Technology USITT DMX512 A Asynchronous Serial Digital Data Transmission Standard for Controlling Lighting Equipment and Accessories ANSI E1 ...

Page 7: ...2 MBOX 2016 DUAL OUTPUT HARDWARE MANUAL Notes ...

Page 8: ...1 HARDWARE This chapter provides an overview of the Mbox 2016 Dual Output hardware and its setup HARDWARE COMPONENTS HARDWARE SETUP 1 ...

Page 9: ...R NE T INPUT 2 INPUT 1 R DM Tx R DM R x DMX R x POR T 1 POR T 2 POWE R B A Tx R x C OMPUTE R LINK E DID CAPTUR E OUTPUT 1 S DI 1 A B GE NLOCK 1 OUT IN PR E VIE W DIM ACTIVE US B DVI 1 VGA 1 E DID CAPTUR E S TAGE B LACK OUT PR E VIE W DIM ACTIVE US B S DI 2 GE NLOCK 2 DVI 2 PR E VIE W 2 VGA 2 A B IN OUT OUTPUT 2 Dual I O Module HDMI E NE T A E NE T B DVI 1 DVI 2 100 240V 50 60Hz 1 2 3 2 3 4 1 LE FT...

Page 10: ...s switch is used when switching between the built in EDID sets and when capturing EDID from any EDID Extended Display Identification Data compliant device Preview Outputs The module provides two 2 preview outputs DVI and HD SDI The preview outputs are for local monitors and are not affected by the hardware dimmer in the Dual I O module controlled by the intensity channel on the Master fixture EDID...

Page 11: ... sACN signal to more than one Mbox server With one connector acting as the in and the other acting as the through Note If the I O Module is receiving DMX512 data then Ethernet cables would not normally be connected between either of the Ethernet connectors on the front of the I O Module and another Mbox server Rear Panel Components AC Input The I O Module uses a Neutrik PowerCON connector for powe...

Page 12: ...ro Computer The bottom of the Mac Pro computer extends through the front of the xMac s front panel This allows for air to be drawn through the computer for cooling purposes Filter Panel Foam behind the front panel acts as a filter for the air that cools the PCIe cards The entire front panel can be removed to access the filter for cleaning purposes Video Inputs These four connectors allow HD SDI vi...

Page 13: ...vide DVI signals to the IO Module Normally both connectors will have a DVI cable connected to them Ethernet These connectors provide gigabit Ethernet interfaces from the Mac Pro Normally only the connector labeled Enet A will have a cable connected to it This cable connects to the Ethernet A connector on the rear of the IO Module HDMI This connector is not used and should not have anything plugged...

Page 14: ...ains a modified graphics card which allows the computer s video output to be locked to genlock reference sync Ethernet Two Ethernet cables connect between the Mac Pro and the xMac unit s rear panel USB The Mac Pro has four USB connections three to the xMac unit s rear panel and one to the front panel Thunderbolt The Mac Pro has one Thunderbolt connection to the xMac unit s rear panel DVI Two Thund...

Page 15: ... power MUST be turned OFF Direct Monitor Allows input to be routed directly to the outputs Monitor Used to adjust audio output level USB Indicator LED Illuminates when the interface has a USB connection to the Mac Pro Headphones Not used in normal operation Note Refer to Chapter 4 USB Audio Interface for information on the correct default settings for the audio interface s switches and potentiomet...

Page 16: ... connectors Step 5 Connect local monitor power cables to UPS or to local AC power service Step 6 Connect UPS power cable to local AC power service Step 7 Connect video output Stage connectors according to the following sections Remove covers Remove keyboard and trackball 1 2 3 SDI 2 SDI 3 SDI 4 SDI 1 HDMI E NE T A E NE T B DVI 1 DVI 2 100 240V 50 60Hz 2 3 4 1 RESET LE FT R IGHT LINE OUTPUTS USB LE...

Page 17: ...n the rear of the xMac unit or use one of the two auxiliary Ethernet connections on the NIC in the PCIe card cage The Mac Pro computer s two built in Ethernet interfaces have preset addressing for the Art Net sACN control and general networking Changing these settings may lead to a loss of functionality though some exceptions may apply in certain cases e g pixel mapping refer to the Mbox Remote Us...

Page 18: ...1 DUAL I O MODULE This chapter provides additional information on the setup and use of the Dual I O Module OPERATION OVERVIEW CONNECTED DISPLAY DEVICES AND EDID SDI OUTPUT GENLOCK DMX AND ETHERNET 2 ...

Page 19: ...on and frequency that the computer is outputting provided that resolution and frequency are compatible with the output signal type see below The module can blackout or partially dim the video output signals to levels below full brightness This can be done from the control console or Mbox Director from the Mac computer or by using the Stage Blackout and or Preview Dim switches on the front of the I...

Page 20: ...t the display is currently set to Older versions of the Mbox application attempted to change the resolution and frequency of outputs when entering Fullscreen mode At times this could lead to confusing situations where the desired resolution or frequency were not applied or where the display device could not display a picture based on the received format To eliminate these issues Mbox v4 will not c...

Page 21: ...ort the desired format Note The arrangement of connected display devices is in the System Preferences Displays pref pane not important to the Mbox application However it may be helpful to arrange display devices to provide a useful working environment when the Mbox application is in Window mode Default EDID Sets and EDID Capture The Dual I O Module can operate with one of three default EDID sets o...

Page 22: ... pane Note Additional frequencies e g 75Hz may be available in the default EDID sets but only when certain VESA resolutions are selected Switching Between Standard EDID or Capturing EDID The I O Module s current EDID set can be changed using the Stage Blackout Preview Dim and EDID Capture switches on the front of the I O Module The position of the first two switches Yes or No when the third switch...

Page 23: ...d down option and click on the Detect Displays button Confirm that the pref pane s header now shows the name of the selected EDID set Step 7 On the Displays pref pane select the desired resolution and frequency clicking on the Scaled radio button to find additional resolutions as required Step 8 Relaunch the Mbox application set it to window mode if necessary On the Outputs tab confirm that the di...

Page 24: ...nd additional resolutions as required Step 9 Relaunch the Mbox application set it to window mode if necessary On the Outputs tab confirm that the display now shows the new resolution and frequency WARNING If the indicator LED does not illuminate solidly as in Step 6b then no EDID has been captured from the connected device Confirm that the device is connected to one of the DVI VGA connectors that ...

Page 25: ...itor if not make sure that the Mbox application is either in window mode or is not running Step 4 Open the System Preferences Displays pref pane and press the Gather Windows button to get the pref panes for both outputs onto that monitor Step 5 Change the EDID set on the I O Module s second output to a different set or capture EDID from the connected display device Hold down option and press the D...

Page 26: ...odule s built in EDID in most cases a selected resolution will offer more than one frequency with the same value The FIRST option with the desired frequency should always be selected Choosing any option other than the first may result in the output not running at exactly the desired frequency and or no SDI output Additionally when using the I O Module s built in 59 94Hz EDID set the listed availab...

Page 27: ... signal but HD SDI monitors can display SD SDI signals When the computer has been configured to output an SDI compatible resolution and frequency the SDI indicator LED to the left of SDI connector A will illuminate If the LED does not illuminate then the I O Module is not outputting SDI and the selected EDID set and the resolution and frequency should be checked Because the Mbox v4 software requir...

Page 28: ...point With all the devices in a video system being synchronized in this manner tearing on outputs or between outputs and tearing when switching between sources can be avoided Note In most cases the output capture device must already be set to output or capture at the exact same refresh frequency as the reference signal This is true for the Mbox system Genlock and the Dual I O Module A genlock refe...

Page 29: ... red and one green which function as follows If the controller is receiving power from the I O Module but no sync data the red LED will turn on When the controller is receiving sync data i e when a genlock input is connected to the I O Module the green LED will turn on and the red LED will turn off When a genlock signal is connected to the I O Module the Genlock Indicator LED to the left of the Ge...

Page 30: ...possible or necessary for these connections there are some important considerations when they are being used DMX The Dual I O Module has two DMX input connectors on its front panel The I O Module converts the two received DMX universes into two Art Net universes The resulting Art Net is placed onto the Ethernet section of the I O Module for distribution on any of the Ethernet connectors The two DM...

Page 31: ...ead Large control networks more than 30 universes may be negatively affected by the slow speed of the I O Module s non gigabit Ethernet speed Because it has no management capability the switch performs no routing This means that multicast traffic e g sACN cannot be filtered and will be present on all the Ethernet connections to from the I O Module Some lighting consoles processing networks e g MA ...

Page 32: ...1 CAPTURE CARD This chapter provides information regarding the use of the Blackmagic Decklink Quad capture card for video input and output OPERATIONAL OVERVIEW INPUT OUTPUT 3 ...

Page 33: ...ur input connectors of the capture card are internally connected to the rear of the four BNC connectors on the front of the Mbox rack The internal connections are made with a special adapter cable due to the DIN 1 0 2 3 connectors on the capture card Input In standard configuration no changes need to be made to the capture card s configuration or connections to support use for video input SDI vide...

Page 34: ...ed output connector Step 3 Open the System Preferences Blackmagic Desktop Video pref pane and adjust the following output properties as desired a PsF Output on off for Progressive Segmented Frame output the off option should be selected unless PsF is specifically required b Remove Field Jitter on Pause on off the off option is recommended c Idle Output Black Last Frame Shown the Black option is re...

Page 35: ...30 MBOX 2016 DUAL OUTPUT HARDWARE MANUAL Notes ...

Page 36: ...USB AUDIO INTERFACE This chapter provides information regarding the use of the Focusrite Scarlett 2i2 USB Audio interface OPERATIONAL OVERVIEW AUDIO OUTPUT AUDIO INPUT LTC 4 ...

Page 37: ...balanced line level signal but the audio interface will also accept an unbalanced and or instrument level input For audio input into Mbox the audio source and input channel must be selected on the application s Preferences tab With the standard audio interface the source selection would be Scarlett 2i2 USB It does not matter which input channel 1 or 2 left or right is used for LTC input But depend...

Page 38: ...nnels would normally be set to 2 When setting the number of channels some exceptions do exist depending on the number of channels in the actual audio file Refer to Audio Output on page 99 of the Mbox software user manual for information on configuring the Mbox application for audio output The Scarlett 2i2 interface has several adjustments that can be made to affect the output signal Direct Monitor...

Page 39: ...34 MBOX 2016 DUAL OUTPUT HARDWARE MANUAL Notes ...

Page 40: ...1 MAINTENANCE This appendix contains procedures for extended care of the Mbox 2016 Dual Output server ROUTINE MAINTENANCE PCIE CARDS ADDITIONAL PERIPHERALS A ...

Page 41: ...sconnect power from the server Step 2 At the front of the rack remove six screws to release front panel Step 3 Remove the front panel and air filter Step 4 Clean filter with compressed air or water If water is used allow to dry fully before use Step 5 Re install filter and front panel Figure B 1 Air Filter Removal ...

Page 42: ...ctor from the front of the Genlock Controller the 3 5mm plug from the back side of the Genlock Controller and the FireWire cable between the computer and the Power Relay unit Step 2 At the rear of the xMac unit loosen the three retaining fasteners that hold the computer enclosure into the xMac unit Step 3 At the front of the rack remove the front panel Refer back to Figure B 1 Air Filter Removal o...

Page 43: ...e Thunderbolt cable has shell with a screw down retainer The Din 1 0 2 3 connectors for the capture card have a locking collar that must be retracted when disconnecting the cable Step 2 At the rear of the xMac unit loosen the five retaining fasteners that hold the card cage into the xMac unit Step 3 At the front of the rack remove the front panel and air filter Refer back to Figure B 1 Air Filter ...

Page 44: ...ITIONAL PERIPHERALS Overview From time to time it may become necessary to connect additional peripheral devices to the Mbox 2016 Dual Output server For the most part these devices will be connected to the available connectors on the front or rear of the rack In the case of added alternate video output connections may need to be altered on the Mac Pro computer s interface panel For example to switc...

Page 45: ...40 MBOX 2016 DUAL OUTPUT HARDWARE MANUAL Notes ...

Page 46: ...INTRA RACK CONNECTIONS This appendix contains a diagram of the connections made between items in the Mbox 2016 Dual Output rack DIAGRAM B ...

Page 47: ...UT AC Power AC Power AC Power MacPro Connections USB 2 USB 3 USB 1 USB 4 TB 2 TB 1 TB 4 TB 3 TB 6 TB 5 Enet 1 Enet 2 HDMI IEC MDP to DVI Adapter for DVI 1 MDP to DVI Adapter for DVI 2 Thunderbolt cable to Sonnet PCIe Bridge Thunderbolt to FireWire Adapter IEC cable from Rear Panel HDMI cable to Rear Panel USB USB USB USB Sync Cable from bottom of MacPro AC Power FW800 Video DVI 1 Video DVI 2 Sync ...

Page 48: ...SPECIFICATIONS This chapter provides specification information for the Mbox 2016 Dual Output server MBOX RACK DUAL I O MODULE COMPUTER SONNET XMAC PRO FOCUSRITE SCARLETT 2I2 C ...

Page 49: ...deo sections EDID management three built in sets capture from connected display Video format conversion DVI to VGA and SDI Video output D A for DVI and SDI output with independent dimming Input DVI single link 1920 x 1200 maximum Output DVI single link 1920x1200 maximum VGA 1920x1200 maximum SDI SMPTE 259M SMPTE 292M 1 5Gb sec limit Built in hardware dimming with program monitor for automatic blac...

Page 50: ... Rack mount computer enclosure Thunderbolt 2 interface to PCIe card cage Front rear mounted I O connections for USB Ethernet DVI Thunderbolt Small Tree P2EG 2 T GbE Dual Port Sonnet Tempo SSD Pro Plus with 2x 1TB Samsung 850 Pro SSD in RAID 0 configuration Blackmagic Decklink Quad capture card 115 230v 50 60Hz Focusrite Scarlett 2i2 Focusrite Scarlett 2i2 USB interface https us focusrite com usb a...

Reviews: