background image

MO

G-65P

MO

G-130P

Í

ndice

2

Guarde este instructivo para futuras referencias.

Los gráficos de este instructivo son para 

referencia, pueden variar del aspecto real de la 

herramienta.

Par

a poder sacar el máximo 

provecho de la herramienta, 

alargar su vida útil, hacer válida 

la garantía en c

aso de ser 

necesario y evitar riesgos o 

lesiones graves, es fundamental 

leer este instructivo por 

completo antes de usar la 

herramienta. 

Especificaciones técnicas

Requerimientos de combustible

Advertencias Generales de Seguridad

para uso de herramientas motorizadas

Advertencias de Seguridad para

uso de motores a gasolina

Partes

Ensamble

Combustible y aceite

Puesta en marcha

Mantenimiento

Solución de problemas

Notas

Centros de Servicio Autorizados

Póliza de Garantía

3

3

4

5

6

7

8

9

10

12

13

15

16

ATE

NCIÓN

ESP

AÑOL

Summary of Contents for 28114

Page 1: ...Manual Gasoline Engine Models Codes Applies for CAUTION Read this manual thoroughly before using the tool INGLÉS ESPAÑOL MOG 65P MOG 130P 28114 28115 Power 6 5 Hp 13 Hp ...

Page 2: ...ty Policy 3 3 4 5 6 7 8 9 10 12 13 15 16 MOG 65P MOG 130P ENGLISH Contents CAUTION Keep this manual for future references The illustrations in this manual are for reference only They might be different from the real tool To gain the best performance of the tool prolong the duty life make the Warranty valid if necessary and to avoid hazards of fatal injuries please read and understand this Manual b...

Page 3: ...o avoid having problems with the motor please drain the fuel system before storing the equipment 30 days or longer Drain the gasoline tank start the motor and leave it running until the fuel lines are empty Next season use fresh gasoline WARNING Do not use the equipment in closed areas Prevent breathing accumulated carbon monoxide an odorless toxic and potentially fatal gas Never smoke near fuel D...

Page 4: ... accessories Wear eye protection dust mask non skid safety shoes helmet and ear plugs These safety gears reduce the risk of injury Turn off the tool before adjusting changing accessories or storin Double check the tool switch is in the off position Refrain from operating the tool if the switch is not working or is not properly assembled Failure to complain with this warning is a hazard of personal...

Page 5: ... irritations persist go see a physician Store fuel in a dedicated container Before re fueling shut down the motor set the equipment on clear terrain and wait for it to cool down Wipe clean all the spilled fuel before operating the equipment Check for fuel leaks to prevent fire or burns If there are leaks mend them before using the pump Under no reason at all burn spilled fuel to get rid of it For ...

Page 6: ...6 Parts ENGLISH Exhaust Oil Drain Cap Fuel Tank Cap Air Filter Spark Plug Throttle Choke Lever Fuel Key Oil Drain Cap Shaft Oil Supply Cap Oil Supply Cap Starter jack line Start Knob Fuel tank ...

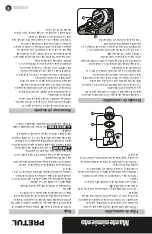
Page 7: ...must be mounted on a level surface otherwise the motor may be damaged due to improper lubrication Engine mount The engine shaft can be attached to a steering wheel or clutch depending on the purpose of the engine 1 Remove the bolt B to remove the cover C that holds the wedge D in place 2 Place the steering wheel E or clutch on the motor shaft not without first placing the key on the shaft to match...

Page 8: ...he tank neck Do not overfill to allow fuel expansion and prevent spillage Clean any fuel spills Cover the tank rotating the cap until hearing a click Clean any spilled fuel before starting up Fuel Supply B CAUTION CAUTION CAUTION 30 20 10 0 10 20 30 40 C 10 W 30 10 W 40 In high altitudes the air fuel combination in a standard carburetor will be rich in fuel Performance will be low and fuel consump...

Page 9: ...n the fuel valve A Move the choke lever into the off position B Set the switch C in the ON position I Move the throttle lever G to the high speed position Slowly pull the starter lever D until filling resistance in the line Then pull with force to start the motor Carefully return the lever to its place do not release it otherwise it would snap back and get damaged Allow the motor to run 5 seconds ...

Page 10: ...air filter to ensure is in good conditions Remember a dirty filter can make starting difficult loosing performance and shorten the working life of the motor Remove the wing nut then remove the filter cover and the filter element Set apart both the sponge filter from the paper filter elements Wash the sponge filter with a detergent and hot water solution Let the filter dry completely Soak the spong...

Page 11: ...e jack line to distribute the oil through the system Set the spark plug back in place Pull softly the jack line handle until feeling resistance This indicated the cylinder is reaching the compression phase and the escape and absorption valves are closed Storing the equipment in these conditions prevents internal corrosion Wipe clean the equipment with a damp cloth and cover it to prevent dust accu...

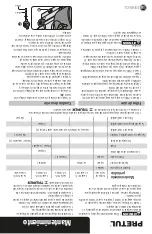
Page 12: ...nter Verify the spark plug spark 1 Disconnect the spark plug cable wipe clean dust around the spark plug and remove it 2 Connect the cable to the spark plug 3 Turn on the motor 4 Make the spark plug electrode contact any metal part in the motor that is free of fuel Is important to carry out tests in a ventilated area with no fuel spilled otherwise an explosion may occur 5 Pull the jack line handle...

Page 13: ...Notes 13 ENGLISH ...

Page 14: ...14 ENGLISH Notes ...

Page 15: ...L 30 INTERIOR DE PASAJE ROBLEDO COL CENTRO C P 43600 TULANCINGO HGO TEL 775 753 6615 775 753 6616 SUCURSAL GUADALAJARA AV ADOLFO B HORN 6800 COL SANTA CRUZ DEL VALLE C P 45655 TLAJOMULCO DE ZUÑIGA JAL TEL 33 3606 5285 AL 90 FIX FERRETERÍAS AV PASEO DE LA REPÚBLICA 3140 A COL EX HACIENDA DE LA HUERTA C P 58050 MORELIA MICH TEL 443 334 6858 FIX FERRETERÍAS CAPITÁN ANZURES 95 ESQ JOSÉ PERDIZ COL CENT...

Page 16: ...regidora 22 Col Centro Alc Cuauhtémoc CDMX C P 06060 or at the establishment where you purchased it or at any Truper Service Center listed in the annex to the warranty policy and or in www truper com Transportation costs resulting from compliance of this warranty will be covered by For questions or comments call 800 690 6990 Made in China Imported by Truper S A de C V Parque Industrial 1 Jilotepec...

Page 17: ...n Corregidora 22 Col Centro Alc Cuauhtémoc CDMX C P 06060 o en el establecimiento donde lo compró o en algún Centro de Servicio Truper de los enlistados en el anexo de la póliza de garantía y o en www truper com Los gastos de transportación que resulten para su cumplimiento serán cubiertos por Para dudas o comentarios llame al 800 690 6990 Hecho en China Importado por Truper S A de C V Parque Indu...

Page 18: ...RO DE SERVICIO ECLIPSE CALLE PRINCIPAL MZ 1 LT 1 COL SANTA FE C P 39010 CHILPANCINGO GRO TEL 747 478 5793 FERREPRECIOS S A DE C V LIBERTAD ORIENTE 304 LOCAL 30 INTERIOR DE PASAJE ROBLEDO COL CENTRO C P 43600 TULANCINGO HGO TEL 775 753 6615 775 753 6616 SUCURSAL GUADALAJARA AV ADOLFO B HORN 6800 COL SANTA CRUZ DEL VALLE C P 45655 TLAJOMULCO DE ZUÑIGA JAL TEL 33 3606 5285 AL 90 FIX FERRETERÍAS AV PA...

Page 19: ...14 ESPAÑOL Notas ...

Page 20: ...Notas 13 ESPAÑOL ...

Page 21: ...da a un Centro de Servicio Autorizado Verifique la chispa de la bujía 1 Desconecte el cable de la bujía limpie el polvo alrededor de la bujía y retírela 2 Conecte el cable a la bujía 3 Encienda el interruptor del motor 4 Ponga en contacto el electrodo de la bujía con cualquier parte metálica del motor libre de combustible Es importante realizar la prueba en áreas ventiladas y sin combustible derra...

Page 22: ... contenedor coloque de nuevo el perno de drenaje y su arandela apretándolos firmemente Limpie todo derrame de combustible Bujía Antes de extraer la bujía B limpie el área alrededor de la base de la bujía para que no ingresen polvo ni desechos al motor Después retire la bujía con ayuda de una llave Limpie los depósitos de carbón de los electrodos de la bujía con un limpiador para bujías o un cepill...

Page 23: ...e esté en buenas condiciones Recuerde que un filtro sucio puede causar dificultades de arranque pérdida de rendimiento y acortar la vida útil del motor Retire la tuerca de mariposa y después quite la cubierta del filtro y quite el elemento del filtro Separe el elemento filtro de esponja del elemento filtro papel Lave el filtro de esponja con una solución de detergente y agua caliente Deje secar po...

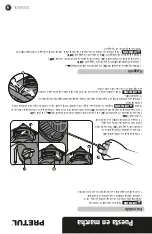
Page 24: ...la válvula de combustible A Mueva la palanca del ahogador a la posición de apagado B Para el arranque del motor en caliente omita este paso Coloque el interruptor C en posición de encendido ON Mueva la palanca de aceleración G a la posición intermedia entre velocidad lenta y rapida Jale suavemente la manija del arrancador D hasta sentir resistencia en la línea Después jale con fuerza para arrancar...

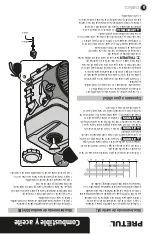
Page 25: ...ble lentamente hasta la parte baja del cuello del tanque No llene demasiado para permitir la expansión del combustible y evitar derrames Limpie cualquier derrame de combustible Tape el tanque girando la tapa hasta escuchar un clic Limpie todo derrame de combustible antes de encender Abastecimiento de combustible B ATENCIÓN ATENCIÓN ATENCIÓN 30 20 10 0 10 20 30 40 C 10 W 30 10 W 40 A una gran altit...

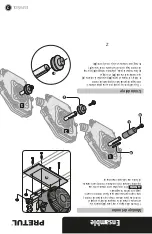
Page 26: ...o sobre una superficie nivelada de lo contrario el motor puede dañarse debido a una lubricacion inadecuada Montaje del motor El eje del motor se puede unir a una polea volante o embrague dependiendo del propósito del motor 1 Afloje y remueva el perno B para retirar la cubierta C que mantiene la chaveta D en su lugar 2 Para montar la polea volante o embrague E en el eje del motor haga coincidir la ...

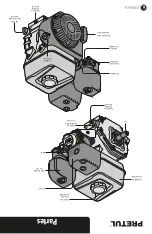
Page 27: ...e combustible Tapa del filtro de aire Bujía Acelerador Palanca del ahogador Llave de combustible Tapón para drenado de aceite Eje Tapón de abastecimiento de aceite Tapón de abastecimiento de aceite Manija de piola del arrancador Perilla de encendido Deposito de combustible ...

Page 28: ...a a un médico Almacene el combustible en un recipiente diseñado para tal fin Antes de reabastecer el equipo de combustible apague el motor colóquelo en suelo despejado y espere a que el motor se enfríe Limpie todo el combustible que pueda haber caído en el equipo antes de operarlo Revise si hay fugas de combustible de ser así corríjalas antes de usar el equipo para evitar incendios o lesiones por ...

Page 29: ...s antipolvo zapatos de seguridad antideslizantes casco protección para los oídos y guantes de seguridad reduce considerablemente el riesgo de lesiones Apague el equipo antes de hacer ajustes cambiar sus accesorios o guardarlo Asegúrese de que el interruptor del equipo esté en posición de apagado Nunca utilice el equipo si el interruptor no funciona o no está debidamente ensamblado De hacerlo se ex...

Page 30: ...ión y la formación de ácidos durante el almacenaje La acidez puede dañar el sistema de combustible del motor cuando se encuentre almacenado Para no tener problemas con el motor se debe vaciar el sistema de combustible antes de almacenar el equipo por periodos de 30 días o más tiempo Vacíe el tanque de gasolina arranque el motor y déjelo funcionar hasta que ADVERTENCIA No utilice el equipo en espac...

Page 31: ...ario y evitar riesgos o lesiones graves es fundamental leer este instructivo por completo antes de usar la herramienta Especificaciones técnicas Requerimientos de combustible Advertencias Generales de Seguridad para uso de herramientas motorizadas Advertencias de Seguridad para uso de motores a gasolina Partes Ensamble Combustible y aceite Puesta en marcha Mantenimiento Solución de problemas Notas...

Page 32: ...ctivo de Motor a gasolina Modelos Códigos MOG 65P MOG 130P Este instructivo es para 28114 28115 Lea este instructivo por completo antes de usar la herramienta ATENCIÓN ESPAÑOL ENGLISH Potencia 4 847 W 9 694 W ...

Reviews: