Prestigio Nobile 1530 User Manual Download Page 10

10

PRESTIGIO NOBILE 1530

ENG

Q: I did not use my spare battery for months. I have problem in recharging it.

A: If you happen to leave your battery pack to go through an extended period of self-discharge, say more than three
months, the battery voltage level will become too low and needs to be Pre-Charged (to bring the battery voltage level
high enough) before it automatically (for Li-Ion only) resumes its normal Fast Charge. Pre-Charge may take 30 minutes.
Fast Charge usually takes 2~3 hours.

2.4 Battery Maintenance

To maintain the battery pack’s maximum capacity, you should occasionally let the notebook deplete its battery power
completely before recharging.
To carry out a complete depletion of the battery, disconnect the AC adapter and let your notebook consume the
remaining battery power. To speed up the depletion, use the HDD as much as possible, and the LCD should be set as bright
as possible. When the battery is empty, wait for the notebook to cool down (especially the battery). The temperature
should be within 15-25

o

C (59-77

o

F).  Then insert the AC adapter to recharge the battery.

2.5 Power Consumption

The Windows® XP, the latest Windows operating systems, has incorporated the latest state-of-the-art ACPI (Advanced
Configuration Power Interface) power management methodology. In order to fully utilize the power of your battery
packs, it would be a good idea for you to spend sometime to acquire a basic understanding of the power management
concept from your operating system.
In Windows® Operating Systems, you can go through Power Options of the Control Panel according to the version of
Windows® Operating System the notebook applies. We shall not describe them in details. The Power Options in Win-
dows® XP are further divided into as below:
* Power Schemes
* Alarms
* Power Meter
* Advanced
* Hibernate

2.6 Reducing Power Consumption

Although your notebook (together with the operating system) is capable of power conservation, there are measures
you can take to reduce the power consumption:
* Use the AC power whenever possible.
* Lower the intensity of the LCD backlight. A very bright screen translates to higher power usage.
* Try to use the HDD or the PCMCIA drive to read and write files, instead of using the external USB FDD.

Note: Whenever system is powered on or powered off, make sure the battery pack is installed in
the battery pack compartment.

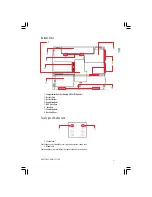
2.7 Removing The Battery Pack

This battery pack can easily be removed and replaced. Make sure that the computer is properly shutdown before
changing the battery pack. If you would like to change the battery pack while power is on, make sure this battery pack
is not the only electrical source to the system unit. Follow the steps below to remove the battery pack.
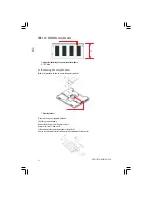
• Make sure the system is properly shutdown.
• Flip the system upside down as shown.
• Push the battery latch to the unlock position as shown by #1.

Summary of Contents for Nobile 1530

Page 1: ...ndinthisguidearesubjecttochangewithoutnotice Anychangesthereforewill beincorporatedinfutureeditions Themanufacturerassumesnoresponsibilityforerrorsoromissionsinthisdocument TRADEMARKS Windows XP is th...

Page 2: ...ollowing items The Notebook AC Adapter AC Power Cord CD Disc Including Drivers and User s Guide Battery Pack Note You should keep the original factory carton and packing materials in case you need to...

Page 3: ...ClickButton 6 The Six Status LEDs 7 ClickButton 8 Touch Pad 9 OpticalDrive 10 SystemButton PowerButton 11 LidSwitch 12 InternalMicrophone 13 Two Power LEDs Front View 1 Speaker 2 Cover Latch 3 Speake...

Page 4: ...s 2 S VideoPort 3 IEEE1394 Port 4 Eject Handle 5 VentilationHoles 6 VentilationHoles 7 MediaSlot 8 PCMCIA Slot Right View 1 SPDIF Out Headphone Jack 2 USBPort 3 EjectButton 4 Emergency Hole 5 VolumeDi...

Page 5: ...yPack 3 BatteryLatches 4 VentilationHoles 5 HDD Drive Door 6 Speakers 7 VentilationHoles 8 Heatsink Door Two Types of Audio Jack 1 Stereo Jack Your headphone jack should have this type of connector as...

Page 6: ...y and Hibernate please refer to Power Options for Windows Systems in the Control Panel of your Microsoft Windows operating system 1 4 The Six Status LEDs The Caps Lock LED The LED would be lit when th...

Page 7: ...CMCIAejecthandleisnowprotrudedoutsidethesystemunit Pleaseobservebelowsafetymeasures MakesurethePCMCIAejecthandledoesnotprotrudeoutatalltimes unlessyouareusingthehandletoejectPCMCIA card Aprotrudedhand...

Page 8: ...tions pressandholddown Fn togetherwiththekeys describedbelow Bluetooth Switch Press this key combination Fn F2 to switch off and switch on the blutooth communication function Standby Switch Press this...

Page 9: ...ils on the LEDs please refer to Chapter 1 3 When the notebook is OFF a depleted Li Ion battery will take three hours to recharge 2 3 Questions And Answers Q I can feel the heat next to theTouch Pad du...

Page 10: ...power of your battery packs itwouldbeagoodideaforyoutospendsometimetoacquireabasicunderstandingofthepowermanagement concept from your operating system InWindows OperatingSystems youcangothroughPowerO...

Page 11: ...DDR2 S O DIMM memory modulesocketisavailableformemoryupgradeto2048MB YournotebooksupportsindustrystandardPC4300 DDR2 533 memorymodule Thetablebelowillustratesallthepossiblewayssystemmemorycanbeconfigu...

Page 12: ...ules Below is the procedure on how to remove the memory modules 1 Memory Sockets Makesurethesystemisproperlyshutdown Flipthesystemupsidedown RemovethebatterypackasshowninChapter2 Remove the screw as s...

Page 13: ...nby 3 Toinsertthememorymodules reversethestepsabove 4 Mini PCI Module Optional Dependingonmodel yournotebookmaybeequippedwithanoptionalMini PCImodule TheMini PCImodulesup portswirelessLANfunction 4 1...

Page 14: ...etwotypesofmini PCImodule Externally theylookslightly different especiallyonthelocationsofthecableconnections RemovetheMini PCImodule ToinserttheMini PCImodule reversethestepsabove 5 The Hard Disk Dri...

Page 15: ...ipthesystemupsidedownasshown RemovethebatterypackasshowninChapter2 Remove the screw as shown by 1 Slide and remove the HDD compartment door as shown by 2 Remove the two screws as shown by 3 Slideandre...

Page 16: ...ouldarise theequipmentshouldbecheckedbyanauthorized technician a Thepowercordorplugisdamaged b Liquidhaspenetratedintotheequipment c Theequipmenthasbeenexposedtoexcessivemoisture d The equipment does...

Page 17: ...igherthan60 C WARNING Handle the battery pack very carefully Avoid touching the metal leads on the connector of the battery case CAUTION UseonlyapprovedACAdapterwithyournotebook UsingthewrongtypeofACA...

Page 18: ...visiontechnicianforhelp Modifications TheFCCrequirestheusertobenotifiedthatanychangesormodificationsmadetothisdevicethatarenotexpressly approvedbythemanufacturerresponsibleforcompliancemayvoidtheuser...

Page 19: ...te Instead it shall be handed over to the applicable collectionpointfortherecyclingofelectricalandelectronicequipment Byensuring thisproductisconsequencesfortheenvironmentandhumanhealth whichcould oth...

Page 20: ...ON X300 X600 X700 128MB VRAM Max Optical Drive DVD ROM Combo DVD Dual HDD 40GB 60GB 80GB 2 5 9 5mmHeight PC Card TypeIIx1 Media Card 1slot SupportSD SD IO MMC MS MS Pro Fax Modem OneRJ 11TelephoneJack...

Reviews: