EN – 2
Wireless Optical Mouse
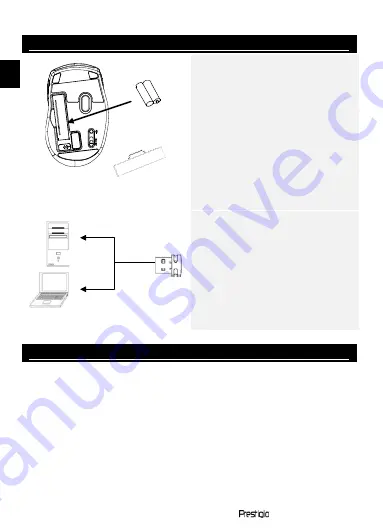
Getting Started
1.
Remove Battery Cover.
2.
Insert AAA Alkaline battery as
indicated. Please make sure tha
the positive (+) and negative (-
ends of battery match polarity
marks as shown.
3.
Place the Battery Cover back
into place. Make sure it is
securely locked.
NOTE:
Click on any of the device buttons
to wake up device from sleeping
mode.
Establishing Connection
1.
Press Receiver Release
Button to extract Receiver
from its storage slot.
2.
Insert Receiver into one of
USB ports on PC or notebook.
3.
The Receiver device is
auto-detected and installed.
The connection is now successfully
established.
Basic Operations
1.
Slide Power Switch to ON position to turn on device. The Low
Power Indicator will stay on for 3 seconds when powered on.
2.
The mouse device is now ready for operation.
3.
Slide DPI Switch to toggle device DPI level between 800DPI and
1600DPI.
4.
Press Reset Button to re-establish connection in case of
interference.
5.
Press Internet Forward/Backward Buttons to return to the
previous page or skip to the next page.
6.
Please replace batteries immediately when Low Power Indicator
stays on.
EN
Summary of Contents for M03L
Page 3: ...1 1 2 3 4 AAA 2...
Page 4: ...2 1 ON 3 2 3 800 1600 4 5 6...
Page 5: ...BG 1 1 Prestigio 2 3 4 2 AAA BG DPI...
Page 6: ...BG 2 1 2 3 1 2 USB 3 1 ON 3 2 3 DPI 800DPI 1600DPI 4 5 6 BG...
Page 19: ...GR 1 1 Prestigio 2 3 4 AAA X 2 GR DPI Internet...
Page 20: ...GR 2 1 2 3 1 2 USB 3 1 ON 3 2 3 DPI DPI 800DPI 1600DPI 4 5 Internet 6 GR...
Page 27: ...KZ 1 1 Prestigio 2 3 4 AAA X 2 DPI KZ...
Page 28: ...KZ 2 1 2 3 1 2 USB 3 1 ON 3 2 3 DPI 800DPI 1600DPI DPI 4 5 6 KZ...
Page 43: ...RU 1 1 Prestigio 2 3 4 AAA X 2 DPI RU...
Page 44: ...RU 2 1 2 3 1 2 USB 3 1 ON 3 2 3 DPI DPI 800DPI 1600DPI 4 5 6 RU...
Page 49: ...UA 1 1 Prestigio 2 3 4 AAA X 2 DPI UA...
Page 50: ...UA 2 Wireless Optical Mouse 1 2 3 1 2 USB 3 1 3 2 3 DPI DPI 800DPI 1600DPI 4 ID 5 6 UA...


