background image


EN-7 


About Rechargeable Battery


The device is equipped with a built-in rechargeable battery. Please fully charge the 

battery (for at least 4 hours) before initial use. The battery status indicator glows in red 

colour when charging and turns bright green colour when charging is complete. Charging 

time is approximately 4 hours. 


Working conditions and precautions for the rechargeable battery 


Device with new batterry should be fully charged before initial use. 


It is not necessary to start charging the device before the battery is fully 

discharged. 


Cautions on Battery 

Charging 


EN


Summary of Contents for GeoVision 5300

Page 1: ...enu 9 Music Player 10 Video Player 11 Photo Viewer 12 Ebook Reader 13 Flash Player 14 FM Radio 15 Tools 16 System Settings 17 Wallpaper 18 Games 19 Screensaver 20 Analog TV 21 Bluetooth Function 22 Pr...

Page 2: ...odifications of the product without authorization from the manufacturer or authorized unit WARNING The device should not be exposed to dripping or splashing and no objects filled with liquids should b...

Page 3: ...EN 3 Accessories List ITEM NAME QTY Car Charger 1 Mounting Cradle 1 USB Cable 1 Touch Pen 1 Leather Carrying Case 1 Driver Documentation CD 1 User Manual 1 Warranty Card 1 Accessories EN...

Page 4: ...Port Connect to headphones or headsets 5 microSD Slot Insert a microSD memory card for data access or memory expansion 6 Battery Status Indicator The indicator glows in bright amber color when batter...

Page 5: ...s the edge of the card to release the safety lock and pull the card out of the slot NOTE Please always make sure that no application is accessing the microSD card before extraction Connecting to Exter...

Page 6: ...USB port Insert car charger connector into vehicle 12V accessory cigarette socket to start charging NOTE Please connect the car charger to vehicle 12V accessory cigarette socket after the vehicle eng...

Page 7: ...cator glows in red colour when charging and turns bright green colour when charging is complete Charging time is approximately 4 hours Working conditions and precautions for the rechargeable battery D...

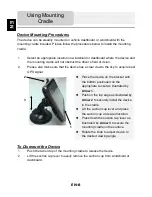
Page 8: ...e the device on the bracket with the bottom positioned on the appropriate socket as illustrated by Arrow 1 Push on the top edge as illustrated by Arrow 2 to securely install the device in the cradle L...

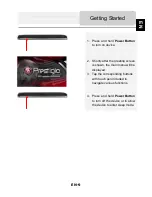
Page 9: ...ter the greeting screen is shown the main menu will be displayed 3 Tap the corresponding buttons with touch pen included to navigate various functions 4 Press and hold Power Button to turn off the dev...

Page 10: ...ing sections Navigation Bluetooth Analog TV Player FM Radio Tools System Settings Wallpaper Games and Screensaver In addition to the main menu icons the screen will display supplementary icons detaile...

Page 11: ...ce supports WMA9 MP3 and WAV music formats Playing Music Insert SD card with audio files loaded before powering on the device Tap on to enter Player function then tap on to enter audio files list Tap...

Page 12: ...Tap on to play pause playback Tap on to stop playback Tap on to enter audio files list Tap on to adjust volume Tap on to select Repeat Random playback Tap on and drag the bar slider to select desired...

Page 13: ...AVI video formats Playing Video Insert SD card with video files loaded before powering on the device Tap on to enter Player function and then tap on to enter Video File List Tap on to exit the current...

Page 14: ...rn to video files list Tap on to adjust volume Tap on to select repeat random playback Tap on and drag the bar slider to select desired starting time for playback Tap on the screen to enter full scree...

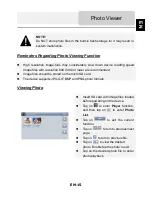
Page 15: ...age files should be stored on the micro SD card The device supports JPG GIF BMP and PNG photo formats Viewing Photo Insert SD card with image files loaded before powering on the device Tap on to enter...

Page 16: ...t in Tap on to rotate image 90 counter clockwise Tap on to display in full screen mode Double tap the screen to resume Tap on to enter photo list Tap on to return to previous skip to next image file T...

Page 17: ...should be stored on the micro SD card The device supports the format of TXT only Reading Text Insert SD card with text files loaded before powering on the device Tap on to enter Player function and th...

Page 18: ...ent function Tap on to turn to previous next page Tap on to enter Ebook list Tap on to enter page jump submenu detailed as follows Tap on the digital button to input character s and press to skip to d...

Page 19: ...les should be stored on the micro SD card The device supports the format of SWF Playing Flash Insert SD card with flash files loaded before powering on the device Tap on to enter Player function and t...

Page 20: ...p playback Tap on for fast preview Tap on to adjust volume Tap and drag the bar slider to select desired starting time for playback Tap on the screen to enter full screen playback Double tap on the sc...

Page 21: ...EN 21 1 Tap on to enter FM function 2 Tap on FM to enable the FM function 3 Tap on to tune FM frequency down up 4 Tap on to exit FM Radio EN...

Page 22: ...function Tap on to turn to previous next note Tap on to create a new note Tap on to store delete the desired note Tap on to scroll up down Tap on to move the keypad to the top of the screen Tap on to...

Page 23: ...culator Tap on to access the Calculator function Tap on to exit the current function 3 Calendar Tap on to access the Calendar function Tap on adjust the value Tap on to exit the current function Toolb...

Page 24: ...emaining battery capacity Backlight Adjust the brightness of touch screen DateTime Set up Time Zone Date Time Language Select desired language Sys Info Calibrate the screen when position deviation occ...

Page 25: ...on to exit Tap on to turn to previous next page Tap on to enter picture folder Tap on to delete wallpaper Tap on to confirm the option Tap on to turn to the previous file Tap on to add the desired pi...

Page 26: ...may result in system malfunction Reminder Regarding Game Function Game files should be stored on the micro SD card Playing Game Insert SD card with game files loaded before powering on the device Tap...

Page 27: ...xit Tap on to turn to previous next page Tap on to turn to the previous file Tap on to enter picture interface Tap on to exit Tap on to enable disable the screensaver function Tap on to set screensave...

Page 28: ...nt TV channel Tap on to manually automatically search for a TV channel Search result is displayed in the list Tap on to delete the desired channel Tap on to select the region Tap on to turn to previou...

Page 29: ...face to enter Attribute function which allows to modify the PIN code 5 Tap on to enable disable the option 6 Tap on to reset a new PIN code 7 Tap on to backspace 8 Tap on to confirm the setting 9 Tap...

Page 30: ...Incoming Call 14 Tap on to adjust the volume 15 Tap on to answer hang up the Incoming Call 16 Tap on on Bluetooth interface to enter Call Record 17 Tap on to view Dialed Call list Received Call list a...

Page 31: ...to turn pages 22 Select mobile phone name from Paired Device list and tap on to re connect from previously connected mobile phone 23 Tap on to disconnect the PND Personal Navigation Device from the mo...

Page 32: ...3 Next maneuver Next maneuver on the way and distance up to it Press this Icon to open route options menu 4 GPS cursor If GPS connection is established displays your current location 5 Information pa...

Page 33: ...street name you are currently moving on Available only if GPS or GLONASS connection is established If there is no street name the direction will be shown 10 MENU Press to enter the Main Menu 11 Scale...

Page 34: ...with GPS connection established 18 Information panel Shows street name you are currently moving on Available only if GPS or GLONASS connection is established If there is no street name the direction w...

Page 35: ...etro stations petrol stations etc 24 Button panel Button panel for easy access to object properties and performing actions to them on map adding waypoints and routes The buttons change depending on ob...

Page 36: ...icon at the right top of the screen Select the needed city 5 Similarly select street 5 and building 6 After you select building it will be shown on the map 7 Press the Go to button to create a route...

Page 37: ...l 2 The route is created 3 Route from one user point on map to other If you want to create a route from one mark on map to another you should do the following create a mark on map 1 set this button as...

Page 38: ...LE SOLUTION There is no sound The volume may be turned down or mute Turn up the volume or turn on the sound output Users cannot turn on the unit The adaptor is not connected well Connect the adaptor c...

Page 39: ...in signal receiving The built in rechargeable battery is weak Use the adaptor to supply power or charge the battery The unit may be obstructed by material such as heat insulation paper Remove the mat...

Page 40: ...c software for operating system Microsoft XP or earlier versions http www microsoft com windowsmobile en us downloads microsoft activesync dow nload mspx and or Microsoft Mobile Device Center software...

Reviews: