128-7407
2 of 12
Page 2
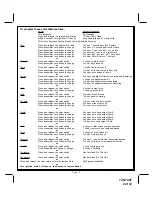
To program these selectable features;
Action
System Response
Turn ignition on
No response
Press and release the valet switch 3 times
1 Chirp - LED 1 flash
Within 3 seconds, turn ignition Off Then On
Long chirp followed by a long chirp
This Action Accesses Feature Bank 2 Alarm Selectable Features
First
Press and release the valet switch 1time
1 chirp = 1 second door lock & unlock
Press transmitter Lock button to change
2 chirps = 3.5 second door lock & Unlock
Press transmitter Lock button to change
3 chirps = 1 sec. lock, dbl 1 sec. unlock
Press transmitter Lock button to change
4 chirps = dbl 1 sec lock, 1 sec unlock
Press transmitter Lock button to change
5 chirps = dbl 1 sec lock, dbl 1 sec unlock
Press transmitter Lock button to change
6 chirps = 350mS unlock. 1 sec lock
o r
Second
Press and release the valet switch
2 chirps = auto locks off
Press transmitter Lock button to change
1 chirp = auto locks on
o r
Third
Press and release the valet switch
3 chirps = auto unlock off
Press transmitter Lock button to change
1 chirp = auto unlock drivers door only
Press transmitter Lock button to change
2 chirps = auto unlock all doors
o r
Fourth
Press and release the valet switch
3 chirps = headlight output when arming and disarming
Press transmitter Lock button to change
4 chirps = headlight output off
Press transmitter Lock button to change
1 chirp = headlight output when arming
Press transmitter Lock button to change
2 chirps = headlight output when disarming
o r
Fifth
Press and release the valet switch
2 chirps = active locks
Press transmitter Lock button to change
1 chirp = passive locks
o r
Sixth
Press and release the valet switch
2 chirps = active arming
Press transmitter Lock button to change
1 chirp = passive arming
o r
Seventh
Press and release the valet switch
1 chirp = siren and horn output
Press transmitter Lock button to change
2 chirps = siren output only
Press transmitter Lock button to change
3 chirps = horn output only
o r
Eighth
Press and release the valet switch
2 chirps = horn chirp output 16mS
Press transmitter Lock button to change
3 chirps = horn chirp output 30mS
Press transmitter Lock button to change
4 chirps = horn chirp output 40mS
Press transmitter Lock button to change
5 chirps = horn chirp output 50mS
Press transmitter Lock button to change
1 chirp = horn chirp output 10 mS
o r
Ninth
Press and release the valet switch
2 chirps = valet switch override operation
Press transmitter Lock button to change
1 chirp = custom code override operation
o r
Tenth
Press and release the valet switch
2 chirps = 2 step unlock off
Press transmitter Lock button to change
1 chirp = 2 step unlock on
o r
Eleventh
Press and release the valet switch
2 chirps = chirp delete from transmitter inactive
Press transmitter Lock button to change
1 chirp = chirp delete from transmitter active
o r
Twelfth
Press and release the valet switch
1 chirp = voltage sense
Press transmitter lock button to change
2 chirps = hardwire
o r
Thirteenth
Press and release the valet switch
Non Functional On This Unit
o r
Fourteenth
Press and release the valet switch
Non Functional On This Unit
o r
Press and release the valet switch or turn the ignition off to:
Exit Programming Mode
o r
Turn ignition switch off then on to advance to feature Bank 3:

