


3
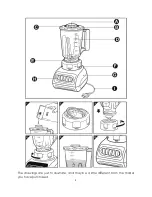
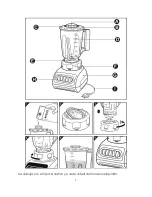
GENERAL DESCRIPTION
A.
Inner cover
B.
Lid’s hole
C.
Lid
D.
Jar body
E.
Sealing ring
F.
Jar holder/ Blade unit
G.
Motor unit
H.
Speed selector
I.
Power cord
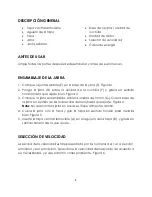
BEFORE USE
Clean all parts after unpacking them and before first use.
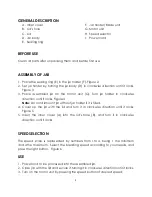
ASSEMBLY OF JAR
1.
Place the sealing ring (E) in the jar holder (F). Figure 2.
2.
Set jar holder by turning the jar body (D) in clockwise direction until it locks.
Figure 3
3.
Place assembled jar on the motor unit (G). Turn jar holder in clockwise
direction until it locks. Figure 4
Note:
Do not dismount jar without jar holder if it is filled.
4.
Cover up the jar with the lid and turn it in clockwise direction until it locks.
Figure 5
5.
Insert the inner cover (A) into the lid’s hole (B), and turn it in clockwise
direction until it locks.
SPEED SELECTION
The speed scale is represented by numbers from 1to 4, being 1 the minimum
and 4 the maximum. Select the blending speed according to your needs, and
press the right button. Figure 6
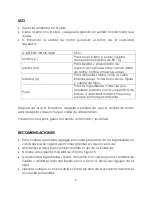
USE
1.
Place food to be processed into the assembled jar.
2.
Close jar with the lid and secure it turning it in clockwise direction until it locks.
3.
Turn on the motor unit by pressing the speed button of desired speed:
Summary of Contents for PB324BK
Page 1: ......
Page 8: ...7 Los dibujos son sólo para ilustrar y puede diferir del modelo adquirido ...
Page 12: ......


