

FlacheSAN1N10U-UN Quick Guide
For more information please visit our website at
www.premioinc.com
Copyright © 2017, Premio Inc. All rights reserved.
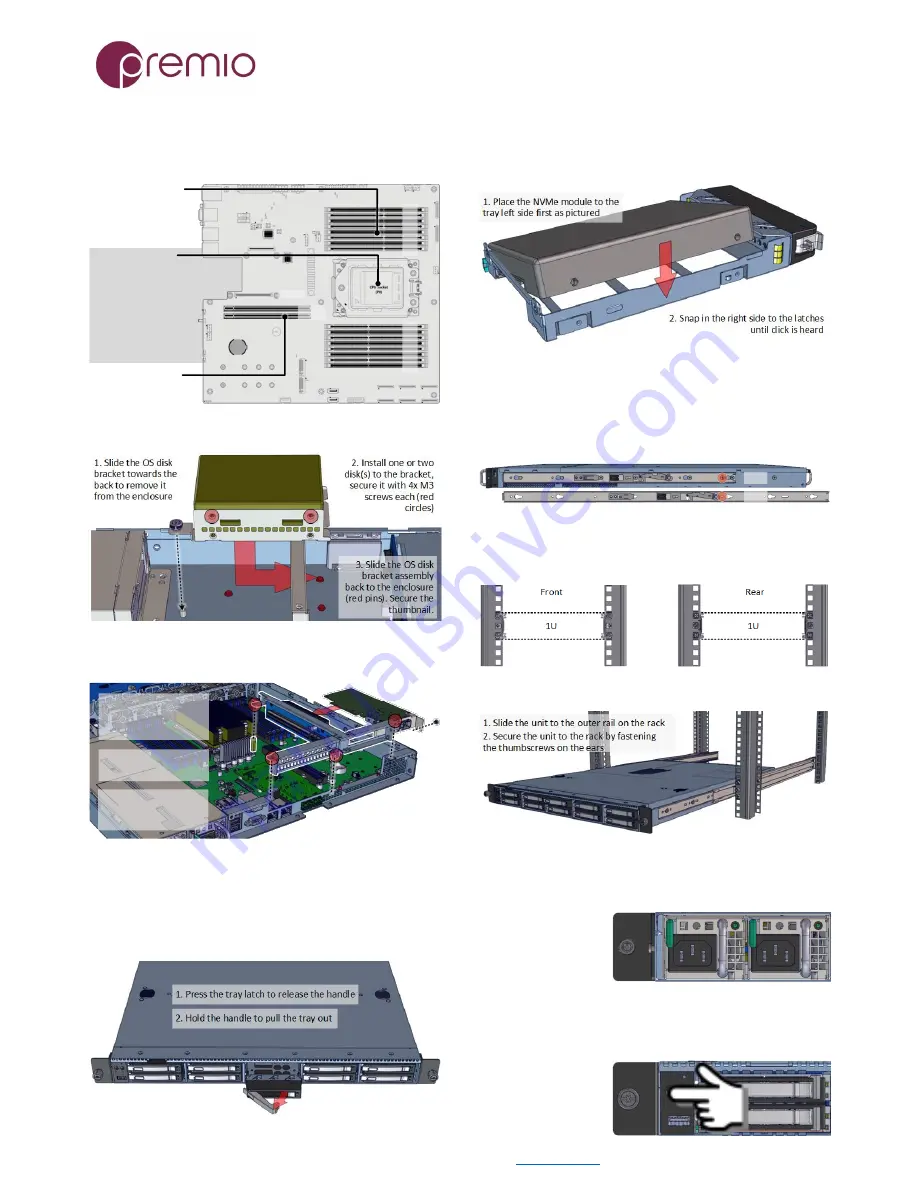
5.
Install CPU and memory
(may be sold separately)
to their respective slots on the motherboard. Refer to the
motherboard’s TPS for details.
Support for AMD
14nm Naples x86
processor
One AMD Socket SP3
Max up to 180W ACP
8+8 DIMM slots
DDR4 ECC RDIMM/LRDIMM/
NVDIMM 2667
Up to 1TB RDIMM, LRDIMM
8 Channels, 1.2V
Populate from farthest
slot first: D1-H1, C1-G1,
B1-F1, A1-E1, then
A0-A1 to E0-E1 for 10
DIMMs and so on
B1
B0
A1
A0
E0
E1
F0
F1
G0
G1
H0
H1
PCIE2
PCIE1
OCP
PCIE1 is Gen3 x16
PCIE2 is Gen3 x24
OCP2.0 is Gen3 x8
D1
D0
C1
C0
6.
Install OS disk(s)
into the bracket.
7.
Install IO cards
(may be sold separately) to PCIe riser
cards.
1. Remove riser card
assembly by removing 4x
6-32 screws (red circles)
2. Install IO card to riser
card and secure it
3. Align the riser card to
enclosure by the pins
(red)
8.
Replace the top cover
once we are finished setting
up the internal of the system.
9.
Remove NVMe trays
from the enclosure to
populate with NVMe modules.
10.
Install NVMe modules into trays.
Follow the
diagram closely. Insert populated NVMe trays back to
enclosure afterwards.
11.
Prepare unit for rack installation.
Remove
inner rails from the rail kit and install them to the unit. Two
types of slide rail (22” and 28” long) are available. Secure with
screw as indicated. Refer to Rail Kit Installation Guide for
details.
22"
28"
12.
Prepare rack for unit installation.
Install outer
rails to the rack. Note the location of unit in regards to the
rack.
13.
Mount unit to rack.
14.
Plug in the power cords
to the AC receptacles
on the back of the unit and secure it with power cable
harness.
15.
Press the power button
on the front of the unit
after connecting a monitor and input devices, and get ready
for software setup.


