background image


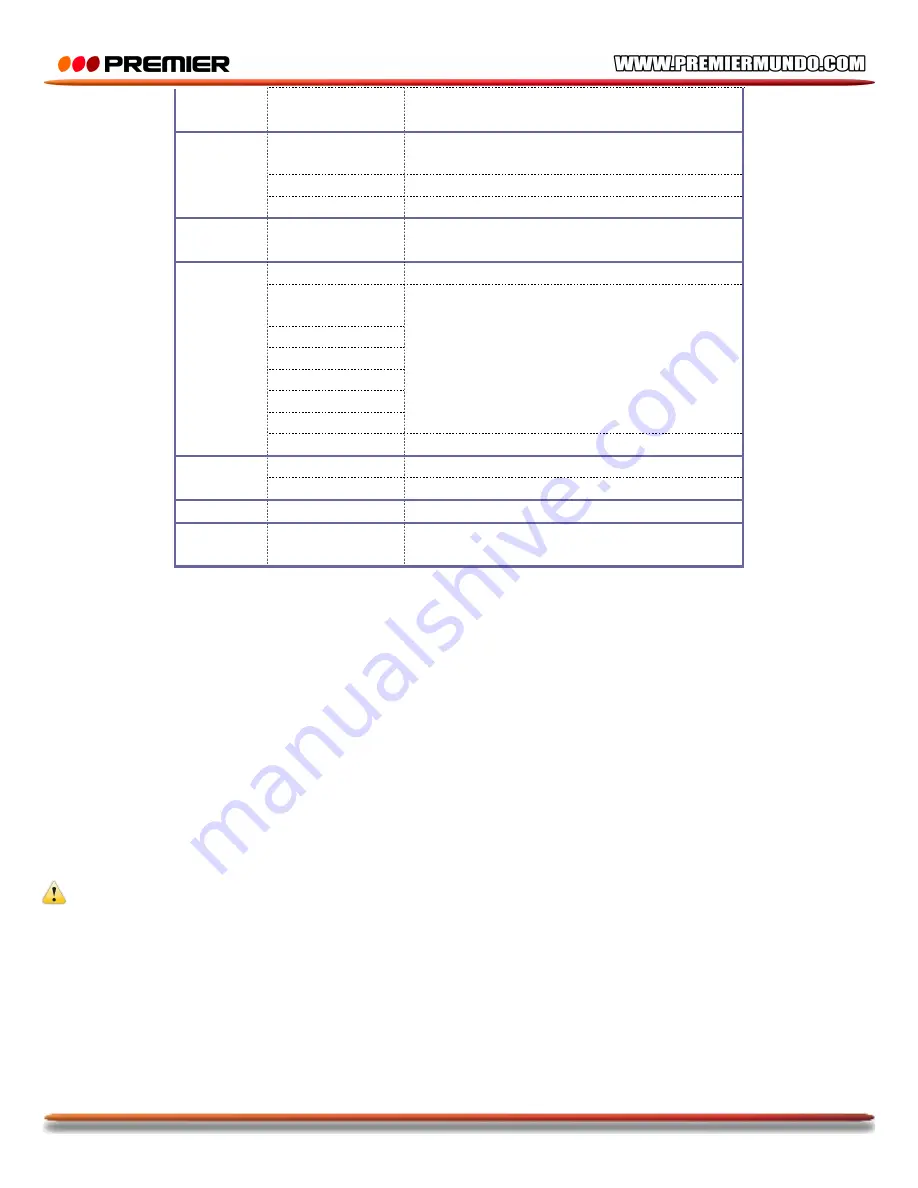
P-10 

frequenc

y  

60Hz 

Light source frequency at 60Hz 

Auto Off 

1m 

Auto off in 1m at idle status 

3m 

Auto off in 3m at idle status 

5m 

Auto off in 5m at idle status 

OFF 

Cancel auto off 

Date&tim

Set date, time and date format 

Languag

English 

Menu in English  

Simplified 

Chinese 

Menu in simplified Chinese 

Français 

Menu in Français 

Español 

Menu in Español 

Italiano 

Menu in Italiano 

Português 

Menu in Português 

Deutsch 

Menu in Deutsch 

Pyc

ский


Menu in Pyc

ский


TV 

NTSC 

NTSC TV format 

PAL 

PAL TV format 

Format 

Yes/No 

Format memory card 

Factory 

reset 

Yes/No 

Factory reset  

 
Switch over setting items with Left key when setting date and time, press Up/Down to adjust. Press OK 
to confirm the setting, press Menu to cancel the setting and return to main menu. 
 

Photo/Video mode                                                    


Enter into Photo/Video mode automatically after switching on 
Press Photo for photo shooting, and press Video to start video and stop recording. 
Press T or W key for digital zoom. 
Press Right key to switch to 10s self-timer mode 
Self-timer mode: Press Photo key for time delay, photo shooting starts after 2s or 10s.  
LED fill light: Press OK to switch on or off fill light. (fill light can't be used under Playback mode) 
At idle status, press Left key to switch over Icon-Off, Screen-Off and Normal Display. 

────────────────────────────────────


Attention: 

l

 Please hold the camera stably when photo shooting. To make photo   

         with best quality, it is better to put the camera on support like tripod. 
         

l

 BUSY light be on after use shutter for photo, do not move the camera  

         at the moment until the BUSY light is off, to ensure no unsharp photos. 

────────────────────────────────────


 Menu setting 

Press Menu to open Photo/Video main menu, press Up/Down key to select the target menu, press OK 
key to get in submenu. Press menu key or Left key to return to main menu at submenu, press Up/Down 
key to select and OK key for confirmation. Press menu key to quit menu after return to main menu.  
When selecting menu, the selected menu will be highlighted with blue color. 

Summary of Contents for VC-5154HD

Page 1: ...LIENTE Con el fin de que obtenga el mayor desempeño de su producto por favor lea este manual de instrucciones cuidadosamente antes de comenzar a utilizarlo y guárdelo para su futura referencia Si necesita soporte adicional no dude en escribir a info premiermundo com ...

Page 2: ... CÁMARA 4 REQUERIMIENTOS DEL SISTEMA 4 FUNCIONES Y CARACTERÍSTICAS 4 DESCRIPCIÓN DE LA CÁMARA 5 DESCRIPCIÓN DE BOTONES Y FUNCIONES 6 INSTRUCCIONES DE OPERACIÓN 6 OPERACIÓN AVANZADA 8 MENÚ DE CONFIGURACIÓN 10 DESCARGAR FOTO VIDEO AL COMPUTADOR 13 CÁMARA PC 13 RESOLUCIÓN DE PROBLEMAS 14 ESPECIFICACIONES 15 ...

Page 3: ...ior de esta unidad que constituye un riesgo de choque eléctrico Este símbolo indica que hay importantes instrucciones de operación y mantenimiento en la literatura que acompaña a esta unidad LÍNEAS DE SERVICIO AL CLIENTE PREMIER Venezuela 0800 ELECTRIC 353 2874 Panamá 300 5185 Sitio Web www premiermundo com E mail servicioalcliente premiermundo com NOTA Nos reservamos el derecho de modificar las e...

Page 4: ...rar la tarjeta de memoria El desempeño de la tarjeta de memoria puede disminuir después del uso repetido Por favor reemplace la tarjeta cuando observe esto Al ser una unidad electrónica de precisión no doble la tarjeta de memoria ni permita que se golpee No coloque la tarjeta de memoria en lugares con alto magnetismo o campos eléctricos como por ejemplo parlantes o receptores de señal de televisió...

Page 5: ...utilizar un limpiador de lentes si es necesario No utilice solventes orgánicos para limpiar la cámara No toque el lente con los dedos REQUERIMIENTOS DEL SISTEMA Lea los requerimientos del sistema antes de utilizar la cámara Se recomienda utilizar el mejor sistema de computación para obtener los mejores resultados de su cámara Sistema operativo Microsoft Windows 7 2000 XP VISTA CPU Por encima de In...

Page 6: ... DE LA CÁMARA Menú Reproducir Obturador Modo Arriba EV Abajo EV Derecha Encender Conector USB DC AV Conector HDMI OK Izquierda Mostrar LED indicador de ocupado LED indicador de carga Iniciar Parar Batería Pantalla TFT ...

Page 7: ...h al tomar imágenes e indicador cuando se conecta la cámara al computador Modo Modo de operación video foto grabación Presione para que funcione como cámara PC al conectar la cámara al computador INSTRUCCIONES DE OPERACIÓN BATERÍA Batería de litio recargable Apague la cámara antes de colocar la batería Presione el cierre eléctrico y empuje la batería ligeramente hacia abajo para sacarla Coloque la...

Page 8: ...o utilice los botones Izquierda o Derecha presione OK para verlo y Menú para detenerlo Presione OK para pausar la reproducción y de nuevo OK para continuar SALIDA DE TV Para reproducir las fotografías el video o el audio en el televisor conecte la cámara por medio del puerto AV al televisor El puerto amarillo es para la señal de video y el puerto rojo blanco para el audio Nota debe detener la grab...

Page 9: ... en el computador Encienda la cámara y conéctela al computador por medio del cable USB El modo USB es para disco removible o cámara PC La cámara entra a modo de disco removible automáticamente Presione el botón Modo iniciar la función de cámara PC OPERACIÓN AVANZADA MODO DE FOTO Y VIDEO Entre al modo de Foto Video automáticamente después de encender la cámara Presione el Obturador para ir al modo ...

Page 10: ... de medición 4 13 Exposición 5 Formato de video 6 Tiempo de grabación 7 19 Estado de la batería 8 18 Indicador de zoom 9 17 Indicador de tarjeta SD 10 Modo de fotografía 14 Tamaño de imagen 15 Calidad de imagen 16 Número de fotos disponibles 20 Detección de rostro 21 Indicador de protección contra sacudidas 22 ISO ...

Page 11: ...1920 x 1080 Alta resolución completa FHD 1280 x 720 Alta resolución 720 x 480 Resolución media Calidad de imagen Alta La mejor calidad Buena Buena calidad Normal Calidad ordinaria Modo de medición Medición central Sujeto al área central para medición Medición de puntos múltiples Sujeto a puntos múltiples Medición de punto Sujeto a un solo punto para medición Balance de blancos Automático Balance d...

Page 12: ...ido Toma una fotografía automáticamente cuando detecta una sonrisa Apagado Apaga esta función MENÚ DE CONFIGURACIÓN MENÚ PRINCIPAL SUBMENÚ DESCRIPCIÓN Sonido Obturador Encendido Apagado Sonido al inicio No 1 2 3 Sonido de los botones Encendido Apagado Volumen 0 1 2 3 Reproducción de audio Apagado Ninguna reproducción después de tomar 1 segundo Muestra la imagen por 1 segundo después de tomarla 3 s...

Page 13: ... OK para encender o apagar la luz de relleno no está activa en el modo de reproducción En el modo inactivo presione el botón izquierdo para cambiar entre Ícono apagado Pantalla apagada y Operación normal Nota Sostenga la cámara firmemente al tomar las fotografías Para obtener la mejor calidad se recomienda utilizar un trípode La luz ocupado se encenderá justo después de presionar el obturador para...

Page 14: ... COMPUTADOR Conecte la cámara al computador vaya a Mi PC para verificar el disco removible la imagen o el video grabados por la cámara se guardan en DCIM 100MEDIA El usuario puede copiar los datos de este archivo al computador Nota No desconecte la cámara del computador cuando esté descargando archivos Para prevenir la pérdida de datos no coloque ni retire la tarjeta de memoria cuando la cámara es...

Page 15: ...deo La tarjeta de memoria puede estar llena Verifique que no esté activa la protección contra escritura de la tarjeta la pestaña Las fotos salen movidas Se recomienda sostener la cámara con firmeza o usar un trípode Las fotos o los videos salen oscuros El entorno puede ser oscuro Intente usar la cámara en un lugar con más luz La unidad se apaga súbitamente Verifique el estado de carga de la baterí...

Page 16: ...16x Balance de blancos Automático Soleado Nublado Lámpara fluorescente Lámpara de tungsteno Compensación de exposición 2 0 a 2 0 Puerto USB 2 0 Salida de TV NTSC PAL Pantalla 2 7 TFT LCD 16 9 Energía Litio recargable 3 7V Idioma del menú Inglés Chino simplificado Distancia focal f 7 36mm Apertura F 3 2 Apagado automático 1 3 5 minutos apagado Requerimientos de sistema operativo Windows 7 2002 XP V...

Page 17: ...RA VC 5154HD DEAR CUSTOMER In order to achieve the best performance of your product please read this instruction manual carefully before using and keep it for future reference If you need extra support please write to info premiermundo com ...

Page 18: ...unit which states a risk of electric shock This sign means that there are important instructions of operation and handling in the manual that comes with this device PREMIER CUSTOMER SERVICE Venezuela 0800 ELECTRIC 353 2874 Panama 300 5185 Website www premiermundo com E mail servicioalcliente premiermundo com NOTE This unit may be submitted to changes in specifications characteristics and or operat...

Page 19: ... memory card and MMC card multimedia memory card SD memory has write protect switch which is designed to protect data being deleted or formated Push the switch on SD card to the bottom data will be protected Push the switch on SD card to the top write protect is canceled Push the switch on SD card to the top before shooting photos Instructions of memory card Pleas format the memory card if it is n...

Page 20: ...nce Keep the camera at dry and dark place when not in use and get the battery out Wear the wrist strap when use the camera to prevent accident falling Use proper protective casing to prevent shot and display scratch To clean the shot surface please blew dust away then wipe the shot lightly with fabric or paper special for optical device Shot cleanser can be used if necessary Do not use organic sol...

Page 21: ...a camera l 16 digital zoom Appearance Functions of keys indicators Key indi cator Function Power ON OFF Video Record stop video Photo Photo shooting Zoom Zoom in out focus or photo playback mode Menu Open quit menu Stop play under video playback ...

Page 22: ...ry Press electric lock push the battery down slightly and get it out Place the charged battery in battery box push it up until the placement is well done Place SD MMC card Open SD slot cap insert the SD MMC card with its metal sheet to outwards in the slot as per guidance besides the slot Press SD MMC card to get it out Attention l Power off camera before replace memory card l Insert the card as c...

Page 23: ...Under switch on status press power until the camera is off Under idle mode if no operation is done in the time beyond auto off time 1m 3m 5m the camera will be switched off automatically for energy saving Menu setting Under Photo Video Playback mode press Menu to open menu press Up Down Left Right to select the menu press OK to skip in submenu Selected menu will be highlighted on background when s...

Page 24: ...witch over Icon Off Screen Off and Normal Display Display information under Photo Video mode No Icon name Description 1 Video mode Press Video to start video under this mode 2 11 White balance Current white balance setting 3 12 Metering mode Current metering mode 4 13 Exposure Current exposure value 5 Video format Current video resolution ratio 6 Recording time Remind recording time at idle mode r...

Page 25: ... pixel 2592x1944 5mega pixel 2048X1536 3mega pixel 1280 960 1mega pixel Video format 1920x1080 Full high resolution FHD 1280x720 High resolution 720X480 Medium resolution Image quality High Best quality Good Good quality Normal Ordinary quality Metering mode Central metering Subject to central area for metering Multiple spot metering Subject to multiple spots Spot metering Subject to single spot f...

Page 26: ...e On Auto photo shooting when detecting smiling face Off Switch off smiling face capture Setting menu Press Left Right key on Menu to get in setting main menu under Video or Photo or Playback mode Press Up Down to select target menu press OK to get in submenu To press Menu or OK at submenu to back to Main Menu press Up Down to select and OK to confirm Press Menu to quit the menu after back to Main...

Page 27: ...ress Video to start video and stop recording Press T or W key for digital zoom Press Right key to switch to 10s self timer mode Self timer mode Press Photo key for time delay photo shooting starts after 2s or 10s LED fill light Press OK to switch on or off fill light fill light can t be used under Playback mode At idle status press Left key to switch over Icon Off Screen Off and Normal Display Att...

Page 28: ...OK key to confirm and move the photo by Up Down Left Right key Playback menu setting Open Playback menu by Menu key press Up Down to select the menu press OK to get in submenu To press Menu or OK at submenu to return to Main Menu press Up Down to select and OK to confirm Press Menu to quit the menu after return to Main Menu Selected menu will be highlighted when selecting menu Playback Menu Photo ...

Page 29: ...C camera is activated then AMCAP window is opened from which shooting object through the camera will be showed on this window If users don t open AMCAP software the PC camera can be used to send video over internet Specification Image sensor 5million pixel CMOS image sensor Resolution ratio of image 16M 4608 x 3472 12M 4032 x 3000 8M 3264 x 2448 5M 2592 x 1944 3M 2048 x 1536 1M 1280 960 Memory car...

Page 30: ...rd may have write protect Get out SD card and unlock the write protect switch Unsharp photos May be caused by shaking hands when photo shooting Please hold the camera stably or use other supports like tripod Do not shake the camera when photo shooting Dark photos or videos Shooting environment may be too dark Please make the shooting at bright place or use light to brighten the shooting place Auto...

Reviews: