background image

26

CONNECTING THE PLAYER TO OTHER COMPONENTS

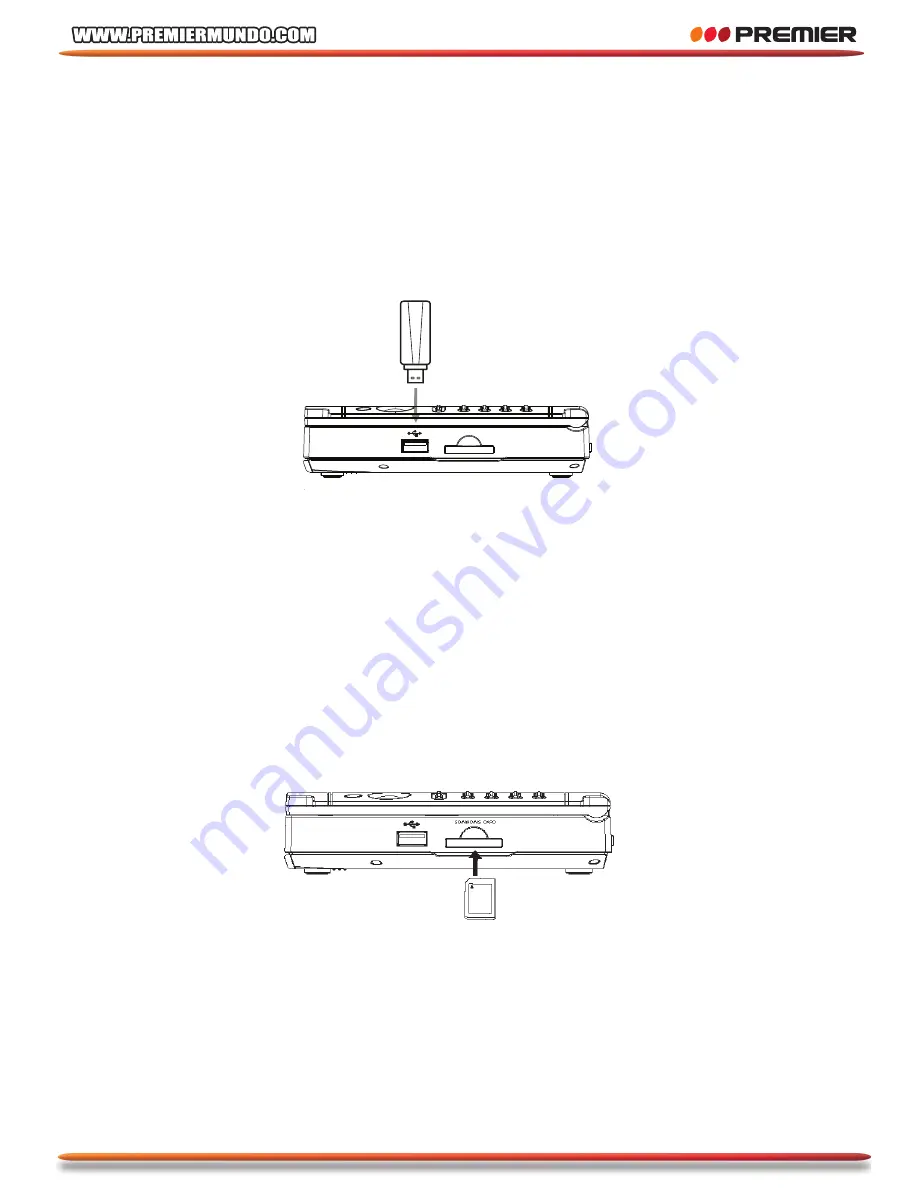
Connecting to USB storage (optional)

1.

Please connect the USB storage to the USB terminal of the main unit.

2.

The main unit can be read the USB storage contents in the automatically.

Note:

The USB terminal of the main unit support USB 1.1 only.

The main unit can read the contents of USB storage when there is no disc

in the main unit.

Connecting to memory card (SD / MMC / MS) (optional)

1. 

 Please insert the memory card to the memory socket of the main unit

2. 

 The main unit can be read the contents in the memory card automatically

Note:

Please insert the memory card in right direction.

The main unit can read the contents of memory card when there is no disc

in the main unit.

•S•D•/•M•M•C•/•M•S• • •C•A

•R•D

USB storage

Mai

n  Unit  right

side

Memor

y card

Summary of Contents for SX-2735TFT

Page 1: ...NUAL PORTABLE DVD PLAYER SX 2735TFT DEAR CUSTOMER Congratulations for your purchase Please read this manual carefully and keep it for future reference If you need extra support please write to info pr...

Page 2: ...1...

Page 3: ...the left side of the player Part in the top of the player Part in the back of the monitor Part in the left side of the monitor Remote control unit USING REMOTE CONTROL UNIT 20 Precautions before using...

Page 4: ...disc Scanning forward and backward Repeat playing the disc Zoom playing Program playing Using OSD Selecting a sub title Selecting an audio Selecting an angle Playing audio files and jpeg disc Playing...

Page 5: ...nt electric shock match wide blade of plug to wide slot fully insert LASER This Digital Video Disc player employs a Laser System To ensure proper use of this product please read this owner s manual ca...

Page 6: ...ALIFIED SERVICE PERSONNEL The lightning flash with arrowhead symbol with in an equilateraltriangle is intended to alert user to the presence of uninsulated dangerous voltage within the product enclosu...

Page 7: ...n and is intended for home and other limited viewing uses only unless otherwise authorized by Macrovision Reverse engineering or disassembly is prohibited FCC NOTICE This device complies with part 15...

Page 8: ...r Turn off the power when not using the player If the player is connected to your TV but not in use then switch the power off this will prevent interference with your normal TV picture Noise problems...

Page 9: ...leaving rubber or plastic products in contact with the player for long periods of time as this may damage the cabinet When using chemically treated cloths read the cloth s instructions carefully Alwa...

Page 10: ...BAG OPERATING INSTRUCTIONS TECHNICAL DATA 7 tft 16 9 lcd screen and dvd player Usb and sd mmc multi media cardreader Pal ntsc compatible Plays dvd mpeg4 dvd r r dvd rw rw cd cd r mp3 vcd svcd jpeg Aud...

Page 11: ...2 cm Noted Don t using the disc that is scratched seriously Specifications Disc type DVD Video VideoCD CD DA JPEG Audio output LINE OUT 20Hz 20kHz Earphone output Video output Video output 1 0Vpp 75oh...

Page 12: ...elow are included AC DC Cable optional Operating instructions this manual Ear phone Specifications Audio input 1Vrms 2Vrms Video input 1 0 Vpp 75 ohm Power CC 12V 0 6 Earphone output 20 Hz 20 kHz LCD...

Page 13: ...he part according to the direction then open the TFT cover Keypad in the main unit 1 Button Press this to play disc When press this in the play mode pause mode is set Press again to resume playback 2...

Page 14: ...ss the button to select Brightness Contrast color then use M M buttons to adjust 3 MUTE Button Press the button to mute the audio output 4 MODEButton Press the button to select screen NORMAL L TO R or...

Page 15: ...o the proper position in order to let the unit stand 2 Battery cover Open the battery cover and place six rechargeable LR 06 NiMH 1 2V 1800mAH batteries into it Part in the right side of the player 1...

Page 16: ...earphone 2 Audio Video input or output input output audio video signal 3 12V DC output Connecting to the monitor 4 12V DC input Connecting to the AC DC adapter or car adapter Part in the top of the p...

Page 17: ...o the proper position in order to let the unit stand Part in the top of the monitor 1 Power switch Turn ON OFF the unit Push power switch to ON to turn on the monitor when the unit is power power indi...

Page 18: ...NCTION Part in the left side of the monitor 1 Earphone jack connecting to earphone 2 Audio Videoinput Input audio video signal 3 12V DC output 4 12V DC input Connecting to the DVD Player 1 2 3 4 A V I...

Page 19: ...ne 5 VOL Increasing the volume 6 VOL Decreasing the volume 7 Return to menu 8 SETUP Set up menu when the unit in play mode 9 Moving cursor Up 10 Moving cursor let 11 OK this to confirm settings 12 Mov...

Page 20: ...D repeat the track or whole disc 22 A B Press this to set A point press again to set B point then the unit playing from A to B repeated Press 3 rd to cancel the A B play 23 AUDIO DVD selecting audio l...

Page 21: ...e obstacles between it and the remote sensor Don t expose the remote sensor to strong light Using the remote control unit within the specified operating range Remote control unit operating range 1 Hor...

Page 22: ...the new battery into the battery holder with the side correctly 3 Fit the battery holder back to its place Note To prevent leakage of fluid from the battery remove the battery when not using the remo...

Page 23: ...month or more If the battery leaks fluid carefully wipe it out of the battery case then change to new batteries Battery storage Please place the battery in a proper environment 15 C 25 C To avoid plac...

Page 24: ...to the direction 2 Place the battery into the battery slot make sure that sideof the battery is connected to the battery slot correctly 3 To tighten the battery cover Note Please use rechargeable AA 1...

Page 25: ...cts the recharging efficiency Recharging is most efficient between temperatures of 10 C 30 C To protect the battery unit do not recharge a fully charged battery unit repeatedly Repeated overcharging t...

Page 26: ...he standard accessory of the main unit Connecting earphone Connect the earphone plug securely to left side the earphone jack on the main unit To listen to the audio using to adjust the volume to a com...

Page 27: ...main unit can read the contents of USB storage when there is no disc in the main unit Connecting to memory card SD MMC MS optional 1 Please insert the memory card to the memory socket of the main uni...

Page 28: ...s turned Off before making connections Connecting to a TV Note Please set the main unit to AV output mode Audio video output input Main unit left side Black Video audio cable included To video input j...

Page 29: ...o not play DVDs when the audio settings are not correct Or may cause strong noise and damage your speakers Audio video output input Main unit left side Black Video audio cable included White Red Yello...

Page 30: ...ve speaker systems Note Please set the main unit to AV output mode Audio video output input Main unit left side Black Video audio cable included Signal flow To Audio input jack To video input jack Whi...

Page 31: ...ant the unit as a monitor Note Please set the main unit to AV input mode Audio video output input Main unit left side Black Video audio cable included Signal flow Red To Video Output jacks Video Out T...

Page 32: ...ing to a monitor Note Please set the main unit to AV input mode Audio video input Monitor left side To DC IN jack AC DC cable included Signal flow The main unit left side To audio video input jack To...

Page 33: ...rol unit or push power switch to OFF main unit to turn off the unit power indicator led off Placing discs O K POWER 1 Power on the player 2 Open the TFT cover 3 Placing the disc 4 Close the TFT cover...

Page 34: ...your favourite when the main unit is in play mode 1 Press MODE setting brightness 2 Press MODE setting contrast 3 Press MODE setting color 4 Press MODE setting LCD display mode 5 Press MODE setting r...

Page 35: ...ess PLAY PAUSE to continues playing Scanning forward and backward 1 Press remote control unit 1 5 seconds to fast the playing when playing in forward backward direction 2 Change the playing speed to X...

Page 36: ...3X 4X 1 2X 1 3X 1 4X and normal Program playing The main unit may play the list according to the following program list 1 Press PROGRAM the menu will be shown in the LCD Hint T is for Title C is for C...

Page 37: ...unit can not play the list if you select the item that does not exit in the disc Using OSD 1 Press OSD to show the play and disc information in the LCD when the main unit is in play mode 2 Press OSD a...

Page 38: ...ursor to the directory file icon or JPEG icon Selecting icon and press OK if you want to play audio files selecting JPEG icon and press OK if you want to play JPEG Selecting a file and press OK if you...

Page 39: ...EAD USB will be shown in LCD and the files will be display in the LCD when the unit finished the reading 3 Operation is like play audio file or JPEG file 4 Please remove the USB storage directly when...

Page 40: ...on the unit inserting the card in to the socket in no disc mode 2 READ CARD will be shown in LCD and the files will be display in the LCD when the unit finished the reading The SD MMC and MS can be r...

Page 41: ...em TV set Default NTSC Note The picture may be a grey picture if the system is not correctly set Setting screen saver This function can save the TFT life if he unit stay in stop no disc over 1 minutes...

Page 42: ...16 9 TV set 4 3 L B Please select this item when connecting this unit to a normal TV set 4 3 P S Please select this item when connecting this unit to a normal TV set Note Picture scale is depending th...

Page 43: ...e unit play parent lock DVD disc Level is divided into 8 level Selecting ADULT the lock is cancel Default ADULT Note The parent lock level can not be set if the parent lock is locked Q SU SYSTEM SETUP...

Page 44: ...Please enter the OSD language select menu use cursor key to move the cursor to the language what you want and press OK LANGUAGE SETUP MENU LANG SUBTITLE LANG AUDIO LANG ODS LANGUAGE EXIT SETUP ENGLIS...

Page 45: ...age Please enter the sub title language select menu use cursor key to move the cursor to the language what you want and press OK LANGUAGE SETUP MENU LANG SUBTITLE LANG AUDIO LANG ODS LANGUAGE EXIT SET...

Page 46: ...ve the cursor to the language what you want and press OK Note The language will be the disc default language if the language you want is not visible Default language English LANGUAGE SETUP MENU LANG S...

Page 47: ...ding in different way Place disc in right direction Using good disc Using right area code disc Insert the cable again Set TV or this unit correctly Removing earphone Insert the cable again Connecting...

Page 48: ...life Failure to do so may incur the penalties established by laws governing waste disposal Proper differential collection and the subsequent recycling processing and environmentally compatible disposa...

Page 49: ...t stick any labels on its surface Avoid playing scratched or distorted disc as they can cause damage to the system Avoid playing disc with irregular shapes as they may not be played by the system and...

Page 50: ...air comes in contact with any cold parts inside the player If the player is located in a room with high humidity When condensation forms inside the player the player may not operate correctly If this...

Page 51: ...50 OTHER INFORMATIONS...

Reviews: