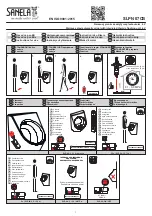
INSTALLATION STEPS: Single handle lavatory faucet
Cleaning:
To maintain and protect the fine luster of all products, clean with a soft, damp cloth
only. DO NOT USE detergents or cleansers as they may harm the protective finish.
INSTALLATION
Model Number: 284441 & 284442
Important: After installation is completed, remove the aerator.
Turn on the water supply and allow both hot and cold water
to run for at least one minute each. This flushes away any
debris that could cause damage to internal parts. While the
water is running, check for leaks. Turn off the water and
replace the aerator.
Install the horizontal rod (2) and the stopper (3) as
shown (4). Hand tighten the pivot nut (1).
Remove the stopper (1) and the flange (2). Screw
the brass nut (3) all the way down. Push the plastic
washer (4) and the gasket (5) down. Unscrew the
pivot nut (6) from the pop-up body (7) and remove
the seal washers (8). Take off the spring clip (9)
from the horizontal rod (10). Remove the tailpiece
(11) from the pop-up body (7).
Place one end of the spring clip (1) onto the end of
the horizontal rod (2). Insert the horizontal rod (2)
through a hole on the strap (3). Connect the other end
of the spring clip (1) to the horizontal rod (2). Insert
the lift rod (4) into the strap and tighten the screw (5).
9.
10.
Making the waterline connections:
Use 1/2 in. I.P.S. faucet connections (2, not
included), or use the coupling nuts (3, not
included) with a 3/8 in. O.D. ball-nose riser (1, not
included). Before tightening the faucet connector
to the water supply, apply a second wrench to the
supply tube fitting. This will prevent the supply
tube from moving or twisting when tightening the
faucet connector. Do not overtighten.
NOTE: The hot side inlet tube is indcated by a
label. If the label is not present, the hot supply
tube is the longer of the two inlet tubes.
Apply the silicone to the underside of the flange (2).
Insert the pop-up body (1) into the drain hole from
below sink. Screw the flange (2) into the pop-up body
(1). With the pivot hole (3) facing toward faucet, Use
groove joint pliers to tighten the nut (4), do not over
tighten. Do not turn the pop-up while tightening the
nut, or sealant may not seal drain. Clean excess
putty.
Apply thread sealant tape to the top threads of
the tailpiece (5) in a clockwise direction, as shown
and hand tighten.
7.
8.
5.
6.
Flange Installation (optional).
Place the flange (1) on bottom of the new faucet.
Place the faucet through the mounting holes in the
sink. From underneath the sink, secure the faucet to
the sink with the washers (2) and the nuts (3)
provided.
Escutcheon Installation (optional).
Install the faucet assembly through the holes of
the sink. From underneath the sink, secure the
faucet to the sink with the mounting nuts (1)
provided.
Proceed to Step 5.
Escutcheon Installation (optional).
Shut off the water supply at angle stop. Remove the
old faucet. Clean the sink surface in preparation for
new faucet. From underneath the base plate (1),
secure the base plate and the escutcheon (1) to the
faucet (3) with screws (4).
Flange Installation (optional).
Screw the bolts (1) to the faucet assembly (2).
3.
4.
1.
2.
1
2
3
4
1
2
1
1
2
3
2
1
2
3
1
2
3
6
5
4
9
8
7
11
10
1
2
3
5
4
1
2
3
4
3
4
2
1
5
Brand Lavatory Faucets
Tools:
Adjustable wrench
Groove joint pliers
Pipe wrench
Screwdriver
Thread sealant tape
Basin wrench
Plumber's putty