background image

To assemble the Spinner

®

 Rally and Spinner

®

 Shift, follow the steps in the order listed 

in this assembly guide. For more product information, visit us at 

www.precor.com

WARNING  At least two people are required to assemble the equipment. 
                         DO NOT attempt assembly by yourself. 

Assembly Requirements


When assembling the bike, we recommend you: 

•  Assemble the equipment close to where you plan to use it.
•  Assemble the equipment on a solid, flat surface, so that it remains level  

and stable. 

•  Leave a minimum of 0.5 m (19.7 in.) on at least once side of the bike  

and 0.5 m (19.7 in.) behind or in front of the bike.

Spinner® Rally and Spinner® Shift

Assembly Guide

Hardware Kit

Begin Assembly

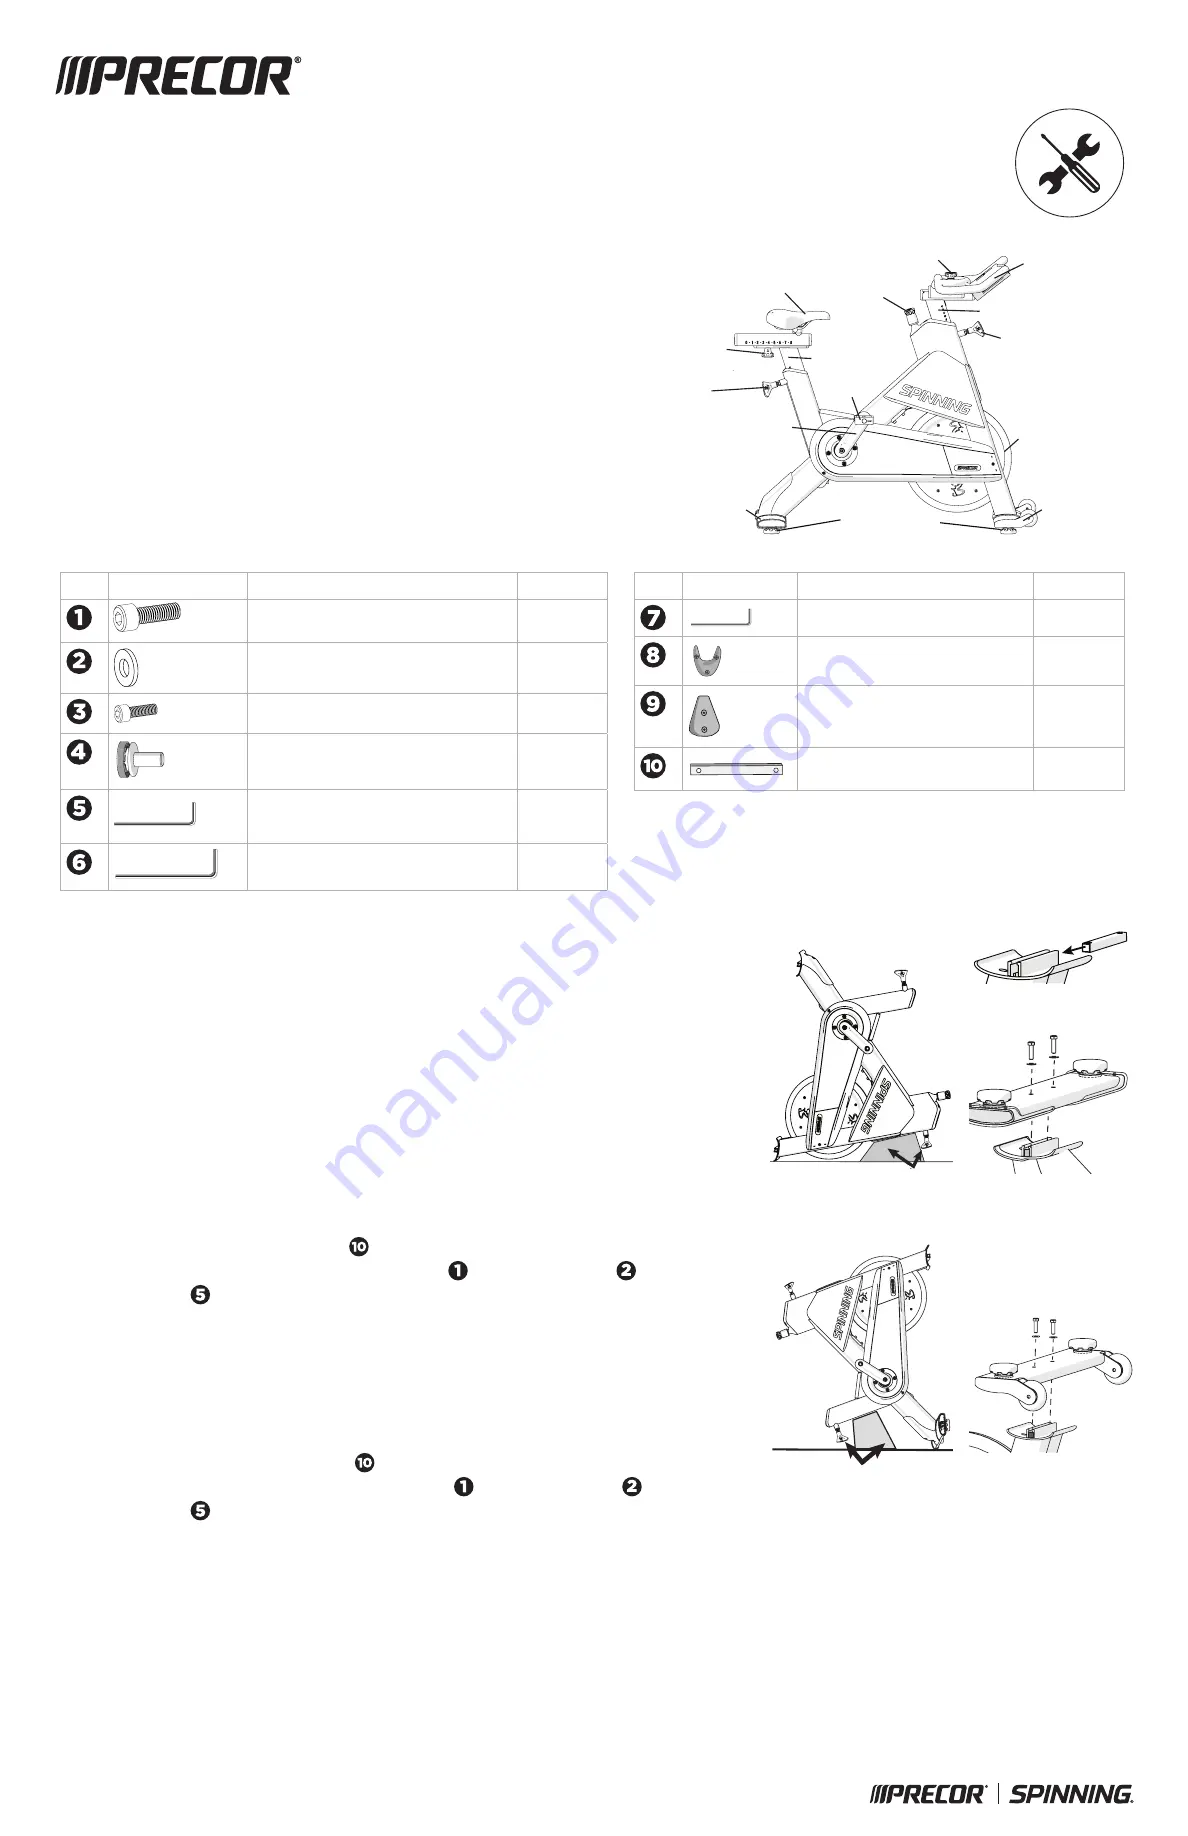
Remove the following parts from the packaging: handlebar assembly, handlebar post, hardware kit, 
product documentation, seat assembly, seat post, and spare parts.

CAUTION   Damage to the bike during assembly is not covered by the Precor Limited  
                        Warranty.   
                        During assembly, you must protect the handlebar and seat adjustment pop-pin  
                        threaded stems from damage. 

To attach the rear stabilizer:

1.  Stand the bike frame on its front end (toward flywheel) and place a piece of foam under the bike 

frame (Figure 1) to protect the handlebar adjustment pop-pin stem from damage. 

2.  Remove the packaging from the rear stabilizer and gently pry off the plastic protection plate from 

the frame. Be careful not to chip the paint.

3.  Slide the rear stabilizer attachment bar   into the slot in the bike frame (Figure 2).
4.  Attach the rear stabilizer to the frame using two bolts   and two flat washers 


(Figure 3).  

Using a hex key  , tighten to 15.6 ft-lb (21.2 N-m).

 
To attach the front stabilizer:

1.  Stand the bike frame on its back end and place a piece of foam under the bike frame (Figure 4) to 

protect the seat adjustment pop-pin stem from damage. 

2.  Remove the packaging from the front stabilizer and gently pry off the plastic protection plate from 

the frame. Be careful not to chip the paint.

3.  Slide the front stabilizer attachment bar   into the slot in the bike frame (Figure 2).
4.  Attach the front stabilizer to the frame using two bolts   and two flat washers 


(Figure 5).  

Using a hex key  , tighten to 15.6 ft-lb (21.2 N-m).

5.  Return the bike to the upright position.

Figure 2

Figure 3

Figure 4

Figure 5

Seat assembly

Handlebar 

assembly

Rear 

stabilizer

Bike frame

Seat post

Handlebar post

Front

stabilizer

Pedal

Seat adjustment 

pop-pin 

Handlebar 

adjustment 

pop-pin

Seat

slider knob

Fore/aft handlebar

knob

Resistance 

knob

Flywheel

Adjustment feet

Crank arm

Component

Quantity

Socket head bolt (M8 x 30 mm)

4

Flat washer (8 mm)

4

Socket head bolt (M3 x 8 mm)

7

Socket head bolt (M8 x 16 mm)

2

Hex key (6 mm)

1

Hex key (8 mm)

1

Component

Quantity

Hex key (2.5 mm)

1

Seat slider end cap

1

Handlebar post end cap

1

Stabilizer attachment bar

2

Figure 1

Summary of Contents for SPINNER RALLY

Page 1: ... the seat to the desired height Turn the pop pin clockwise and secure it in a preset hole Handlebar Height The handlebar should be approximately the same height as the seat or higher if you feel back discomfort To adjust the handlebar height 1 Turn the handlebar adjustment pop pin counterclockwise to loosen and release it from the post 2 Raise or lower the handlebars to the desired height then sec...

Page 2: ... commercial bikes Release all tension from the resistance knob after each use to allow for perspiration to evaporate If bikes are used in a class setting the instructor should direct class participants to release all tension from the resistance knob after each use For bikes used in a home setting Wipe down the bike after each use Pay special attention to wipe under the resistance knob When done tu...

Page 3: ...ently pry off the plastic protection plate from the frame Be careful not to chip the paint 3 Slide the rear stabilizer attachment bar into the slot in the bike frame Figure 2 4 Attach the rear stabilizer to the frame using two bolts and two flat washers Figure 3 Using a hex key tighten to 15 6 ft lb 21 2 N m To attach the front stabilizer 1 Stand the bike frame on its back end and place a piece of...

Page 4: ...to set the travel limit Figure 7 3 Attach the seat slider end cap using three bolts Figure 8 and fully tighten with the hex key Figure 9 Figure 7 Figure 8 Figure 14 Bike Assembly Checklist Use this checklist to make sure your bike is assembled properly Check that all bolts are tightened to proper torque specification and no parts are missing Check that the handlebar and seat posts move freely and ...

Page 5: ...or petroleum based solvents on the bike Use a soft nylon scrub brush to clean grooves and textured surfaces on pedals For commercial bikes o Release all tension from the resistance knob after each use to allow for perspiration to evaporate If bikes are used in a class setting the instructor should direct class participants to release all tension from the resistance knob after each use For bikes us...

Page 6: ...dware o Seat and handlebar hardware including knobs and pop pin handles o Toe straps toe clips Monthly Maintenance Tasks The monthly maintenance check is a comprehensive inspection of the entire bike frame and hardware in addition to the weekly maintenance tasks Inspect the bike for rust or corrosion Turn the bike upside down to thoroughly examine the underside components Check flywheel alignment ...

Page 7: ...r Part Replacement Schedule Brake Pad Assembly 1 year Chain 2 years Belt 2 years Pedal 2 years Adjust the Chain Important Improper chain adjustment will cause premature wear and may void the Precor Limited Warranty Insert a screwdriver into the chain tension inspection window and gently move the chain up and down Figure 1 A properly fitted chain should travel inch up and down If the chain is too l...

Page 8: ...eping your fingers away from the belt 6 Replace the covers Replace the Brake Pad Your bike comes with a spare brake pad To order more pads contact Precor Customer Support To replace the brake pad 1 Remove tension from the brake pad by turning the resistance knob counterclockwise until completely loose 2 Using a 5 mm hex key remove the two bolts holding the brake pad against the frame Figure 7 3 Re...

Page 9: ...on the invoice date of the original purchase This warranty applies only against defects discovered within the warranty period and extends only to the original purchaser of the product Parts repaired or replaced under the terms of this warranty will be warranted for the remainder of the original warranty period only To claim under this warranty the buyer must notify Precor or your authorized Precor...

Page 10: ...ned Product Quote that has been accepted by Precor then such limited extended warranty i shall only apply to Mechanical and Electrical parts and Product Labor if applicable ii shall commence on the invoice date of the original purchase iii shall replace and not be in addition to the warranty periods for Mechanical and Electric parts and Product Labor set forth above e g the standard warranty perio...

Page 11: ...applies to services such as those provided by an Internet service provider ISP and also to hardware related to Internet connectivity such as Ethernet cabling routers servers and switches 4 Precor is not responsible for the quality of television video audio or other media supplied to its products This restriction applies to services such as those provided by a cable or satellite television provider...

Page 12: ... use conditions at the time of installation 3 Consumable goods or cosmetic items of the product to include all plastic or painted surfaces the exterior of which has been damaged or defaced as a result of abuse misuse accident improper service or installation mishandling or modification in design or construction not authorized by Precor including without limitation use or incorporation of any non O...

Page 13: ...NG BUT NOT LIMITED TO A ANY OBLIGATION LIABILITY RIGHT CLAIM OR REMEDY IN TORT WHETHER OR NOT ARISING FROM THE NEGLIGENCE OF PRECOR OR ITS SUPPLIERS WHETHER ACTIVE PASSIVE OR IMPUTED AND B ANY OBLIGATION LIABILITY RIGHT CLAIM OR REMEDY FOR LOSS OF OR DAMAGE TO ANY EQUIPMENT This disclaimer and release shall apply even if the express warranty set forth above fails of its essential purpose Exclusive...

Page 14: ...SE OR ANY OTHER INCIDENTAL SPECIAL INDIRECT OR CONSEQUENTIAL DAMAGES WHETHER RESULTING FROM NONDELIVERY OR FROM THE USE MISUSE OR INABILITY TO USE THE PRODUCT This exclusion applies even if the above warranty fails of its essential purposes and regardless of whether such damages are sought for breach of warranty breach of contract negligence or strict liability in tort or under any other legal the...

Page 15: ...mplete this portion and keep for your records Purchased from Example Distributor or store name Phone number Example Distributor or store telephone number Product model Example Spinner Rally Serial number The serial number is found on the shipping container ...

Page 16: ...ike Line Limited Warranty Precor Incorporated 20031 142nd Ave NE P O Box 7202 Woodinville WA 98072 4002 USA 1 800 347 4404 www precor com Effective 01 January 2016 P N 304227 101 rev A ENU 2016 Precor Incorporated ...

Reviews: