

IMPORTANT Before you fully tighten a fastener, check that its head is flush
with the surface of the equipment. If not, cross-threading may have occurred.
DO NOT attempt to rework the assembly as more damage to the equipment
will occur. Instead, contact Customer Service at www.precor.com.
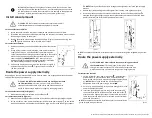
Install console mount
WARNING DO NOT attempt to connect electrical power until all
assembly procedures are complete and properly installed.
For non-touchscreen consoles:
1. Locate the communication cable that is bundled and attached to the EFX frame.
2. Thread the communication cable upward through the center of the console mount and out
the opening at the top of the mount.
3. Position the display mount on top of the base frame (Figure 1) and attach it using four
bolts
. Tighten all bolts to 180 in-lb (20 N-m) of torque.
For touchscreen consoles:
1. Retrieve the power, coax, and Ethernet cables from the console
box.
2. Group all four cables—communication, coax, power extension
supply, and Ethernet—and thread them upward through the
center column and out through the center opening in the console
mount. Tape them to the top of the console mount to secure
them temporarily.
IMPORTANT
DO NOT stretch, crimp, or
damage the cables. Cables damaged by improper installation
are not covered by the Precor Limited Warranty.
3. Position the display mount on top of the base frame (Figure 1)
and attach it using four bolts
. Tighten all bolts to 180 in-lb
(20 N-m) of torque.
Figure 1
Route the power supply internally
Depending on the site location and distance from an outlet, you might need to route the power
supply either internally or externally.
WARNING
DO NOT allow cables to touch any moving parts around
the lift motor body—
lift screw, yoke, or ramp. Run the ramp
through its movement path a few times and have someone else
watch to make sure no cables are caught up or hanging loosely.
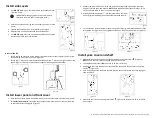
For non-touchscreen consoles (Figure 2):
1. Make sure the cables are secured in the cable clips
.
For touchscreen consoles (Figure 3):
1. Hook the Power Supply Bracket (included in console box) onto the right upright support.
2. Coil up all cables—coax, power and Ethernet—and hold the power supply
on the holder
with one hand, and with the other hand, thread a large zip tie around the upright support
.
NOTE
Ensure you thread the zip tie through the designated slots in the power supply
bracket.
3. Reduce any slack by pulling the cables tighter from the top, then tighten the zip tie.
4. Insert the ground connector. Secure the cables inside each of the three cable clips
attached to the right upright support. Leave cable connectors loose until after the lower
panel is installed (see Install lower panel and front cover).
Figure 2
Figure 3
NOTE
To complete the console installation, refer to the installation guide shipped with your con-
sole.
Route the power supply externally
WARNING
DO NOT allow cables to touch any moving parts around
the lift motor body—
lift screw, yoke, or ramp. Run the ramp
through its movement path a few times and have someone else
watch to make sure no cables are caught up or hanging loosely.
For touchscreen consoles:
1. Coil up all cables—coax, power extension
, and Ethernet—
and hold them in place with one hand, and with the other
hand, thread a large zip tie around the upright support (Figure
4).
NOTE
Make sure you thread the zip tie through the
designated slots in the power supply bracket
.
2. Pull the zip tie tight, making sure you have enough slack in the
power and extension cables.
3. Insert the grounding jumper into the ground connector, and
then secure the cables inside each of the three cable clips
attached to the right upright support. Leave cable connectors
loose until after the lower panel is installed (see Install lower
panel and front cover ).
NOTE
To complete the console installation, refer to the installation
guide shipped with your console.
Figure 4
©2020 Precor Incorporated
|
800/600 Line EFX Assembly Guide P/N 305292-101C, ENU
|
Oct 2020
|
2


