background image

ENCLOSURE DESIGN

This section gives the basic description for a sealed enclosure.

PrecisionPower

TM

woofers are designed for sealed enclosures and

vented enclosures. Sealed enclosures are generally considered the
most versatile for all music types and are the easiest to build. They
will also give high power handling with a wider range of frequencies.
The enclosure must be absolutely air tight. Use a high quality wood
glue for all seams of the enclosure. The enclosure should also be
screwed together. We recommend to use ¾" MDF for the following
enclosures. As MDF is a porous material it is best to also seal the
inside of the enclosure.

14

Summary of Contents for PCX 102

Page 1: ...PowerClass SubWoofers PCX 102 PCX 104 PCX 122 PCX 124...

Page 2: ...TABLE OF CONTENTS Congratulations 3 Caution 3 Specifications 4 Features 5 Wiring Configurations 6 Enclosure Design 14 Notes 17 2...

Page 3: ...suggestions These are by no means the only enclosures to use but they provide a starting point To determine the correct enclosure for your needs many factors must be addressed amount of power vehicle...

Page 4: ...linear excursion mm 16 1 16 1 16 1 16 1 Pe continuous power handling watts 300 300 300 300 Peak power handling music watts 600 600 600 600 Mms total moving mass grams 129 129 152 140 Cms mechanical co...

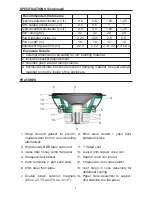
Page 5: ...65 oz on 10 and 70 oz on 12 14 Paper cone assembly to support and stabilize the flat panel 1 13 14 12 11 10 2 3 4 5 6 7 8 9 Recommended Enclosures Typical sealed enclosure cu ft 0 6 0 6 1 25 1 25 SPL...

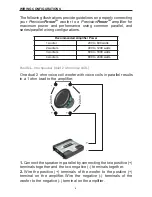
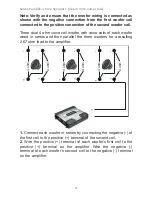
Page 6: ...woofer with voice coils in parallel results in a 1 ohm load to the amplifier 1 Connect the speaker in parallel by connecting the two positive terminals together and the two negative terminals togethe...

Page 7: ...1 ohm load to the amplifier 1 Connect the speaker in parallel by connecting the four positive terminals together and the four negative terminals together 2 Wire the positive terminals of the woofers...

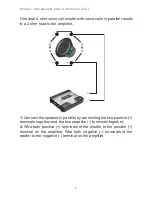
Page 8: ...d to the amplifier 1 Connect the speaker in parallel by connecting the two positive terminals together and the two negative terminals together 2 Wire both positive terminals of the woofer to the posit...

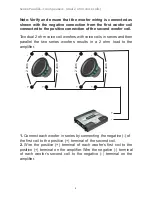
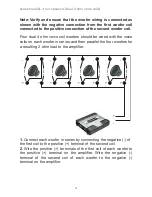
Page 9: ...l woofers with voice coils in series and then parallel the two series woofers results in a 2 ohm load to the amplifier 1 Connect each woofer in series by connecting the negative of the first coil to t...

Page 10: ...oice coils of each woofer wired in series and then parallel the three woofers for a resulting 2 67 ohm load to the amplifier 1 Connect each woofer in series by connecting the negative of the first coi...

Page 11: ...m load to the amplifier 1 Connect the woofer in series by connecting the negative of one terminal to the positive terminal of the other coil 2 Wire the positive terminal of the first coil to the posit...

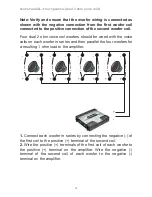
Page 12: ...e voice coils on each woofer in series and then parallel the four woofers for a resulting 2 ohm load to the amplifier 1 Connect each woofer in series by connecting the negative of the first coil to th...

Page 13: ...e voice coils on each woofer in series and then parallel the four woofers for a resulting 1 ohm load to the amplifier 1 Connect each woofer in series by connecting the negative of the first coil to th...

Page 14: ...ersatile for all music types and are the easiest to build They will also give high power handling with a wider range of frequencies The enclosure must be absolutely air tight Use a high quality wood g...

Page 15: ...ess 0 75 in 1 Front 1 Back height a 10 5 in width d 10 5 in thickness 0 75 in 2 Sides height a 10 5 in depth c 11 5 in thickness 0 75 in Driver Mounting Front Top Bottom a d Front Back c Sides A B C E...

Page 16: ...s 0 75 in 1 Front 1 Back height a 14 5 in width d 13 5 in thickness 0 75 in 2 Sides height a 14 5 in depth c 13 25 in thickness 0 75 in Driver Mounting Front Top Bottom a d Front Back c Sides A B C Ex...

Page 17: ...____________________ _____________________________________________________ _____________________________________________________ _____________________________________________________ _________________...

Page 18: ...ct which has been opened or tampered for any reason Units which are found to be damaged by abuse resulting in thermally damaged voice coils are not covered by this warranty but may be replaced at the...

Reviews: