background image

Flight

Manual:

IMPORTANT: 

If the drone has difficulty standing still while in hover, it will need a GPS 

recalibration, refer to page 10 for the instructions

1) Follow all of the steps under the Pre-Flight section first
2) Refer to the FAA guidelines for safe and proper drone operation

To take off, bring the throttle stick up past 50%

To hover in place, leave the throttle at 50%

To descend, bring the throttle a little under 50%

To rotate the camera, twist the Aux 3 knob on the controller

GPS Mode

Position 0 (GPS): GPS is ON, Gyro active

Position 1 (Att.): GPS is OFF, Gyro active

Position 2 (FS): Failsafe (

For emergency use only!

)

NOTE: 

If you had to recalibrate the GPS as described on page 10, make sure

you followed step 12

Flight Mode Orientation 

Position 0: The default Flight Mode will make the drone move in relation to its 

own heading. Basically, its left will always be its left, forward is forward, back is 
back, etc.

Position 1: The Course Lock mode will save the current heading as the forward 

orientation whenever. So no matter how you rotate the drone in flight 

forward/back/left/right always remain the same. A new course can be set with a
flick of the switch during flight.

1

13

Page 12 

Summary of Contents for Onset

Page 1: ...User s Manual Onset Scout Model 2014...

Page 2: ...1 Warnings 2 2 What s in the case 4 3 Detailed Components 5 4 Getting Everything Charged 9 5 GPS Recalibration 10 6 Pre Flight 11 7 Flight 12 8 Post Flight 14 9 Crop Health Imaging 14 10 Rotation Diag...

Page 3: ...ce when it reaches 10 5v Keep away from spinning motors at ALL TIMES Do not attempt to modify the drone Do not attempt to repair the drone NEVER allow minors to charge battery packs NEVER drop power s...

Page 4: ...th Never allow use of this product by anyone without providing them with these instructions You must read understand and follow all instructions and warnings for any product s to which this product is...

Page 5: ...Feed Monitor Charger Scout model 1x Precision Vision Camera RGB 1x Precision Vision Camera IR If equipped 1x Camera Charge Cable 1x DX8 Controller 1x Controller Charger 1x Controller Strap 1x Bind Pl...

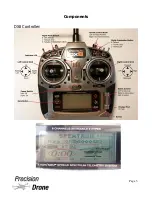
Page 6: ...Components DX8 Controller 1 6 Page 5...

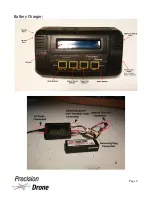
Page 7: ...Battery Charger 1 7 Page 6...

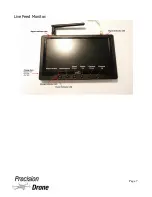
Page 8: ...Live Feed Monitor 1 8 Page 7...

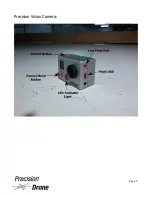
Page 9: ...Precision Vision Camera 1 9 Page 8...

Page 10: ...sing the power cable Attach the red and black leads to their respective positions on the charger Attach the balancing board to the balancing port on the charger Now take the red black leads and connec...

Page 11: ...f the drone will immediately turn a solid blue 7 Grab the Scout by arm 5 arm 3 on the Onset lift it straight up from the ground and hold above the waist 8 Rotate the drone 360 degrees clockwise around...

Page 12: ...all switches on the controller are forward Flight Mode Switch should both be in position 0 see page 5 8 Turn on controller 9 Scroll right on the main screen with the DX8 until you see all the telemet...

Page 13: ...ode Position 0 GPS GPS is ON Gyro active Position 1 Att GPS is OFF Gyro active Position 2 FS Failsafe For emergency use only NOTE If you had to recalibrate the GPS as described on page 10 make sure yo...

Page 14: ...or Onset came equipped with the Precision Vision 1 Crop Health System make sure both the IR and RGB cameras are charged Turn on both cameras and set them both to video mode Press and hold the record...

Page 15: ...4 Trim out unnecessary footage such as ascend and descent 5 Add the clip to the conversion list then hit convert all 6 Go to Step 2 Edit 7 Drag the clip to the video section in the bottom center of t...

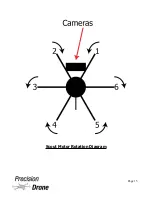
Page 16: ...Scout Motor Rotation Diagram 1 16 Page 15...

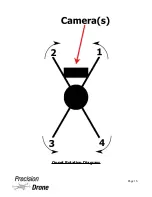
Page 17: ...Onset Rotation Diagram 1 17 Page 16...

Reviews: