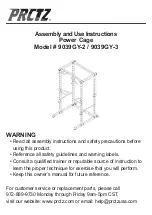
PRCTZ 9039GY-2 Assembly And Use Instructions Download Page 2

2

Important Safety Instructions

WARNING:

 To reduce the risk of injury, please read the following 

precautions before using this product. PRCTZ assumes no 

responsibility for personal injury or property damage sustained by or 

through the use of this product

1. It is recommended that the equipment is located in an access 

controlled area. It is the owners responsibility to Keep children away 

from all equipment 

2. Do not use or permit use of any equipment that is damaged, or has 

worn or broken parts. For all PRCTZ equipment use only replacement 

parts supplied by PRCTZ. 

3. Always make sure that all nuts and bolts are tightened prior 

to each use. 

4. Maintain labels and nameplates - do not remove labels for any 

reason. They contain important information.

5. Equipment maintenance - preventative maintenance is the key to 

smooth operating equipment. Please ensure that you follow our 

maintenance tips to ensure the continued correct function of your 

PRCTZ equipment.

6. Before any use, examine all accessories approved for use with the 

PRCTZ equipment for damage or wear.

7. Should your PRCTZ equipment appear damaged or worn, do not 

attempt to use or repair the equipment yourself.

8. It is the purchaser's responsibility to instruct all users as to the 

proper operating procedures of all PRCTZ equipment. 

Summary of Contents for 9039GY-2

Page 1: ...delines and warning labels Consult a qualified trainer or reputable source of instruction to learn the proper technique for exercise that you will perform Keep this owner s manual for future reference...

Page 2: ...rts supplied by PRCTZ 3 Always make sure that all nuts and bolts are tightened prior to each use 4 Maintain labels and nameplates do not remove labels for any reason They contain important information...

Page 3: ...also recommended that users tie up long hair to avoid contact with moving parts 11 Ensure that anyone not using the equipment stays clear of the user accessories and moving parts while the machine is...

Page 4: ...List Description Base Bar Top Bar Upright Pole Top Bar Connector Base Bar Connector Pull up Bar Left J Hook Right J Hook Left Safety Bar Right Safety Bar No 1 2 3 4 5 6 7 8 9 10 Qty 2 2 4 1 1 1 1 1 1...

Page 5: ...iption Left Dip Bar Right Dip Bar M10 x 85mm Bolt M10 Nylon Locknut M10 Washer 60mm Square End Cap 60mm Square Inner Cap 25x135mm Handle 25mm Round Inner Cap No 11 12 13 14 15 16 17 18 19 Qty 1 1 16 1...

Page 6: ...5 EXPLODED VIEW 6...

Page 7: ...7 Step 1 Parts and Hardware in Step 1 Image 8...

Page 8: ...8 Step 2 2 4 6 8 Parts and Hardware in Step 2 Image...

Page 9: ...9 Step 3 Parts and Hardware in Step 3 Image 8 8 18...

Page 10: ...10 Step 4 Parts and Hardware in Step 4 Images...

Page 11: ...after each use Avoid getting excessive moisture on components Do not use abrasive cleaners or petroleum based solvents to clean equipment Do not attempt any technical service on equipment without cons...

Page 12: ...expire at the original date i e 90 days from the original purchase date This warranty excludes defects caused by the product not being used in accordance with instructions accidental damage misuse or...

Page 13: ...e states do not allow the exclusion or limitation of incidental or consequential damages Accordingly the above limitation may not apply to you The warranty extended hereunder is in lieu of all other w...

Reviews: