The nozzle should be set for various nap height carpets. Short
nap carpets require lower settings, high nap higher settings. The
highest setting consistent with good cleaning should be used for any
particular carpet. A machine with the nozzle set lower than
necessary may not give as good a cleaning performance and may
result in excessive wear to carpet and brush bristles and be difficult
to push.
CAUTIONS
Disconnect cord plug from wall outlet when removing dust bag
or inspecting blower fan and brush.
Don’t operate machine without bag and adaptor/deflector in place.
Inspect fan for strings, thread, etc. and remove when cleaning
dust bag.
The brush belt guard and thread guard are designed to prevent
thread and strings from binding the brush. However, the brush
should be inspected frequently and obstructions removed to
prevent damage to bristles.
Do not pick up large metal slugs, metal shavings, or similar
debris. Also care must be taken so as not to suck up loose carpets
or other such bulky articles into the vacuum.
When machine is not in use, place nozzle in up position to lift
brush bristles off the floor, thus preventing damaging a set of brush
bristles.
The machine handle can be stored in the full vertical position, or
laid flat as positioned for packing.
ADJUSTMENTS & MAINTENANCE
The filter bag should be kept clean for best performance. To clean,
release bag strap clamp, remove bag from cable hooks and shake
out bag thru zipper opening and then replace cleaned filter bag.
Adjust belts for wear by loosening brush mounting screws. Pull
brush forward and retighten screws.
To replace a worn brush assembly remove belt cover, remove
screws, two at each end of brush housing. Remove bracket and
thread guard and re-assemble to new brush assembly. Re-
assemble and adjust belt as above.
Check supply cord for worn spots, cuts, etc. Replace if defective
for safety of the operator. Cord is to be stored by winding around
the handle pipe.
HANDLE AND BAG
ASSEMBLY INSTRUCTIONS
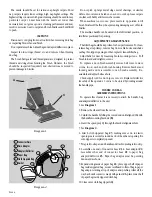
To operate this cleaner it is necessary to attach the handle, bag
and adaptor/deflector to the unit.
1. See
Diagram 1
.
2. Remove the cleaner from the carton.
3. Unfold the handle by lifting the curved end until aligned
(A)
with
the handle mounting brackets
(B)
.
4. Insert the speed pin
(C)
through the bracket alignment hole.
5. See
Diagram 2
.
6. Attach cloth zippered bag
#5
, making sure sewn in elastic
opening seals securely around neck of the exhaust opening. Be
sure zipper is completely opened.
7. Wrap velcro strap around handle and attach to mating velcro strip.
8. Assemble one end of connector hose
#1
to hose adaptor
#2
.
Assemble other end of connector hose
#1
to paper bag
adaptor/deflector
#3
. Paper bag adaptor must be pointing
downward as shown.
9. Expand side gussets of paper bag
#4
, place upper half of paper
bag inside zippered bag, mount cardboard collar of bag to paper
bag adaptor starting at top of adaptor and pushing collar all the
way back until contact is made with gasket
#6
, place lower half
of paper bag inside zippered cloth bag.
10. Close outer cloth bag zipper fully.
Diagram 1
Diagram 2
1
2
6
5
3
4
1 Connector Hose
2 Hose Adapter
3 Adaptor/Deflector
4 Paper Bag
5 Cloth Zippered Bag
6 Gasket
A
B
C
X8446


