background image

16


PowerXL Vortex Pro Air Fryer Plus™

PowerXL Vortex Pro Air Fryer Plus™    

17

Using The Wi-Fi Features 

Download the PowerXL App 

and Create an Account

1.  Download the PowerXL app from the Google Play 

store or App Store.

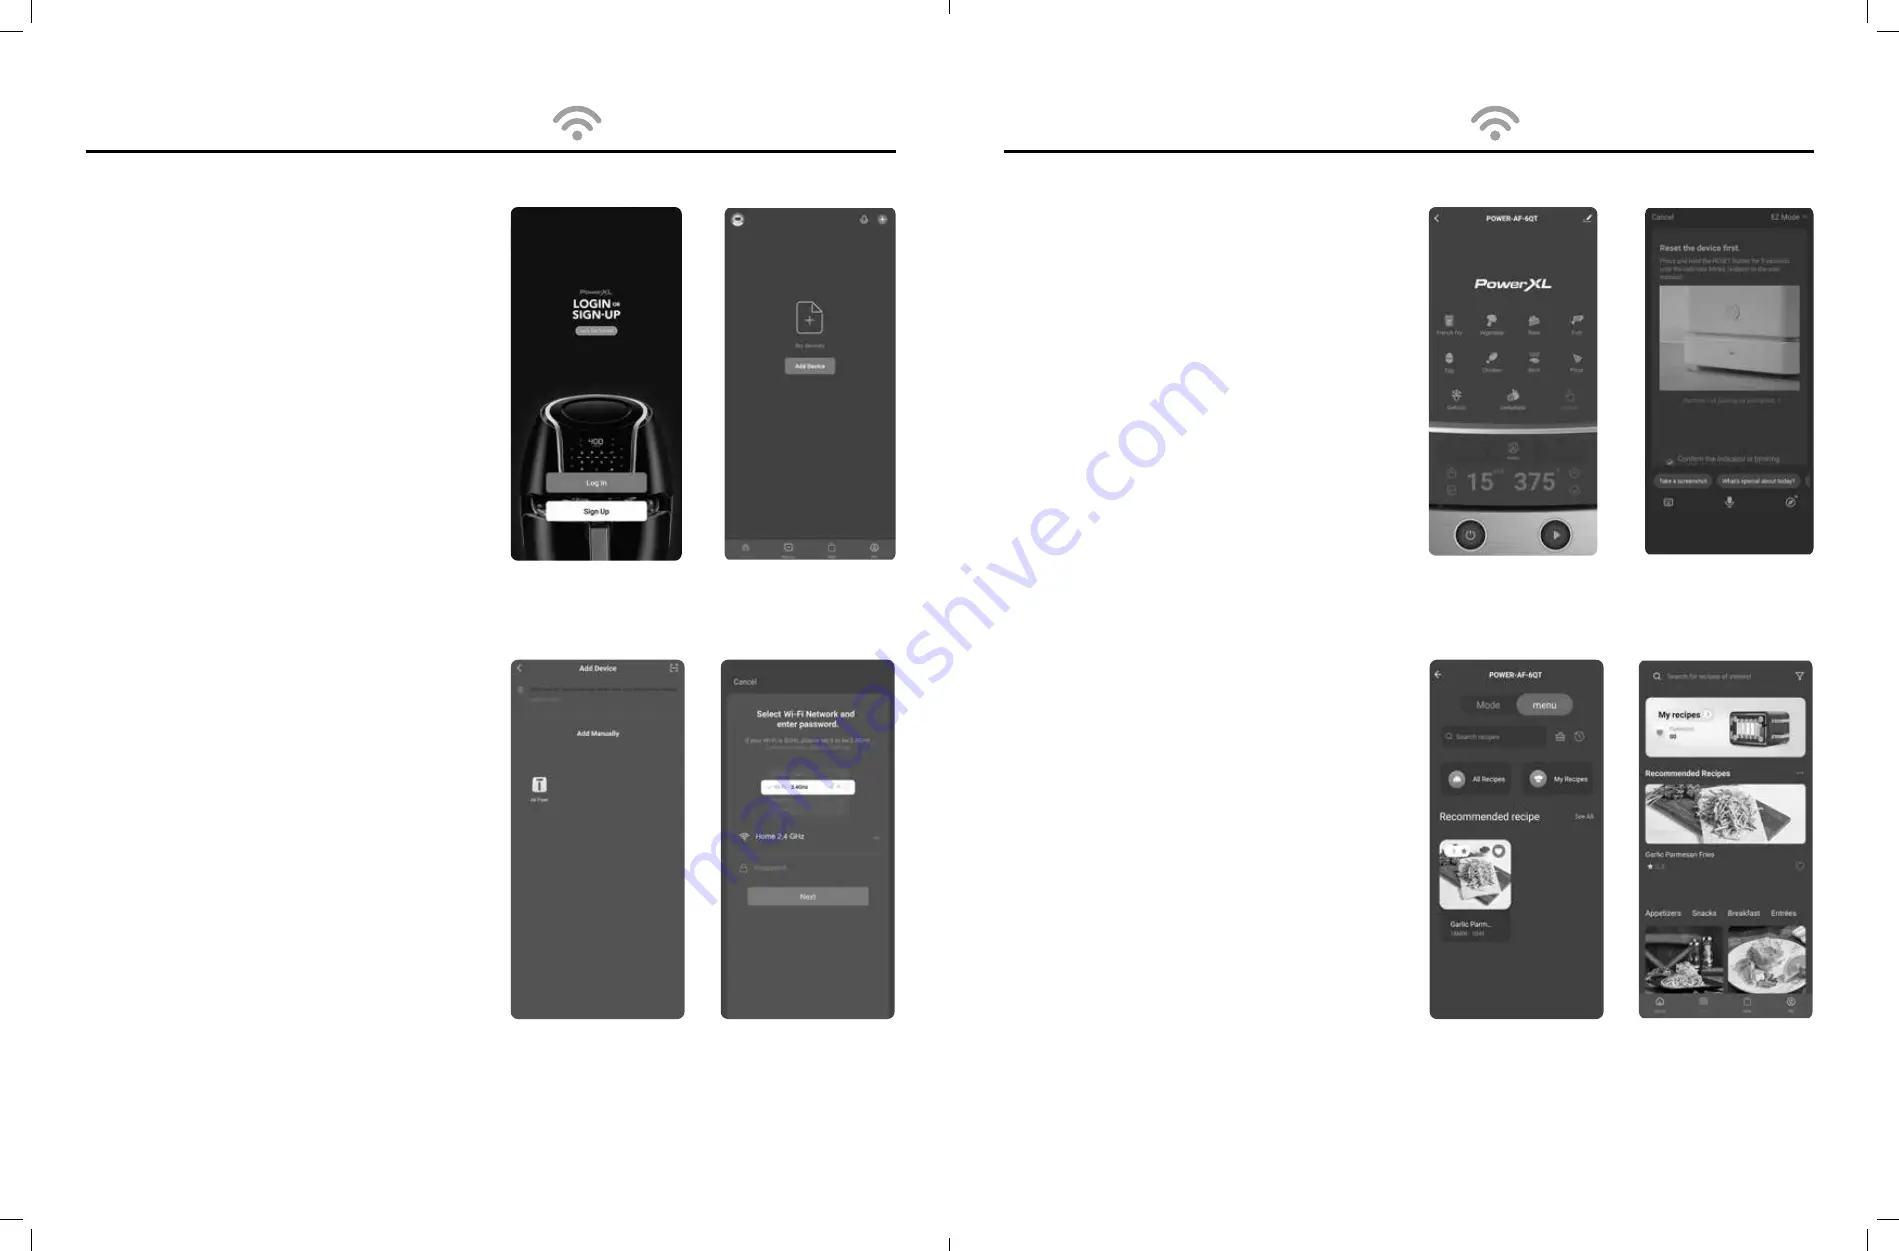
2.  Select “Sign Up” and enter your email to create 

an account (see 

Fig. a

). Your email will be sent a 

verification code.

3.  Enter the verification in the app and create 

a password.

Pair Your Device  

with the PowerXL App

1.  Plug the appliance into an electrical outlet and 

press the Power Button to turn the appliance on. 

After the appliance has been powered on for at 

least 10 seconds, press and hold the Power Button 

for 5 seconds. The Wi-Fi indicator on the control 

panel should start flashing rapidly, indicating that 

the appliance has entered pairing mode.

2. 

To pair automatically:

 In the Home tab, select “Add 

Device” (see 

Fig. b

). The appliance should be able 

to connect to the app automatically via Bluetooth 

connection. If the appliance does not connect 

automatically, you can manually pair the appliance 

with your app.

3. 

To pair manually: 

After selecting “Add Device,” 

select your appliance type (Air Fryer) under “Add 

Manually” (see 

Fig. c

). Select your 2.4 GHz wi-fi 

network and enter the password for that network. 

Select “Next” (see 

Fig. d

).

4.  Select “Confirm the indicator is blinking rapidly” 

and then select “Next” (see 

Fig. f

).

5.  The app will attempt to connect to the appliance. 

This process might take a few minutes.

6.  Your appliance should now be connected to the 

app. After the app is connected, your appliance

control panel can be accessed on the app

Home tab.

Fig. a

Fig. c

Fig. b

Fig. d

Using The Wi-Fi Features 

Controlling Your Appliance  

Through the App

You can use the PowerXL app to set cooking presets 

and set the cooking time and temperature on your 

appliance. 
Power Button: Select to light up the appliance

control panel. You must select the Power Button 

before selecting any other buttons.
Preset Buttons: Press to select a cooking preset. 

You can manually adjust the cooking time and 

temperature after selecting a preset setting.
Time Adjustment: Manually adjust the cooking time.
Temperature Adjustment: Manually adjust the 

cooking temperature.
Menu Button: Takes you to the recipe database, 

allowing you to select a recipe.
NOTE: You must press the Power Button on the 

appliance

s Control Panel in order to begin any 

cooking process. The appliance cannot be started 

remotely using the app; only the cooking time and 

temperature can be set.

Using the Recipe Database

The recipe database can be accessed by selecting 

the Menu button on the app

s appliance control 

panel (see 

Fig. g

) or by selecting the Recipe tab at the 

bottom of the app (see 

Fig. h

). Here, you can search for 

recipes compatible with your appliance.
In addition to providing you with pictures, ingredients, 

and step-by-step instructions for following a recipe, 

the recipe portion of the app can be used to set the 

cooking time and temperature associated with the 

recipe automatically. Scroll to the bottom of the recipe 

and press the Start button. Select your appliance from 

the list of appliances that appears and press “Start 

cooking” to set the cooking time and temperature you 

will need to complete the recipe.

Fig. e

Fig. g

Fig. f

Fig. h

Summary of Contents for AF-E6001-C

Page 1: ...8 qt 1700W 120V When using electrical appliances basic safety precautions should always be followed Do not use the PowerXL Vortex Pro Air Fryer until you have read this manual thoroughly Visit TristarCares com for tutorial videos product details and more Guarantee Information Inside pictured Model AF E6001 C ...

Page 2: ... SAFEGUARDS 4 Appliance Specifications 8 Parts Accessories 9 Attaching the Fry Basket Handle Display Panels Fry Baskets and Fry Trays 10 11 Using the Control Panel 12 Preset Chart 13 Instructiobs For Use 14 Before First Use Inserting the Fry Tray Using the Appliance Shaking Tips 14 14 15 15 15 Using The Wi Fi Features 16 Download the PowerXL App and Create an Account Pair Your Device with the Powe...

Page 3: ... should be followed including the following PREVENT INJURIES CAREFULLY READ ALL INSTRUCTIONS BEFORE USE 18 ALWAYS make sure the plug is attached to the appliance first and then plug the cord into the electrical outlet To disconnect press the Power button to turn the appliance off and then remove the plug from the electrical outlet 19 MAKE SURE the appliance is properly plugged into a dedicated ele...

Page 4: ... is removed POLARIZED PLUG This appliance has a polarized plug one blade is wider than the other To reduce the risk of electric shock this plug is intended to fit into a polarized outlet only one way If the plug does not fit fully into the outlet reverse the plug If it still does not fit contact a qualified electrician Do not attempt to modify the plug in any way a A short power supply cord is pro...

Page 5: ...ccessories 1 FRY TRAY 2 SILICONE BUMPERS 3 BASKET 4 HANDLE 5 CONTROL PANEL 6 AIR INLET VENT 7 MAIN UNIT HOUSING 8 HOT AIR OUTLET VENT 9 POWER CABLE 4 4 5 6 8 9 NOTE Unpack all listed contents from the packaging Contents vary by model Please remove any clear or blue protective film on the components before use Removing the bumpers is not recommended IMPORTANT Please make sure that your appliance ha...

Page 6: ...aging To attach the Fry Basket Handle 1 Remove the paper label Pull the Fry Basket out of the appliance 2 Slide the attachment point on the handle downward until it clicks into place 3 The Fry Basket Handle should lock into place and should not detach once it is locked into place 6 Qt Display Panel AF E6001 C 8 Qt Display Panel AF E8001 C 8 Qt Fry Tray and Basket AF E8001 C 6 Qt Fry Tray and Baske...

Page 7: ... Temperature Control Buttons The and symbols enable you to increase or decrease cooking temperature 5 F at a time Keeping a button held down will rapidly change the temperature Temperature control range 180 F 430 F 82 C 221 C Dehydrate temperature control range 90 F 170 F 32 C 77 C 5 Time and Temperature Display This display will keep track of the temperature and remaining cook time Shake Indicato...

Page 8: ...ays use the Fry Tray with the Basket 3 Press the Power Button Set the appropriate time and temperature for the ingredients you are cooking 4 When the timer beeps five times either the set cooking time has elapsed or the appliance is reminding you to shake your food see Shaking in Instructions for Use Pull the Basket out of the appliance and place it on a heat resistant surface 5 When removing food...

Page 9: ...iance s control panel can be accessed on the app s Home tab Fig a Fig c Fig b Fig d Using The Wi Fi Features ControllingYourAppliance Through theApp You can use the PowerXL app to set cooking presets and set the cooking time and temperature on your appliance Power Button Select to light up the appliance s control panel You must select the Power Button before selecting any other buttons Preset Butt...

Page 10: ... Preheat Shake or Flip Spray with Oil VEGETABLES Asparagus 1lb 380 F 193 C 8min Broccoli 8oz 380 F 193 C 8min Cornonthecob 2pc 380 F 193 C 8min PREPARED FOOD Hardboiledeggs shellon 250 F 121 C 18min Cake 320 F 160 C 20min Grilledcheesesandwich 1pc 375 F 191 C 6min InternalTemperature Meat Chart Food Type InternalTemp Beef Veal Ground 160 F 71 C Steaks roasts medium 145 F 63 C Steaks roasts rare 12...

Page 11: ...e Do not stack objects on top of the appliance Storage Troubleshooting Symptom Possible Cause Solution Theappliance doesnotwork Theapplianceisnotpluggedin PlugthePowerCableintoanelectricaloutlet Theapplianceispluggedintoanoutletthatisshared withotherdevices Plugtheapplianceintoadedicated electricaloutlet Theappliancehasnotbeenturnedonbysettingthe preparationtimeandtemperature PressthePowerButton S...

Page 12: ...Guarantee Policy Our products when purchased from an authorized retailer include a 1 year replacement guarantee if your product or component part does not perform as expected the guarantee extends only to the original purchaser and is not transferable If you experience an issue with one of our products within 1 year of purchase return the product or the component part for replacement with a functi...

Page 13: ...rXL Vortex Pro Air Fryer PlusTM This product has been manufactured to the highest standards Should you have any questions our friendly customer service staff is here to help you For parts recipes accessories and everything PowerXL go to tristarcares com or scan this QR code with your smartphone or tablet To contact us email us at info tvcustomerinfo com or call us at 973 287 5129 ...

Reviews: