background image

24-2


41

Daily Plant Checks

While it may not be the operator’s responsibility to 

perform servicing or mechanical maintenance, 

the operator must be thoroughly familiar with 

the plant and its proper care since their own 

safety is involved.


n

DANGER

DO NOT allow an excavator bucket 

feeding material into the hopper to pass 

overhead or near the plant operator.


n

WARNING

NEVER leave the plant unattended whilst 

it is in operation.

Checks Prior to Daily Start

4. Perform all actions required in the lubrication 

schedule requiring a daily check or lubrication, 

refer to servicing - lubrication.


n

WARNINGS

It is imperative that the operator carries 

out regular and diligent checks before 

operating the plant, especially with 

operational safety in mind.
Always consider what particular safety 

hazards could occur at specific sites and 

eliminate them before commencing work.

Plant

1. Observe all safety warnings.
2. Visually check and inspect all guards, covers 

and doors are in position and secure.

3. Check that all equipment and tools that are 

hazardous to operation are removed from the 

immediate site.

Summary of Contents for XA750S

Page 1: ...XA750S JAW CRUSHER SUBJECT TO CHANGE WITHOUT PRIOR NOTICE Original Instructions Issue Date 14 02 2012 Language English en Revision No 1 0 Reference No XA750S 01 Operations Manual...

Page 2: ......

Page 3: ...the operator should read and follow Failure to do this will increase the risk of injury or may result in death This user manual is part of the plant and must always be available wherever the plant is...

Page 4: ......

Page 5: ...Governing Specific Operational Phases 02 9 Warning of Special Dangers 02 12 Safety Signs 02 16 03 EN General Information General 03 2 EC Conformity 03 2 Units of Measure 03 3 Copyright 03 3 Operating...

Page 6: ...Battery Recharging 14 3 Battery Replacement 14 4 15 EN Engine Stop Switching off engine 15 2 16 EN Emergency Stop Emergency Stopping the Machine 16 2 Re Setting Emergency Stops 16 3 Testing Emergency...

Page 7: ...24 EN Daily Plant Checks Checks Prior to Daily Start 24 2 25 EN Dust Suppression System Dust Suppression Water Spray System if fitted 25 2 26 EN Re fuelling Check Fuel Level and Fill Up 26 2 27 EN Fe...

Page 8: ...42 6 43 EN Servicing Vibrating Hopper Feeder Vibrating Hopper Feeder Servicing 43 2 44 EN Servicing Jaw Crusher Jaw Crusher Lubrication 44 2 45 EN Servicing Vee Belts General 45 2 Alignment 45 3 Adju...

Page 9: ...r General if fitted 49 2 Inspection 49 2 Servicing 49 3 50 EN Servicing Electrical System General 50 2 Battery Replacement 50 3 51 EN Servicing Hydraulic System General 51 2 Hydraulic Fluid Level 51 3...

Page 10: ...vi Manual Contents...

Page 11: ...01 1 Introduction to the Machine EN 01 EN Introduction...

Page 12: ...he reliability and life of the machine Failure to do so may invalidate any warranties in force 4 This manual is part of the machine and must always be available wherever the machine is in use and kept...

Page 13: ...safe operating practices n nDANGER Indicates an imminently hazardous situation which if not avoided will result in death or serious injury n nWARNING Indicates a potentially hazardous situation which...

Page 14: ...lications It is vitally important that large pieces of steel or similar uncrushable objects are not allowed to enter the crushing chamber as severe damage and injury may occur The machine is not desig...

Page 15: ...MANUAL CHECK FOR ANY ADDENDUM OR BULLETIN WHICH IS INCLUDED IN THIS SECTION TO SUPPORT THESE VARIATIONS TAKE NOTE OF ANY VARIATIONS AS THEY MAY AFFECT PROCEDURES MACHINES CAN VARY IN SPECIFICATION The...

Page 16: ...01 6 Introduction to the Machine...

Page 17: ...of the kit are lengths of plain hose 25mm 1in bore for suction with strainer and delivery 5 The 2573 7002 pump is suitable for equipment with diesel fuel tanks between 200 and 500 litres 53 and 132 US...

Page 18: ...1 2 3 Fuel Transfer Pump if fitted 1 DO NOT USE A TRIGGER NOZZLE FOR DELIVERY INTO THE FUEL TANK 2 FLASHPOINT BELOW 37 C 99 F PETROL GASOLINE BENZINE 3 FLASHPOINT ABOVE 37 C 99 F DIESEL GAS OIL FUEL O...

Page 19: ...3 4 5 6 7 Fuel Transfer Pump if fitted EN INSTALLATION USE 4 CONTINUOUS DUTY AT 40 C 104 F 5 TEMPERATURE RANGE 6 DO NOT ALLOW THE PUMP TO RUN DRY 7 SWITCH OFF IMMEDIATELY DELIVERY OF THE FUEL IS COMP...

Page 20: ...ance with the introduction and specification 7 When re fuelling is complete switch off the pump and stow the hoses 8 Replace the filler cap 9 If the machine is to be operated refer to engine starting...

Page 21: ...AM0010 1 Powerscreen Plants EN Addendum to User Manual AM0010 M C S Belt Weigher BW100 EN...

Page 22: ...INITIAL ZERO COUNT 5 ZERO CALIBRATION REQUIRED ROUTINE CALIBRATION SIMPLIFIED GUIDE 1 The Following procedures may be performed on a routine basis as required 2 Important The belt should be stopped an...

Page 23: ...ibration 12 With belt running empty at normal speed with test weights applied 13 INITIAL SPAN COUNT 14 FREQUENCY COUNT DISPLAYED DURING CALIBRATION 15 DEVIATION 16 NEW SPAN COUNT 17 CALIBRATION COMPLE...

Page 24: ...elt fitted build up on the weigher etc 3 Important The belt should be stopped and secured prior to suspending or removing the test weights for span calibration Safe working practice should be adopted...

Page 25: ...12 With belt running empty at normal speed with test weights applied 13 SELECT P388 14 INVOKE INITIAL SPAN ENTER 1 15 CURRENT SPAN COUNT 16 SPAN CALCULATION FREQUENCY COUNT DISPLAYED 17 SPAN DEVIATION...

Page 26: ...AM0010 6 BW100 Belt Weigher if fitted...

Page 27: ...min nominal 6 6 US gall min to supply the machine spray bars only 2575 2009 65 l min nominal 17 US gall min to supply the machine spray bars plus additional capacity for requirements additional to th...

Page 28: ...container close to the machine 3 Whilst valve lever 2 is in the on position the screw type valve can be used to regulate the supply to the machine water system SKIN INJECTION HAZARD n nDANGER Refer t...

Page 29: ...ne checks Pump Hydraulic and Water Circuits Protection from Freezing 6 Precautions must be taken in cold weather to ensure water does not freeze within the system by opening the water manifold drain v...

Page 30: ...AM0011 4 Water Pump if fitted...

Page 31: ...02 1 Safety Hazards EN 02 EN Safety Notices and Hazards...

Page 32: ...removing guards Safety Notices n nDANGER SKIN INJECTION HAZARD Hydraulic fluid under high pressure can penetrate the skin causing serious injury Always relieve the pressure from the hydraulic system...

Page 33: ...ction Dust Mask Close Fitting Overalls Steel Toed Boots Industrial Gloves and High Visibility Vest n nWARNING FALLING HAZARD Falling from and or onto a machine can cause serious injury or even death D...

Page 34: ...E When carrying out maintenance or adjustment to the machine the following lockout procedure must be followed 1 Switch off engine or motor 2 Remove ignition or isolation key 3 Keep keys on person duri...

Page 35: ...reened or conveyed with this equipment When dusts are generated by the operation of this equipment use approved respiratory protection as required by National Federal State and Local safety and health...

Page 36: ...eral State National and Local laws and safety regulations must be complied with at all times to prevent possible danger to persons or property from accidents or harmful exposure 5 See also the separat...

Page 37: ...warnings and instruction labels clean to ensure safety instructions and warnings attached to the machine are always complete and perfectly legible 18 Replace unreadable or missing labels with new one...

Page 38: ...of the machine must be carried out only by a skilled electrician or by instructed persons under the supervision and guidance of a skilled electrician and in accordance with electrical engineering rul...

Page 39: ...rm could be pulled in and amputated 10 Switch off and lockout the machine before removing for adjustment purposes any safety devices or guarding 11 NEVER leave the machine unattended whilst it is in o...

Page 40: ...working platforms 25 Always use any walkway platforms provided or a safe and secure platform approved by the regional safety enforcing authority 26 Always use an EN A N S I approved safety harness whe...

Page 41: ...iesel fuel is highly flammable 40 Never remove the filler cap or refuel with the engine running 41 Never add gasoline or any other fuels mixed to diesel because of increased fire or explosion risks 42...

Page 42: ...Avoid contact with the skin eyes or clothing Electric Energy 1 Use only original fuses with the specified current rating Switch off the machine immediately if trouble occurs in the electrical system 2...

Page 43: ...sure operators wear a suitable face mask where exposed to possible harmful effects of air pollution of any kind Hydraulic and Pneumatic Equipment 24 Only persons having special knowledge and experienc...

Page 44: ...res are formulated to safely handle hazardous materials by correct identification labelling storage use and disposal 2 All hazardous materials must be handled strictly in accordance with the manufactu...

Page 45: ...ctional 9 Before setting the machine in motion always check that the accessories have been safely stowed away 10 When travelling on public roads ways and places always observe the valid traffic regula...

Page 46: ...cation and positions of safety signs on the machine Maintenance 2 Replace any missing or damaged safety signs 3 Keep operator safety in mind at all times 4 Keep safety signs clean using mild soap and...

Page 47: ...02 17 3000032 ISO 3000033 ISO 3000034 ISO 3000035 ISO EN Safety Hazards Illustrations...

Page 48: ...02 18 3000038 ISO 3000039 ISO 3000040 ISO 3000043 ISO Safety Hazards...

Page 49: ...02 19 3000118 ISO 3000120 ISO 3000189 ISO 3000196 ISO EN Safety Hazards...

Page 50: ...02 20 3000269 ISO 3000284 ISO 3000355 ISO 3000386 ISO Safety Hazards...

Page 51: ...02 21 3000819 ISO 3000820 ISO 3000821 ISO EN Safety Hazards...

Page 52: ...02 22 3000822 ISO 3000823 ISO 3000834 ISO Safety Hazards...

Page 53: ...02 23 3000835 ISO 3000836 ISO EN Safety Hazards...

Page 54: ...02 24 3000837 ISO 3000838 ISO 3000838 ISO Safety Hazards...

Page 55: ...02 25 3000839 ISO 3000840 ISO EN Safety Hazards...

Page 56: ...02 26 3000850 ISO 3000850 ISO 3000848 ISO 3000848 ISO Safety Hazards...

Page 57: ...02 27 3000862 ISO 3000862 ISO 3 EN Safety Hazards...

Page 58: ...02 28 3000866 ISO 3000866 ISO Safety Hazards...

Page 59: ...03 1 General Information EN 03 EN General Information...

Page 60: ...and adjust Expert assistance is seldom required provided that ordinary care is exercised in daily use 5 The machine has been built in accordance with current standards and recognised safety rules 6 I...

Page 61: ...er manual contains information and technical drawings which may not be copied distributed altered stored on electronic media revealed to others or used for the purpose of competition either partially...

Page 62: ...temperatures outside of this range contact your Powerscreen dealer or Powerscreen technical support department for details 2 Appropriate oils lubricants coolant to suit the local operating environmen...

Page 63: ...04 1 Powerscreen XA750S EN 04 EN Plant Specification and Information...

Page 64: ...6mm Width 3408mm Height 4320mm Track width 3160mm Working Dimensions All dimensions are in millimetres Feed hopper raised and product conveyor fully raised Approximate dimensions are in Feet Inches Ov...

Page 65: ...en designed and built to provide a range of equipment choices to meet a wide variety of individual needs and preferences as selected at the time of initial purchase Plant Description Weights 3 The wei...

Page 66: ...in conjunction with the optional dirt conveyor If the material is able to be screened it allows the extraction of smaller fines onto the dirt conveyor with the coarser material discharging onto the p...

Page 67: ...end Tracks 14 Heavy duty track pitch chain tracks driven by integral hydraulic motors and gearboxes with dual speed control by umbilical control or radio remote control if fitted Power Pack 15 Water c...

Page 68: ...s to move the plant 21 Emergency stop buttons are provided on each side of the plant and on the umbilical control Guards 22 Wire mesh or sheet metal guards are provided for all drives flywheels pulley...

Page 69: ...out prior notice as we operate a policy of continual product development 25 It cannot be guaranteed that the equipment specified will meet any specific requirements in respect of noise or vibration le...

Page 70: ...ulated 2 All feed should be of a size that will readily enter the crusher chamber 3 In order to avoid packing of the discharge opening and excessive wear of the plant jaws under size material should b...

Page 71: ...06 1 EN Powerscreen Plants Graphic displays 06 EN General Screen Icons...

Page 72: ...positioned next to icon that item is not operating 13 When positioned next to icon that item is operating 14 Engine operating hours 15 Number of times the engine has been started 16 Scroll to highlig...

Page 73: ...plant component or icon 22 Hollow arrow down decreases the speed of a plant component 23 Hollow arrow up increases the speed of a plant component 24 Rotating arrow indicates the component adjacent on...

Page 74: ...up 35 Raise product output conveyor 36 Lower product output conveyor 37 Control the tracks with the wired umbilical control 38 Control the tracks with the radio conttrol 39 Press horn button on contro...

Page 75: ...10 1 Powerscreen XA750S EN 10 EN Preparing to Move the Plant...

Page 76: ...oeuvring of the plant the tracks must be free of obstructions including crushed material and fines Do not push or tow the plant Failure to observe this warning could result in danger to persons and da...

Page 77: ...fication and plant information for travel dimensions 8 Observe all safety warnings n nWARNING Refer to Safety Notices Section for relevant warning and procedure FALLING HAZARD Preparing for Loading En...

Page 78: ...pward and secure with clips 14 Remove the securing bolts from the pivot points on the ladder 15 Fold up the ladder and fit the securing chain 13 Remove the fasteners lift and remove the handrail secti...

Page 79: ...last working screen in use 4 Scroll to highlight set up mode using ok knob or function buttons Product Conveyor 3 The plant preparation can only be undertaken in set up mode P20 If the plant is not i...

Page 80: ...ng a button there is a 3 second delay during which there is an audible alarm and the button light flashes before any movement takes place When moving the conveyor ensure that the hydraulic hoses and c...

Page 81: ...Powerscreen XA750S 8 EN Lower Section 8 The controls for the conveyor lower section are located on the left side of the plant 9 Fully raise the lower part of the product conveyor using the control le...

Page 82: ...m the transport bracket to allow the dirt conveyor to operate into the transport position 4 Locate the dirt conveyor control bank 5 Operate lever to fold the dirt conveyor for transport 1 Remove the e...

Page 83: ...eyor belt are not entangled with any part of the plant Failure in releasing any tucks folds in the dirt conveyor belt may result in ripping or tearing the belt 6 When folding the dirt conveyor observe...

Page 84: ...1 The hopper controls are positioned at the rear of the chassis 2 Operate the lever to disengage the end plate of the hopper from the wedges then fully lower the plate 3 Operate the lever to fully low...

Page 85: ...lly 1 Remove the two securing pins to allow the safety grid to to rotate back into the transport position 2 Connect suitable lifting shackles and lifting equipment to the lifting points on the safety...

Page 86: ...Preparing to Move Plant 1 Remove required fasteners securing the platform to the frame Secure all loose items removed to prevent loss Maintenance Platforms 2 Lower the platform down on the hinges for...

Page 87: ...orted on the plant 2 Small items should be stored in the left side of the control cabinet n nWARNING Prior to transportation always check the plant for loose or damaged components Fasten all loose par...

Page 88: ...ng to Move Plant Set Plant to Track Mode 1 Set the screen display to P00 by pressing function button if necessary 2 Scroll to highlight track mode using ok knob or function buttons 3 Select track mode...

Page 89: ...reen XA750S 12 11 15 EN 4 To load the plant on to a transporting trailer refer to unloading and loading 5 To manoeuvre the plant refer to moving the plant 6 Stop the engine see engine stop unless requ...

Page 90: ...10 16 Preparing to Move Plant...

Page 91: ...11 1 Unload Load Transport Trailer EN 11 EN Unloading and Loading Transport Trailer...

Page 92: ...g 6 Check that any loose items transported with the machine will not cause a hazard while unloading 7 Start the engine see engine starting 9 Unload the machine slowly off the trailer into a safe posit...

Page 93: ...if fitted see moving the plant 16 Start the engine see engine starting 12 Check that the travelling dimensions and weight when loaded will be within the regulation limits refer to specification and i...

Page 94: ...o transport always check the machine for loose or damaged components 18 Securing the machine and any loose items to the transport trailer is the responsibility of the haulage contractor NOTICE To obta...

Page 95: ...12 1 Moving the Machine Fitted with 860 controls EN 12 EN Moving the Machine 860 control...

Page 96: ...cks 1 The machine is manoeuvred with the tracks using the umbilical control or the radio remote control if fitted 2 Prepare the machine for moving see preparing to move Initial Preparation 3 Observe a...

Page 97: ...8 Take the umbilical control from the control box 9 Stand well clear of the machine 10 Hold the control with the stop button nearest to the operator 11 Press the horn button to sound the safety warnin...

Page 98: ...control with the stop button nearest to the operator and switch it on by pulling out the stop button 3 Press both of the safety buttons at the same time for at least 1 second and a red light will illu...

Page 99: ...orn button to sound the alarm The missing beep or break in the alarm after five seconds indicates that the tracks are ready for use The alarm will continue to sound 7 To move the machine refer to mano...

Page 100: ...which may invalidate warranty 1 The machine cannot be manoeuvred when mode is set to crush or 0 2 The alarm sounds continuously whilst the machine is being manoeuvred n nDANGER DO NOT stand on any of...

Page 101: ...f the machine 7 Avoid manoeuvring the machine over extremely uneven ground or damage may occur 8 Control valves mounted on the engine and beneath the feeder are NOT to be used to manoeuvre the machine...

Page 102: ...in the desired direction 15 Release the buttons to stop movement NOTICES If the machine is being moved using the radio remote control and moves out of the operating range of the radio or the battery b...

Page 103: ...1 or fast 2 tracks A B reverse Right turn slow reverse track A Left turn slow reverse track B Rotate clockwise track A forward B reverse Rotate counter clockwise track A reverse B forward 16 Refer to...

Page 104: ...ty warning horn off 2 Set track operation mode off by esc exit 0 or crush depending on the type of controls fitted 3 If crushing is to commence see preparing to crush 5 If not required further switch...

Page 105: ...14 1 860 Radio Remote Control if fitted EN 14 EN 860 Radio Remote Control...

Page 106: ...ime for at least 1 second and a red light will illuminate Release the safety buttons and it will change to green 3 To switch off the control push in the stop button when the plant is not set to radio...

Page 107: ...us operation remaining and indicates it requires recharging 10 A charging cable is supplied suitable for plugging into a vehicle auxiliary or cigarette lighter point Some machines have a 24V socket on...

Page 108: ...rol should be recycled 4 All batteries shall be disposed of correctly to be recycled at an approved treatment facility 2 Contact your local Powerscreen dealer or Powerscreen technical support departme...

Page 109: ...15 1 Engine Stop EN 15 EN Engine Stop...

Page 110: ...engine ignition to close down the machine Always follow the correct sequence to finish crushing with the machine 1 Observe all safety warnings 2 Follow instructions to prepare to finish crushing or f...

Page 111: ...the engine is running at its slowest speed 5 On plants with manual engine speed control set the engine at its slowest speed 6 Let the engine idle with no load for 3 to 5 minutes 4 Switch plant contro...

Page 112: ...9 Engine Stop 9 If the radio remote control if fitted has been in use switch off by depressing the stop button n nWARNING Refer to Safety Notices Section for relevant warning and procedure LOCKOUT PL...

Page 113: ...16 1 Emergency Stop EN 16 EN Emergency Stop...

Page 114: ...BUTTON n nWARNING The stop button on the remote radio control if fitted is NOT an emergency stop as it may not be operative at all times 2 When the machine has been stopped using an emergency stop bu...

Page 115: ...ton will remain engaged until physically released by pulling or twisting depending upon the type fitted 8 The engine cannot be started if any of the emergency stops remain depressed Re Setting Emergen...

Page 116: ...ges are shown on machines with a display 5 The safety alarm will sound 8 Turn the key off the 0 position 2 Start the engine see engine starting 9 Turn ignition key to the first position again 10 Wait...

Page 117: ...17 1 Powerscreen XA750S EN 17 EN Preparing to Crush...

Page 118: ...ty awareness training has been undertaken 1 Prior to setting up the plant consideration should be given to a suitable layout to prevent oversize material or metal from entering the plant In order to p...

Page 119: ...on cap in the toolbox 5 Observe all safety instructions 6 Start the engine see engine starting leaving the engine at its idling speed 7 The plant control screen will display the last working screen in...

Page 120: ...17 4 9 9 9 F5 F4 ok 10 10 F6 ok Preparing to Crush 9 Scroll to highlight set up mode using ok knob or function buttons 10 Select set up mode by either pressing ok or function button...

Page 121: ...opper controls are positioned at the rear of the chassis 3 Operate the lever to fully raise the hopper end plate and engage the wedge lugs on the side plates Hopper 2 Operate the lever to fully raise...

Page 122: ...Secure Hopper 1 Fit two wedges in each hopper side plate n nWARNING Refer to Safety Notices Section for relevant warning and procedure FALLING HAZARD 2 Fit the two rear corner wedges to secure the hop...

Page 123: ...the chassis 4 Operate lever to fully unfolded the dirt conveyor into the working position 5 When unfolding the dirt conveyor observe the conveyor belt particularly in the pivot point area If any fold...

Page 124: ...he working position Crusher Safety Grid 3 Secure the safety gate in the working position by fitting the securing bolts 1 Locate the 2 lifting points on the safety gate Illustration for showing the lif...

Page 125: ...es place When moving the conveyor ensure that the hydraulic hoses and conveyor belt are not entangled with any part of the plant Product Conveyor Upper Section 1 Press and hold the product conveyor ra...

Page 126: ...to engine stop and implement the lockout procedure refer to safety notices and hazards 4 Return to screen display P00 by pressing function button as required 3 Fully lower the lower part of the produ...

Page 127: ...tices Section for relevant warning and procedure FALLING HAZARD 1 Raise platform up into the working position on the hinges and secure with the fasteners 2 Secure the platform to the upper section and...

Page 128: ...17 12 4 5 6 Preparing to Crush 4 Release the latch and unfold the engine maintenance platform ladder down 5 Locate support bar into the slots 6 Fit the hand rails and secure with pins...

Page 129: ...epare the other side ladders for use in a similar manner 8 Proceed to the right hand side maintenance platform 9 Place the ladder support bracket into the working position and secure 12 Using suitable...

Page 130: ...17 14 Preparing to Crush...

Page 131: ...18 1 EN Loading the Vibrating Feeder Hopper 18 EN Loading the Vibrating Feeder Hopper...

Page 132: ...ed for loading 5 This method will allow feed material to pass over the feeder bars gradually to allow them to function correctly 6 The feed bucket should pass as close as possible to the hopper top ed...

Page 133: ...per 9 Load material into the hopper at a rate the feeder and crusher can work efficiently 10 Set the feeder speed such that material is fed evenly and does not build up refer to crusher operation 11 D...

Page 134: ...18 4 Loading the Vibrating Feeder Hopper...

Page 135: ...20 1 Powerscreen XA750S EN 20 EN Crusher Operation...

Page 136: ...nWARNING Ensure that all safety aspects are checked before starting the engine Starting to Crush Material 3 Measure the crusher discharge opening and adjust if necessary 4 Check that all guards are in...

Page 137: ...screen will display the last working screen in use 6 Observe all safety instructions 7 Start the engine see engine starting leaving the engine at its idling speed 9 The crusher can only be operated i...

Page 138: ...hen be started in an automated sequence or manually Starting Automatic Sequence 15 Scroll to highlight feeder using ok knob or function buttons 13 For the plant to operate the temperature of the hydra...

Page 139: ...ing feeder 17 The plant will follow an automatic sequence of starting sections of the plant 18 There will be a delay between each section starting 19 The engine speed will change as sections start 16...

Page 140: ...a button there is a 3 second delay during which there is an audible alarm and the button light flashes before any movement takes place Product Conveyor 2 Scroll the arrow to highlight product conveyor...

Page 141: ...20 7 Powerscreen XA750S 4 4 EN 4 The plant component icon becomes solid when on and displays a running icon adjacent 5 Check conveyor is running satisfactorily 6 The crusher can now be started...

Page 142: ...display screen P10 when the product conveyor is running 2 Scroll the arrow to highlight crusher using ok knob or function buttons Crusher 3 Switch on product conveyor by either pressing ok or function...

Page 143: ...plant component icon becomes solid when on and displays a running icon adjacent 6 The feeder can now be started NOTICE To avoid damaging the clutch DO NOT increase the engine speed to the operating sp...

Page 144: ...all safety instructions 2 Visually confirm that the dirt conveyor if fitted has been lowered outward into its working position 3 The conveyor can only be operated in plant mode a display screen P10 4...

Page 145: ...20 11 Powerscreen XA750S 6 6 6 ok F6 5 5 EN 5 Switch on dirt conveyor by either pressing ok or function button 6 The plant component icon becomes solid when on and displays a running icon adjacent...

Page 146: ...he product conveyor and crusher should already be running check they are operating 3 The feeder can only be operated in plant mode display screen P10 when the crusher is running 4 Scroll to highlight...

Page 147: ...d on and off remotely with the radio remote control if fitted and selected but the speed can only be adjusted by the feeder control on the plant 6 The vibrating feeder icon has a running icon adjacent...

Page 148: ...ding upon the type of material being fed into the plant to maintain an even regular flow through the crusher 2 The feeder speed can be set in plant mode display screen P10 3 Scroll to highlight speed...

Page 149: ...20 15 Powerscreen XA750S ok F6 6 6 F5 F4 ok 5 5 EN 5 To adjust the feeder speed use the ok knob or function buttons down or up arrows 6 Press ok or function button to confirm and set the feeder speed...

Page 150: ...unning satisfactorily 2 Ensure the plant is stable and without undue vibration If necessary reposition the plant on firm level area with the full length of both tracks in contact with the ground 3 Che...

Page 151: ...21 1 Powerscreen XA750 EN 21 EN Operation Adjusting and Setting...

Page 152: ...pening X is measured from the top of the tooth on one jaw plate to the corresponding root between two teeth on the other jaw plate 5 The opening should ideally be measured when the jaw is closed at a...

Page 153: ...ch other and moved by a hydraulic cylinder controlled by a lever 10 When the adjustment cylinder is fully retracted the wedges move the jaw to the minimum gap setting 11 When the adjustment cylinder i...

Page 154: ...rd to reduce the discharge opening 5 DO NOT start any part of the plant 6 The crusher must be stationary to make adjustments Adjusting Discharge Opening 8 Operate the control lever downward to increas...

Page 155: ...EN 9 Stop the engine refer to engine stop 11 Start the engine and make further adjustments as necessary 10 Check measurement and discharge opening refer to measuring discharge opening 12 Refer to pla...

Page 156: ...21 6 Crusher Operation...

Page 157: ...22 1 Powerscreen XA750 EN 22 EN Operation Clearing Blockages...

Page 158: ...rusher Operation 1 This model does not have a special way of clearing blockages and is cleared in the same manner as a standard jaw crusher Clearing Blocked Crusher 2 Refer to separate section on clea...

Page 159: ...23 1 Powerscreen XA750 EN 23 EN Plant Alarms...

Page 160: ...r icons and information NOTICE A fault must be rectified before crushing operations can be resumed n nWARNING To rectify faults which require repairs or replacements of parts where specialist tools or...

Page 161: ...gency stop activated 03 Stop on radio control activated 04 Engine fault reported 05 Crusher stopped start fault 06 Hydraulic fluid level low 07 Clutch control fault 08 Fuel level low 09 Product convey...

Page 162: ...Operation 15 Clutch pressure sensor fault 14 Feeder stopped engine load too high 16 Clutch locked out 17 Clutch coil fault 18 Clutch fault 19 Communication connection fault 20 Jaw hydraulic system flu...

Page 163: ...24 1 Daily Plant Checks EN 24 EN Daily Plant Checks...

Page 164: ...Daily Start 4 Perform all actions required in the lubrication schedule requiring a daily check or lubrication refer to servicing lubrication n nWARNINGS It is imperative that the operator carries out...

Page 165: ...dust or dirt is allowed to build up Clean out if necessary Avoid frequent starting and stopping of the plant unnecessarily as it will cause damage to the plant and excessive wear 5 Make sure all warn...

Page 166: ...heck coolant level when cold and top up as necessary refer to engine manual and servicing lubrication 6 Some plants are fitted with a coolant header tank for filling and topping up 7 Some plants are f...

Page 167: ...racks refer to servicing of tracks 9 Close down the plant and implement the lockout procedure 10 Check the track rollers and idler wheels for possible leakage 11 Check the surface of the track rollers...

Page 168: ...age in the following areas Main chassis Feeder Track frames Conveyor frames Conveyors 15 Observe all safety warnings 16 Check that all conveyor rollers are free to rotate 17 Remove any build up of mat...

Page 169: ...25 1 Dust Suppression if fitted EN 25 EN Dust Suppression System...

Page 170: ...and pipe work varies on different type of plant 3 Each circuit consists of spray bars each fitted with atomiser nozzles 4 These are normally located in the following areas 5 The total flow requirement...

Page 171: ...All nozzles should be kept free of dirt and blockages 10 Each nozzle should be checked every time the dust suppression is switched on NOTICE Drain water from system when not in use if there is a possi...

Page 172: ...25 2 Dust Suppression if fitted...

Page 173: ...26 1 Re fuelling EN 26 EN Re fuelling...

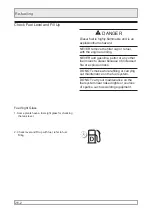
Page 174: ...or any other fuel mixes to diesel because of increased fire or explosion risks DO NOT smoke while refilling or carrying out maintenance on the fuel system DO NOT carry out maintenance on the fuel sys...

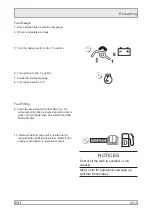
Page 175: ...e filler is located behind a door or panel Some plants have an external fuel tank fitted with filler NOTICES Do Not fill the tank to overflow or full capacity Allow room for expansion and wipe up spil...

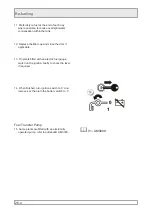
Page 176: ...ce the filler cap and close the door if applicable 13 On plants fitted with an electric fuel gauge switch on the ignition briefly to check the level if required 14 When finished turn ignition switch t...

Page 177: ...27 1 860 Radio Remote Feeder Stop Start if fitted EN 27 EN Feeder Stop and Start 860 Radio Remote...

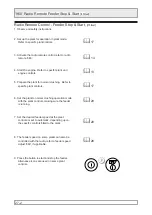
Page 178: ...d on some plants can also be controlled with the radio refer to feeder speed adjust 860 if applicable 3 Activate the radio remote control refer to radio remote 860 4 Start the engine Refer to specific...

Page 179: ...31 1 Powerscreen XA750 EN 31 EN Preparing to Finish Crushing...

Page 180: ...r by switching off the engine ignition to close down the plant Always follow the correct preparation sequence Normal Closing Down the Plant Feeder 2 Wait until the feeder is empty of material then sto...

Page 181: ...being used press the button on the radio remote control to stop the feeder 8 Wait until the feeder has stopped before stopping the next item Crusher 9 When the crusher is empty of material then stop t...

Page 182: ...ave run off the product conveyor stop the product conveyor 16 The product conveyor is operated in plant mode P10 13 The crusher icon and its running icon will clear and it will follow a slowing and st...

Page 183: ...stop the engine as described in engine stop Final Preparation 22 It is recommended that at the end of operation for the day the plant is routinely cleaned down and thoroughly examined to check for an...

Page 184: ...31 6 Preparing to Finish Crushing...

Page 185: ...32 1 Clearing a Stalled Jaw Crushers EN 32 EN Clearing a Stalled Jaw Crusher...

Page 186: ...causes the crusher to stall and the toggle plate does not fail it is possible that very high pressure will be sustained on the moving swing jaw dependent on which position the stall occurred in the c...

Page 187: ...SECURELY FASTENED IN PLACE SUITABLE PERSONAL PROTECTION EQUIPMENT MUST BE WORN n nCAUTION The following procedure or any other procedure developed to remove tramp metal or any other material that resu...

Page 188: ...iolent swinging movement of the jaw 8 The toggle plate should heated across the centre line between the holes using a long handled large gas torch such that the operator can stand in a protected posit...

Page 189: ...33 1 Powerscreen Jaw Plants EN 33 EN Initial Checks Running In...

Page 190: ...week of operation This section should be read and understood prior to starting the plant If there are any doubts consult your local Powerscreen dealer or Powerscreen technical support 3 Refer to engin...

Page 191: ...in the tank 10 Check the alignment and tension of the vee belt drive daily during the initial days of operation 11 Check the shaft bearing temperature daily using a contact thermometer and record for...

Page 192: ...sher has not been run for some time re grease all the crusher bearings then run empty for approximately 2 hours Feeder 17 Frequently check the oil levels in the vibrating unit oil baths 18 After first...

Page 193: ...34 1 Powerscreen Jaw Plants EN 34 EN Jaw Crusher Checks...

Page 194: ...1 Check discharge opening with callipers and adjust as necessary to the required settings 2 Check the jaw and side cheek securing nuts daily Jaw Crushers Wear Checks 3 In high ambient temperatures gre...

Page 195: ...no rocking movement of the toggle beam View through the chassis shim aperture guards whilst the crusher is running 14 Excessive wear or damaged pads could result in movement of the toggle beam or cyli...

Page 196: ...3 Jaw Checks Crushers should be inspected on a weekly basis and at 500 hour intervals for damage in the following areas 1 Crusher body 2 Wear Parts Routine Inspection Checks 3 Flywheel s Area to insp...

Page 197: ...40 1 Servicing Safety Precautions EN 40 EN Servicing Safety and Precautions...

Page 198: ...r improper servicing will cause high repair costs and long term standstill Therefore regular servicing is imperative 3 The reliability and life of the plant depends on regular and proper servicing 4 T...

Page 199: ...s undertaken 9 Read the appropriate manual relevant to the operation in hand 10 Carry out a risk assessment for all servicing operations 11 Have suitable lifting equipment available for the component...

Page 200: ...cedure and display a prominent tag at the control station or other appropriate place to warn of work being carried out 15 Keep clear of moving parts when trying to identify or isolate any unusual nois...

Page 201: ...any welding instruction label inside the engine canopy 2 Turn the battery disconnect switch off to the 0 position and lockout n nWARNING Refer to Safety Notices Section for relevant warning and proced...

Page 202: ...bearings hydraulic components electrical components and ground straps 6 Do not use electrical components the electronics control module or electrical ground stud for grounding the welder 7 Protect an...

Page 203: ...in running nip points Disengage all the power and operate controls to relieve pressure Stop the engine Implement lockout procedure Allow machinery to cool Securely support any plant or machine element...

Page 204: ...40 8 Servicing Safety Precautions...

Page 205: ...41 1 Powerscreen XA750S EN 41 EN Servicing Lubrication...

Page 206: ...gular checks on fluids and the lubrication of the plant in accordance with the schedule is essential 3 In addition to the lubrication points the lubrication schedule lists the regular attention requir...

Page 207: ...t guess or assume an amount Check the greasing equipment used regularly To prevent contamination of the grease wipe the grease nipples clean before applying the grease gun 4 Refer to lubricant and flu...

Page 208: ...41 4 P10 P3 P8 P9 P8 P9 P11 P10 P11 P2 P2 P4 P4 P5 P5 P6 P6 P7 P7 P12 P12 P13 P13 P13 P13 P13 P13 P13 P1 P1 P13 P14 P14 Servicing Lubrication Lubrication and Hydraulic System Schedule...

Page 209: ...oz each Re grease 8 Hours High ambient conditions 35 C 95 F Quantity each bearing 50g 1 8 oz Re grease 8 Hours NOTICE DO NOT use grease that contains molybdenum disulphide MoS2 5 All hours stated are...

Page 210: ...t Conveyor Shafts Locations 4 Lubricant D Re grease Every 2 weeks If fitted Locations 4 Lubricant D Re grease Every 2 weeks 10 Dirt conveyor if fitted head and tail shaft bearings are located on the h...

Page 211: ...the sole responsibility to keep anyone at risk clear of the plant Persons with medical implants which may be affected by the magnetic field should keep a minimum of 3m 10ft away 12 Type C track gearb...

Page 212: ...anual Refer to engine manual P7 Engine Lubricating oil Fuel Coolant E L C Coolant Extender E L C Extender E L C Extended Life Coolant See engine manual 15 Plant hydraulic system level refer also to se...

Page 213: ...k Tension Track Tension D E or H P13 General Grease Points Locations Hopper cylinder pivots 10 Product conveyor cylinder pivots 4 Dirt conveyor cylinder pivots 2 Conveyor belt tensioners 4 Lubricant D...

Page 214: ...he plant are dependent upon the ambient operating temperature 2 Ambient temperatures are defined as daily temperatures which are consistently below the temperature stated or consistently above the tem...

Page 215: ...42 1 Lubricant Fluid Specifications EN 42 EN Lubricant and Fluid Specifications...

Page 216: ...F Kinematic viscosity at 40 C mm s 104 F in s 220 0 341 100 C mm s 212 F in s 20 1 0 031 Viscosity index 105 Timken OK lb minimum 50 Extreme pressure agent Yes R O agent Yes Anti foaming agent Yes Cop...

Page 217: ...VG 100 ISO VG 150 DO NOT use synthetic oil Oil Specification Grade Q Specification API GL 4 Gear oil SAE 90 Oil Specification Grade R Shell Omala 100 BP Energol GR XP 100 Oil Specification Grade S She...

Page 218: ...range 20 to 120 C 4 to 248 F Viscosity 150cst at 40 C 104 F Speed factor 200 000 Duty Heavy Suppliers Castrol Spheerol EPL2 Shell Albida LX Kluber Centoplex 2EP FAG Arcanol L135V Grease Specification...

Page 219: ...antity and type of grease at the correct intervals specified Grease Specification Grade U General purpose grease containing molybdenum disulphide MoS2 NOTICE GRADE M For cone crusher wedge rings this...

Page 220: ...32 Hydraulic Fluid Specification Grade F ISO VG 46 Kinematic viscosity at 40 C mm s 104 F in s 46 0 0713 100 C mm s 212 F in s 6 5 0 010 Viscosity index 95 Rust inhibitor Yes De foament Yes Anti scuff...

Page 221: ...Servicing Vibrating Hopper Feeder EN 43 EN Servicing Vibrating Hopper Feeder...

Page 222: ...to Safety Notices Section for relevant warning and procedure LOCKOUT PLANT FALLING HAZARD 2 Unscrew the plug to drain oil from each oil bath Re fit plug to seal Vibrating Hopper Feeder Servicing 3 Fil...

Page 223: ...work and that any hardened material inside the pan is not allowed to build up and affect the performance of the plant 8 Check to ensure that the hydraulic drive is operating efficiently 9 Check the co...

Page 224: ...Servicing Vibrating Hopper Feeder...

Page 225: ...44 1 Powerscreen Plants EN 44 EN Servicing Jaw Crusher...

Page 226: ...t the crusher eccentric shaft is greased at the correct intervals refer to servicing lubrication Jaw Crusher Lubrication 2 Use the correct grease only not a mixture refer to lubricant and fluid specif...

Page 227: ...45 1 Servicing Vee Belts EN 45 EN Servicing Vee Belts...

Page 228: ...excessive loading on the shaft bearings and can lead to premature failure 6 When replacing a multi belt drive always use a set of matched new belts so that equal force can be applied to all the belts...

Page 229: ...el when viewed from all planes Alignment A Correct installation both shafts and pulleys are parallel and in alignment B Incorrect shafts are parallel from above but not from end view C Incorrect shaft...

Page 230: ...e moving power pack base frame mounted on four adjusting screws which must have all the locknuts tight whilst running the plant 4 Some plants with vertical tensioning have a hydraulic assisted system...

Page 231: ...described in drive belt tensioning 7 Close down the plant and implement the Lockout Procedure 8 Remove guarding as necessary to gain access to the Vee belt drive and tensioning elements 9 Mark or mea...

Page 232: ...valves in turn and operate the pump to raise each cylinder and take the weight of the engine and frame off the nuts 8 The centre valve operates two cylinders at the belt end 9 Release the appropriate...

Page 233: ...re fitted new belts Refer to servicing vee belts fault finding 17 The drive centre distance must be reduced prior to installation so that new belts can be fitted without the use of force 18 Under no c...

Page 234: ...n nWARNING Refer to Safety Notices Section for relevant warning and procedure LOCKOUT PLANT FALLING HAZARD Drive Belt Tension 5 If a belt tension indicator is available METRIC Centre to Centre Distanc...

Page 235: ...55mm 14in 6 6kgf 14 6lbf SPC BELT SECTION Small Pulley Diameter 224 to 250mm 8 8 to 9 8in 7 1kgf 15 7lbf 265 to 355mm 10 4 to 14in 9 4kgf 20 7lbf Over 375mm 14 8in 12kgf 26 5lbf x1 25 BASIC SETTING FO...

Page 236: ...ening Caused by excessive contamination by oil certain cutting fluids or rubber solvent Whipping During Running Usually caused by incorrect tensioning principally on long centre drives If a slightly h...

Page 237: ...46 1 Servicing Conveyors EN 46 EN Servicing Conveyors...

Page 238: ...acking purposes n nWARNING The belt magnet assembly is very powerful and permanently charged The strong magnetic field produced could affect heart pacemakers watches credit cards mobile phones etc The...

Page 239: ...tion on the conveyor that could cause accident or damage when the conveyor is started 9 Tracking should be carried out with the belt empty With very stiff belts which do not trough well nor make prope...

Page 240: ...g when loaded without any slip occuring 4 The tension adjusting screws should be kept clean and well oiled n nDANGER Under no circumstances should any adjustment be made on the belt whilst the machine...

Page 241: ...g a sliding bearing 10 Once correct tension has been achieved tighten the lock nuts and clamping nuts 8 Loosen the screw tension lock nuts where fitted 9 Either by turning a nut on the screw or the sc...

Page 242: ...e seals and the belt but at the same time not bearing hard on the belt n nDANGER Clip joints can be dangerous and should not be used Belt repairs replacements should be performed by vulcanising only I...

Page 243: ...ause damage to the belt are renewed immediately 11 In the interests of efficient operation and general safety it is important that operating conditions are kept as clean as possible and that any spill...

Page 244: ...conveyors are place in more convenient positions remotely from the bearing 6 Where the machine does not have a vibrating feeder but includes a feed conveyor with an oil lubricated speed reduction gear...

Page 245: ...prior to the commencement of any work 9 Use suitable personal protective equipment i e eye foot hand and head protection etc as may be required or necessary to undertake the task 10 Gloves to protect...

Page 246: ...h or shovel 15 In the case of a blockage at a drive or tail drum it may be necessary to loosen the tension on the conveyor belt so that the blockage can be removed Re tension and re align the belt aft...

Page 247: ...47 1 Servicing of Tracks EN 47 EN Servicing of Tracks...

Page 248: ...HQJWK W VKRXOG DOVR EH SDUNHG RQ OHYHO JURXQG RYHUQLJKW DQG GXULQJ SHULRGV WR RI QRQ XVDJH 7KLV LV SDUWLFXODUO LPSRUWDQW ZKHQ ZRUNLQJ LQ DGYHUVH FRQGLWLRQV W LV HVVHQWLDO WKDW WKH WUDFNV DUH FRUUHFWO...

Page 249: ...sure the maximum amount of track sag from the high point of the track to the bottom of the straight edge Correctly adjusted the sag should be approximately 15mm 0 63in but must not be less that 5mm 0...

Page 250: ...tion for relevant warning and procedure 1 Observe all Safety Warnings 2 Close down the plant and implement the Lockout Procedure 3 Locate the access aperture on the side of the track frame and remove...

Page 251: ...tting has been loosened do not attempt to remove the tracks or disassemble the track tension system or remove the grease fitting It is possible that running the tracks with the grease fitting loosened...

Page 252: ...he top position and the other plug is as shown 7 Clean plugs using a clean non flammable solvent 8 Apply thread sealant to the plugs and refit 9 Repeat procedure on the other side Drive Oil Draining F...

Page 253: ...should be positioned horizontally side to side 13 Close down the plant and implement the lockout procedure 14 Place a suitable container in position to collect the old oil 15 Remove the filling level...

Page 254: ...table container in position to collect the old oil 6 Remove the filling plug 7 Remove the drain plug and drain the old oil looking for metal particles indicating component wear 8 Clean and re fit the...

Page 255: ...48 1 Servicing Clutch type G EN 48 EN Servicing Clutch type G...

Page 256: ...ia the plant system Servicing Inspection 3 Every 500 hours of operation check the tightness of clutch securing bolts and hydraulic connections 4 At every 5000 hours of operation the clutch must be ins...

Page 257: ...49 1 Servicing Magnetic Separator if fitted EN 49 EN Servicing Magnetic Separator...

Page 258: ...lear of the machine Persons with medical implants which may be affected by the magnetic field should keep a minimum of 3m 10ft away 1 Be sure the magnet frame is visibly square and has not been damage...

Page 259: ...s this will cause the shaft bearings to fail 6 Regularly check the hydraulic motor mounting bolts for tightness and that both halves of the coupling between the motor and the drive shaft are in alignm...

Page 260: ...49 4 Servicing Magnetic Separator if fitted...

Page 261: ...50 1 Servicing Electrical System EN 50 EN Servicing Electrical System...

Page 262: ...ion device after failure must not exceed the rating of the original otherwise damage to components may occur and any warranty invalidated A repeat of the failure must be investigated and the problem r...

Page 263: ...which are replacable 9 Battery Posts terminals and related accessories contain lead and lead compounds 10 Handle batteries carefully and keep them level as they contain sulphuric acid an electrolyte w...

Page 264: ...eplaced by a competent person 18 On some plants it is necessary for a suitable working platform to be used 19 The plant has a negative chassis connection 20 Disconnect the cable at the negative batter...

Page 265: ...ame type and capacity as the original ones fitted 25 Contact your local Powerscreen dealer or Powerscreen technical support department for advice if in doubt Battery Recycling 26 Do not dispose of any...

Page 266: ...50 6 Servicing Electrical System...

Page 267: ...51 1 Servicing Hydraulic Systems EN 51 EN Servicing Hydraulic System...

Page 268: ...is relieved then close the valve Do not amend the hydraulic system In the event of any problems these should only be dealt with by suitably experienced and qualified engineers General Daily plant chec...

Page 269: ...filters etc to apply the greatest degree of cleanliness as it is most important that contaminants are not allowed to enter the system 1 Check the fluid level on the gauge and top up as necessary 4 If...

Page 270: ...uid filters have condition indicators to show when the filter element needs to be renewed When the gauge changes from green to red whilst the system is running at normal operating temperature the filt...

Page 271: ...t reaches the stop 7 Place container below filter to collect spillage of fluid 8 Remove screws and the cover plate 9 Remove filter and clean inside the housing and cover plate with lint free cloth 10...

Page 272: ...clean inside the housing and cover with lint free cloth 7 Fitting new filter of the approved pattern and specification 8 Replace the spring which holds the filter in place 9 Lightly smear the O ring w...

Page 273: ...nd thereafter after 1000 hours but in dusty atmosphere it is recommended to change more frequently depending upon conditions 12 Observe all safety warnings 13 Close down the machine and implement the...

Page 274: ...pillage of fluid 7 Unscrew the filter bowl turn anti clockwise looking from below 8 Remove the old filter and clean inside the bowl and housing with lint free cloth 9 Fit new filter and small O ring o...

Page 275: ...60 1 Powerscreen XA750S EN 60 EN Replacing Worn Jaws...

Page 276: ...dges are firmly seated and the clamping nuts are secure It is recommended this is checked before starting crushing again after 3 days and after 1 week Further checks should also be made at least every...

Page 277: ...nnect suitable lifting shackles and lifting equipment to the lifting points on the safety gate 5 Raise the gate using the lifting equipment and rotate the gate back 180 until the gate is supported by...

Page 278: ...ct the threads on the bolts and nuts and strike the bolt to loosen the wedges 11 Springs are fitted below the bolt heads to help release the wedges 12 Move the top of the jaw forward using a suitable...

Page 279: ...n the back face and remove any burrs 5 Check the centre jaw location for wear The nominal width of the location lug on the jaw holder when new is 73 to 74mm 2 9in and if the wear is more than 5mm 0 2i...

Page 280: ...to engage with the jaw holder 10 Move the top of the jaw towards the holder and locate the clamp into the hook on the jaw 11 Lightly tighten the clamping nuts and hammer the jaw and clamp to ensure i...

Page 281: ...the same items on the other side to allow the clamping rod to move 5 Take the extraction washer from toolbox and fit it and a nut to the jaw clamping rod 6 Tighten the nut to pull the wedge outward wi...

Page 282: ...s necessary 14 Repair or renew the wedges if the wear is more than 5mm 0 2in 15 Renew the wedge locking nut and bolt if they are damaged or bolt is bent Fitting the Fixed Jaw 10 Inspect the backing pl...

Page 283: ...Raise the jaw to engage the lower jaw hook over the full width then slew the top over the side wedges to fully engage with the jaw holder 23 Fit the spacer tubes washers and thin nuts to each end of...

Page 284: ...60 2 Wear Parts Replacing Jaws...

Page 285: ...Warranty 05 05 2014 Page A 1 Rev 050514 Operations Manual Warranty Table of Content 1 Non USA Sales Warranty A 2 2 USA Sales Warranty A 5 3 Engine Warranty A 7...

Page 286: ...arts shall be provided at no cost to the owner If requested by Seller components or parts for which a warranty claim is made shall be returned to Seller at a location designated by Seller All componen...

Page 287: ...ately with the respective carrier 6 Deterioration Repairs work required or parts exposed as the result of age storage weathering lack of use demonstration use or use for transportation of corrosive ch...

Page 288: ...OR OBLIGATION IMPOSED BY STATUTE CONTRACT TORT OR COMMON LAW OR OTHERWISE WHETHER OR NOT CAUSED BY THE NEGLIGENCE OF THE SELLER ITS EMPLOYEES AGENTS OR OTHERWISE INCLUDING WITHOUT LIMITATION LOSS OF...

Page 289: ...kmanship Such parts shall be provided at no cost to the owner If requested by Seller components or parts for which a warranty claim is made shall be returned to Seller at a location designated by Sell...

Page 290: ...Seller will not be responsible under the warranty for resultant damage to other parts due to that continued operation 8 Workmanship of Others Seller does not accept responsibility for improper instal...

Page 291: ...nty of this machine please visit http warranty finlayhydrascreens com Depending on the engine fitted to your machine you must also register the engine of your product via Catapillilar http www cat com...

Page 292: ...05 05 2014 Page A 8 Warranty Rev 050514 Operations Manual Warranty Intentionally Left Blank...

Reviews: