PowerPeak FSL8246P User Manual Download Page 10

Speed Control/Resistance 

The best way to determine your proper resistance setting depends on your fitness goals. If you are using
the stepper for the first time or if you desire cardiovascular, fat-burning and strength endurance workout
than we recommend that you place the speed control knob in the fast position. This allows you to step
at a fast, easy and steady pace with light pedal resistance. 
The stronger your muscles become the more resistance you may need to strengthen your legs and
improve your cardiovascular system. To do this, simply slide the knob towards the SLOW position. Do
not slide the knob more than one half an inch at a time per workout until you reach your desired
resistance. 

IMPORTANT: make sure your muscles are strong enough to handle the intense pressing against the
pedals prior to moving the resistance knob towards the advances slow position. 

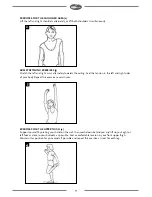
Getting on the stepper:

IMPORTANT: to help establish correct balance and proper form while exercising on the stepper, we
highly recommend that firs time users place the unit between a doorway or position a high back chair in
front of the stepper. Hold onto the doorway or chair back and without getting on the unit, slowly place
one foot on a pedal and push down so that the pedal contacts the base. Now, place this same foot in
the middle of the pedal and step up onto the pedal. Next, place your other foot in the centre of the other
pedal and slowly start stepping up and down with both feet. Keep stepping slowly as you gain both
balance and experience with the stepper's unique bi-directional movement. 
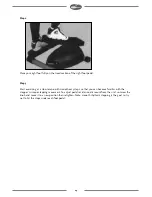
Step 1

Stand on the floor at the rear of your trainer. Put your left foot fully on the tread section of the left foot
pedal and push it down until it stops. 

28

Summary of Contents for FSL8246P

Page 1: ...Gebruiksaanwijzing User manual Bedienungsanleitung Mode d emploi FSL8246P 10 05...

Page 2: ...nterrupt the training immediately and consult a doctor Benutzen Sie den Stepper nur komplett montiert Wir raten Anf ngern den Stepper zur Unterst tzung an einer Wand einem Stuhl oder in einem T rrahme...

Page 3: ...19 SOLVING PROBLEMS 37 GARANTIEBEWIJS 20 GUARANTEE 38 SERVICEFORMULIER 21 SERVICEFORM 39 INHALTSVERZEICHNIS SOMMAIRE SICHERHEITSVORSCHRIFTEN 40 CONSIGNES DE S CURIT 58 BAUZEICHNUNG 42 SCHEMA DE MONTAG...

Page 4: ...circumstances should the equipment be used as a toy This equipment has not been designed to be used as a toy and must only be used for the purposes described in this manual Read the instructions below...

Page 5: ...s carefully and take a look at the assembly instructions 3 Remove all packaging materials and lay down all parts on a free space This gives you an overview and simplifies the assembly procedure Protec...

Page 6: ...1 5 Right foot tube assembly 1 6 STW 19 Circlip 2 7 Turnbuckle link bar 1 8 Turnbuckle 1 9 Outside cone 1 10 Inside cone 1 11 Thrust bearing 1 12 Large nut 1 13 Shaft 1 14 Washer 035 x 0 8 x 3 mm 1 1...

Page 7: ...ocket head bolt 4 29 M6x 20mm Socket head bolt 4 30 Foot pedal plug 4 31 30mm Wave washer 1 32 M4x15mm Pan head screw 10 33 Shaft stop plate 1 34 M6 spring washer 4 35 Chain keeper 1 36 Stopper 2 37 M...

Page 8: ...t the two large rubber feet into each of the rear stabilizer ends Align the key on the foot with the slot in the tube Ensure that the screw holes are aligned then fit and tighten one screw in the side...

Page 9: ...r is located at the rear of unit Grasp the ball knob at the end of the lever Rotate anti clock wise to unlock the control then slide the lever to either the fast or slow position Rotate clock wise to...

Page 10: ...ntense pressing against the pedals prior to moving the resistance knob towards the advances slow position Getting on the stepper IMPORTANT to help establish correct balance and proper form while exerc...

Page 11: ...tempo with smooth easy steps so that you can become familiar with the stepper s unique stepping movement To adjust pedal resistance dismount from the unit unscrew the knob and move it to a new positi...

Page 12: ...loor so that the bottom is facing upwards Position yourself at the rear of the unit so that the turnbuckle adjustment and the link bar are located on the left side To increase the pedal height Turn th...

Page 13: ...ect function The small arrow will indicate which function is selected in accordance with the arrow s position on the LCD compared to the print below the LCD To select function to be permanently displa...

Page 14: ...s Avoid wide clothes because they can get caught in moving parts of the product WARM UP STRETCHING COOL DOWN A successful exercise session begins with warming up exercises and ends with exercises for...

Page 15: ...sion in the left and right sides of your body Repeat this exercise several times EXERCISES FOR THE UPPER THIGH 4 Support yourself by placing your hand on the wall then reach down behind you and lift u...

Page 16: ...ssible TOUCH TOES 6 Bend your trunk slowly forwards and try to touch your feet with your hands Reach down as far as possible to your toes Maintain this position for 20 30 seconds if possible EXERCISES...

Page 17: ...to the other prior to each pedal touching the base Free swinging step Easy cardiovascular workout Step on the lateral thigh stepper Slowly begin to swing your arms from side to side as if you were wal...

Page 18: ...me you step Side deltoid raises Lift up your cardiovascular workout while you train your legs and shoulders at the same time While stepping place both arms at your side with your elbows slightly bent...

Page 19: ...seems Move the resistance level to Fast position Alternatively your unit may to be too high require additional grease Additionally the resistance system of the stepper can be slightly adjusted from i...

Page 20: ...ted or made illegible Repairs have been executed by unauthorized repair workshops or unauthorized persons The damage can be blamed on a cause that is alien to the device such as fire damage water dama...

Page 21: ...scription Powerpeak Stepper Shop of purchase Date of purchase YOUR DATA Name Address Postal code City Telephone Fax E mail DESCRIPTION OF THE PROBLEM For us to be able to guarantee a rapid settlement...

Reviews: