background image


www.powermaxfitness.net 


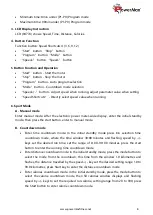
Minimum time: 8min under (P1-P9) Program mode 


Maximum time: 99min under (P1-P9) Program mode 

3.


LCD Display Instruction 

LCD (94774) shows: Speed, Time, Distance, Calories. 

4.


Button Function 

Function button: Speed Shortcuts 4 (3, 6, 9, 12) 


“Start” button “Stop” button


“Program” button “Mode” button


“Speed+” button “

Speed-

” button


5. 

Button Function and Operation


“Start” button 

- Start the motor 


“Stop” button 

- Stop the motor 


“Program” button 

- Auto program selection 


“Mode” button 

- Countdown mode selection 


“Speed+/

-

” button 

- Adjust speed when running, adjust parameter value when setting 


“Speed Shortcuts” 

- Directly select speed value when running 

6. Sport Mode 

A.


Manual mode 

Enter manual mode: After the electronic power meter-wide display, enter the initial standby 
mode, then press the start button, enter to manual mode. 

B.


Countdown mode 


Enter  time  countdown  mode:  In  the  initial  standby  mode  press  Kin  selection  time 
countdown mode, where the time window 30:00 minutes and flashing speed by +/- 
keys set the desired run time, set the range of 8: 00-99: 00 minutes, press the start 
button to enter the running time countdown mode. 


Enter distance countdown mode: In the initial standby mode, press the mode button to 
select the mode from the countdown, this time from the window 1.0 kilometres and 
flashes, the distance travelled by the speed +/- key set the desired setting range 1.0 to 
99.0 kilometres, press Start key to enter the distance countdown mode. 


Enter calories countdown mode: In the initial standby mode, press the mode button to 
select  the  calorie  countdown  mode,  then  50  calories  window  displays  and  flashing 
speed by +/- keys to set the required run-calorie, setting range from 20 to 990, press 
the Start button to enter calorie countdown mode. 


Summary of Contents for TDM-99S

Page 1: ...S MANUAL Read all instructions carefully before using this product Retain this owner s manual for the future s reference Product may be slightly different with photos it is subject to actual product T...

Page 2: ...er this warranty is limited to replacing or repairing free of charge any parts which may prove to be defective under normal home use This warranty does not include any damage caused by improper operat...

Page 3: ...under adults accompany Please wear comfortable clothes avoid flip flop or skirt when using this machine Please start from suitable sport as excessive exercise may affect health Loading capacity is 110...

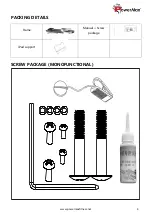
Page 4: ...www powermaxfitness net 4 PACKING DETAILS Frame Manual Screw package iPad support SCREW PACKAGE MONOFUNCTIONAL...

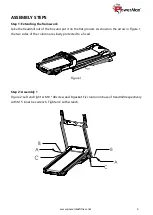
Page 5: ...box and put it on the flat ground As shown in the arrow in Figure 1 the two sides of the column are slowly protected to a fixed Figure I Step 2 Assembly 1 Figure 2 Left and right A M 8 40 screw and B...

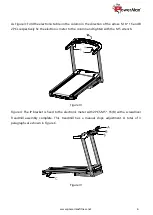
Page 6: ...PCs respectively fix the electronic meter to the column and tighten with the M 5 wrench Figure III Figure 4 The IP bracket is fixed to the electronic meter with 2PCS M5 16 B with a screwdriver Treadm...

Page 7: ...mill owner slowly descends to the ground level NO LIFT ELECTRONIC WATCHES OPERATING INSTRUCTIONS PROGRAM MODE 6 3 9 12 CAL TIME DIST PULSE SPEED 1 Description Treadmill parameter Sport parameter Sport...

Page 8: ...s the start button enter to manual mode B Countdown mode Enter time countdown mode In the initial standby mode press Kin selection time countdown mode where the time window 30 00 minutes and flashing...

Page 9: ...any key to wake electronic form re enter standby mode after the initial full display 8 Safety lock function After normal use the need to specify the location of the safety lock into electronic form b...

Page 10: ...ic and under controller Please connect again or change communication line When Electronic without signal Change Electronic to repair When under controller without signal Change under controller to rep...

Page 11: ...ck Solution Safety Magnet off Please set magnet safety lock correctly Electronic Safety lock system malfunction Change electronic to repair Running belt adjustment method 1 When running belt lean to t...

Page 12: ...Treadmill Lubricant Location is in the middle of the lower surface of the running belt When add lubricant please inject to the centre of running board then put down the belt pressing the hole by hands...

Reviews: