LV710 Freight Camera - Dry Van Swing Door Installation
Revised: 05/23/19
34
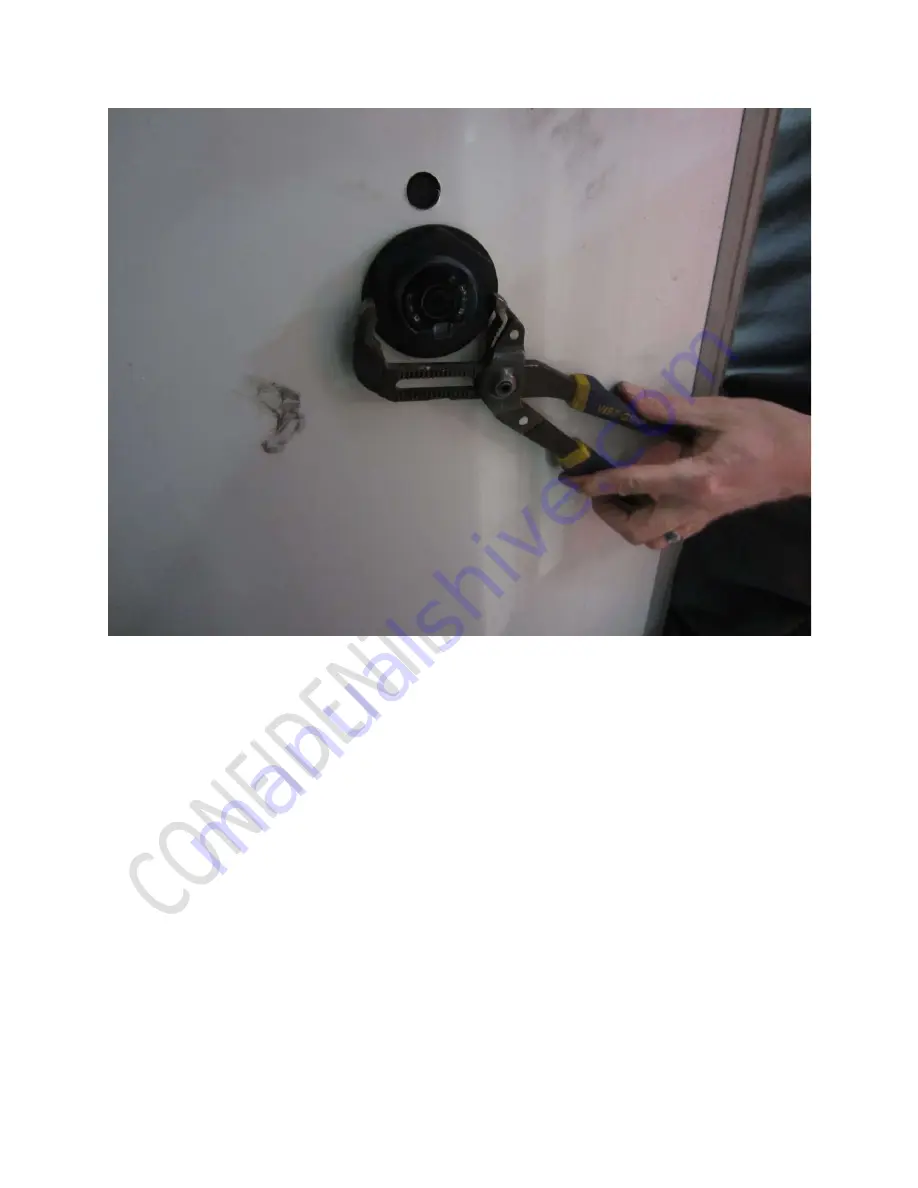
Tighten nut ¼ turn past hand tight
Page 1: ...e Saw countersink only 10 24 Tap Cutting Oil Installation Requirements 1 Device must be installed on rear curbside door next to inner locking rod 2 Overall door thickness must be 1 125 Overall door th...
Page 2: ...e 4 Remove the activation magnet from the device Retain the magnet 5 Observe that the LED on the device lens flashes red three times This confirms activation Device Pairing 1 Contact I D Systems Custo...
Page 3: ...LV710 Freight Camera Dry Van Swing Door Installation Revised 05 23 19 3 Removing tape over activation magnet Activation magnet removal and LED flash...
Page 4: ...19 4 Standard Installation 1 Confirm curbside door thickness is 75 2 Assemble installation hole template 3 On the exterior of the curbside door next to inner locking rod mark a location 50 up from th...
Page 5: ...05 23 19 5 4 With curbside door closed and latched align the center of lens hole on the template with the marked location on the door Press the vertical edge of the template against the inner locking...
Page 6: ...or Installation Revised 05 23 19 6 5 Using a spring loaded punch and template mark the location of 2 holes on the door a Lens hole 1 Door b Positioning dowel hole 1 Door Mark hole locations with sprin...
Page 7: ...LV710 Freight Camera Dry Van Swing Door Installation Revised 05 23 19 7 6 Drill 2 5 8 hole for lens at marked location on door 2 5 8 lens hole...
Page 8: ...LV710 Freight Camera Dry Van Swing Door Installation Revised 05 23 19 8 7 Drill hole for positioning dowel at marked location on door hole for positioning dowel...
Page 9: ...9 9 8 Remove any drill shavings and debris from exterior and interior door surfaces 9 Deburr any metal edges on exterior and interior door surfaces 10 Apply a bead of Sikaflex 252 to exterior door sur...
Page 10: ...l shock mount hardware onto device a Slide thick black rubber washer over lens assembly with flat side against device body b Slide white plastic washer over lens assembly with flat side against thick...
Page 11: ...d positioning dowel into holes b Hold device in place c Ensure lens is centered in 2 5 8 hole d Slide thin black rubber washer over lens assembly e Install plastic nut onto lens assembly by turning cl...
Page 12: ...LV710 Freight Camera Dry Van Swing Door Installation Revised 05 23 19 12 Lens centered in hole...
Page 13: ...LV710 Freight Camera Dry Van Swing Door Installation Revised 05 23 19 13 Install thin black rubber washer...
Page 14: ...LV710 Freight Camera Dry Van Swing Door Installation Revised 05 23 19 14 Hand tighten black plastic nut...
Page 15: ...LV710 Freight Camera Dry Van Swing Door Installation Revised 05 23 19 15 Tighten nut turn past hand tight...
Page 16: ...LV710 Freight Camera Dry Van Swing Door Installation Revised 05 23 19 16 Remove clear protective film from lens...
Page 17: ...bside door b Place magnet bracket on locking rod parallel to the device c Slide magnet bracket up or down so that center of magnet is aligned 1 16 above top of notch on device d Unlatch curbside door...
Page 18: ...LV710 Freight Camera Dry Van Swing Door Installation Revised 05 23 19 18 14 Install thread forming screws...
Page 19: ...LV710 Freight Camera Dry Van Swing Door Installation Revised 05 23 19 19 Completed installation...
Page 20: ...overall curbside door thickness using an external caliper gauge Confirm overall curbside door thickness is 75 and 1 125 16 Assemble installation hole template 17 On the exterior of the curbside door n...
Page 21: ...sed 05 23 19 21 18 With curbside door closed and latched align the lens hole on the template with the marked location on the door Press the vertical edge of the template against the inner locking rod...
Page 22: ...19 22 19 Using a spring loaded punch mark the locations of 4 holes in template c Lens hole 1 Door d Positioning dowel hole 1 Door e Trigger magnet mounting screw holes 2 Inner locking rod Mark locati...
Page 23: ...in step 5 21 Remove any sheathing disc from interior door surface f Using a 3 3 8 hole saw drill through inner door sheathing at location of 3 16 hole drilled in step 6 g Avoid letting hole saw teeth...
Page 24: ...LV710 Freight Camera Dry Van Swing Door Installation Revised 05 23 19 24 Remove sheathing disc...
Page 25: ...LV710 Freight Camera Dry Van Swing Door Installation Revised 05 23 19 25 22 Drill 2 5 8 hole for lens at marked location on door 2 5 8 lens hole...
Page 26: ...LV710 Freight Camera Dry Van Swing Door Installation Revised 05 23 19 26 23 Drill hole for positioning dowel at marked location on door hole for positioning dowel...
Page 27: ...LV710 Freight Camera Dry Van Swing Door Installation Revised 05 23 19 27 24 Drill a 17 173 hole at each 2 marked location on inner locking rod Drill 17 holes in inner locking rod...
Page 28: ...oor interior i Verify router has 5 16 rabbet bit installed j Subtract 3 4 from overall door thickness This is the depth of the countersink Set the router depth to this depth i Example If overall door...
Page 29: ...Van Swing Door Installation Revised 05 23 19 29 Countersink around lens hole 26 Remove any drill shavings and debris from exterior and interior door surfaces 27 Deburr any metal edges on exterior and...
Page 30: ...LV710 Freight Camera Dry Van Swing Door Installation Revised 05 23 19 30 28 Apply a bead of Sikaflex 252 to exterior door surface around the lens and positioning dowel holes Apply Sikaflex 252...
Page 31: ...Revised 05 23 19 31 29 Install external shock mount hardware onto device l Slide thick black rubber washer over lens assembly m Slide white plastic washer over lens assembly n Place black rubber plug...
Page 32: ...itioning dowel into holes p Hold device in place q Ensure lens is centered in 2 5 8 hole r Slide thin black rubber washer over lens assembly s Install plastic nut onto lens assembly by turning clockwi...
Page 33: ...LV710 Freight Camera Dry Van Swing Door Installation Revised 05 23 19 33 Interior washer and nut installed in countersink...
Page 34: ...LV710 Freight Camera Dry Van Swing Door Installation Revised 05 23 19 34 Tighten nut turn past hand tight...
Page 35: ...LV710 Freight Camera Dry Van Swing Door Installation Revised 05 23 19 35 Remove clear protective film from lens...
Page 36: ...ger magnet w Close and latch curbside door x Apply Loctite to the two 10 32 thread forming screws in kit y Install screws through door trigger magnet flange holes and into holes drilled in locking rod...
Page 37: ...LV710 Freight Camera Dry Van Swing Door Installation Revised 05 23 19 37 Install thread forming screws...
Page 38: ...LV710 Freight Camera Dry Van Swing Door Installation Revised 05 23 19 38 Completed installation...
Page 39: ...be co located or operating in conjunction with any other antenna or transmitter FCC Radiation Exposure Statement This equipment complies with FCC radiation exposure limits set forth for an uncontrolle...