background image

MOUNTING LOCATION

Find a dry, clear and well ventilated area to mount your amplifier that is unobstructed by any objects that will 
cause harm or block ventilation. 

The amplifier should be protected from exposure to moisture and direct sunlight. You may use the amplifier 
as a template and mark the four screw locations with a felt tip pen. Set the amplifier aside before drilling. Use 
caution to make sure there are no objects behind the installation surface that may become damaged during 
drilling. 

If mounting under a seat, make sure there is at least 1-inch (2.5 cm) of space above the amplifier’s heatsink 
to permit proper cooling.

The best places to mount your amplifier are: The floor of the trunk, under a seat, or on the back of the rear seat. 
For alternate installation locations, please consult your authorized PowerBass Dealer.

*** WARNING ***

•  Do not install in a place where it could injure the driver or passengers if the vehicle 

stops suddenly.

•  Upside down mounting will compromise heat dissipation through the heatsink and 

could engage the Advanced Protection Circuitry.

•  Try to avoid mounting the amplifier on a subwoofer enclosure, as extended exposure 

to vibration may cause malfunction of the amplifier.

•  Don’t mount the amplifier so that the wire connections are unprotected or are sub-

ject to pinching or damage from nearby objects.

•  The DC power wire must be fused at the battery positive (+) terminal connection. 

Before making or breaking power connections at the amplifier power terminals, 
disconnect the DC power wire at the battery end.

•  The battery of the car audio system must be disconnected until the entire wiring and 

installation is completed.

Summary of Contents for XAX 5670FD

Page 1: ... MINI AMPLIFIER Owners Manual Please read through this manual to familiarize yourself with your new amplifier Should your PowerBass Xtreme mobile amplifier ever require service you will need to have the original dated receipt ...

Page 2: ...ay be selected only to power subwoofers It is important that you closely follow the wiring instructions contained in this Owners Manual so that you get the most from your PowerBass Xtreme mobile amplifier Caution High powered audio systems in a vehicle are capable of generating higher then Live Concert levels of sound pressure Continued exposure to excessively high volume sound levels could cause ...

Page 3: ...HNOLOGY These amplifiers use the latest Philips NXP Class D chipset combined with premium MOSFETSs to provide full range audio signal accuracy The result is an extremely high switching rate Because of the high carrier switching frequency the amplifier is able to increase efficiency while main taining excellent response across the entire audio range Thus these amplifiers require less heatsink for c...

Page 4: ... tubing and heat gun Soldering iron Electronic not Acid Core Solder INSTALLATION PRECAUTIONS NOTE Proceed only if you are a qualified installer otherwise see your Authorized PowerBass Dealer to professionally install this amplifier Always wear protective eyewear when using tools Turn off all stereo and other electrical devices before you begin Disconnect the negative lead from your vehicles batter...

Page 5: ...ifier will reduce its power output volume to maintain operation For this reason the amplifier should be mounted in a location which will allow air to circulate freely The compact size of the PowerBass XAX Series amplifier allows greater flexibility in mounting Fig 1 Mounting Amplifier MOUNTING THE AMPLIFIER 5 WARNING Make sure there are at least 2 inches 5cm around the air vents on the amplifer Ai...

Page 6: ...back of the rear seat For alternate installation locations please consult your authorized PowerBass Dealer WARNING Do not install in a place where it could injure the driver or passengers if the vehicle stops suddenly Upside down mounting will compromise heat dissipation through the heatsink and could engage the Advanced Protection Circuitry Try to avoid mounting the amplifier on a subwoofer enclo...

Page 7: ... are for use with source units that have RCA line level inputs A source unit with a minimum of 0 5 volt is required for proper operation However this input will accept levels up to 6Vrms CH2 and CH3 are commonly used for the REAR Left and Right Channels 3 GAIN Control CH 3 and CH 4 This control is used to match the input sensitivity of the amplifier to the source unit you are using on CH3 and CH4 ...

Page 8: ...ol CH1 and CH 2 This control is continuously adjustable from 15Hz through 250Hz at 12dB per octave and is used in conjunc tion with CH1 and CH2 only 10 SUB INPUT Selector Switch This button selects the signal source for the SUB channel When the button is in the input signal will be sup plied from the SUB INPUT RCA When the button is out the amplifier will use the signals from CH1 through CH4 summe...

Page 9: ...hm stereo and 4 ohms bridged CH1 2 3 4 and 2 ohms for the Sub channel 17 FUSE S For convenience PowerBass uses common automotive ATC type fuses For continued protection in the event a fuse blows replace the fuse only with the same value CAUTION These power fuses on the amplifier chassis are for protecting the amp against over drive To protect the vehicles electrical system an additional fuse MUST ...

Page 10: ...ff the amplifier Remember bigger wire is better For best results we recommend a PowerBass ampli fier install kit available at your local PowerBass dealer Use rubber grommets when running cables through any metal or sharp plastic to prevent accidental shorting or shearing Make sure the cables do not interfere with normal operation of the vehicle The audio signal cables RCA interconnects should be k...

Page 11: ...gh to the amplifier Avoid running the power cable over engine components and near heater cores The use of an inline fuse or circuit breaker is a must this will prevent the risk of a potential fire caused by a short in your power cable Connect the fuse holder or circuit breaker as close to the battery positive terminal as possible within 18 from the battery This fuse or circuit breaker should be no...

Page 12: ...be connected to a switched 12V source Typically remote turn on leads are provided at the source unit that will turn on and off the amplifier in correspondence with the source If the source unit does not have a remote turn on lead then a power antenna wire can be used If neither of these leads is available at the source unit then a switched 12V supply must be used like the ACC 12V Run a minimum of ...

Page 13: ...ments are notorious for poorly insulated wires This means that hiss engine noise and fan noise can easily be picked up through RCA cables if run incorrectly Make sure that the cables for power and audio signal are not on the same side of the vehicle and that they do not cross each other this will help reduce any noise that may radiate from the power cable and the signal cable If an audio cable is ...

Page 14: ...Since the radio s 2V or possibly lower pre out signal is split between 3 sets of inputs the GAIN controls will need to be set considerably higher to maximize the amplifiers ouput By doing this you will lose the Front to Rear fader capability as only the Rear RCA is being used Dual RCA Output from the Radio Front and Rear If the car radio head unit you are using has 2 sets of RCA preamp outputs you...

Page 15: ... OUT Front and Rear plus Subwoofer Three RCA Outputs from the Radio Front and Rear plus Subwoofer This is the optimum configuration for this amplifier by providing 3 sets of discrete signal to the preamp It will also offer the most flexibility in tuning the system ...

Page 16: ...a 5 channel amplifier that can accept up to three separate sets of signal imputs When setting the individual GAIN levels it is recommended to start first with CH1 CH2 GAIN then CH3 CH4 GAIN and followed lastly by the SUB GAIN depending on the number of input signals available USER ADJUSTABLE CONTROLS Input GAIN Adjustment BASS EQ Adjustment Fig 5 GAIN Control GAIN MIN MAX Input Sensitivity Control...

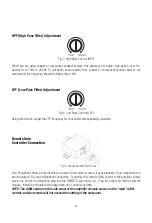
Page 17: ... Fig 7 High Pass Control HPF Your PowerBass Xtreme amp includes a remote GAIN control module It uses standard 6 pin telephone wire and modular U S A style telephone connectors To connect the remote GAIN Control to the amplifier simply insert one end of the telephone plug into the REMOTE gain input port Plug the other end into the remote module Install the module within easy reach on or under your ...

Page 18: ...t the speaker end using insulated speaker terminals not supplied or by soldering the connection Make sure the speaker connections are positive to positive and negative to negative At the amplifier end it is very im portant that the wires are making solid contact Strip the wires insulation back approximately 1 2 inch 12mm and insert the wires into the appropriate openings while being careful there ...

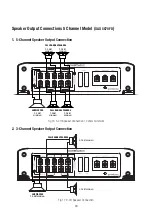
Page 19: ...nel Speaker Output Connection Fig 17 3 CH Speaker Connection Fig 16 5 CH Speaker Connection 2 ohms minimum 19 2 OHM minimum 2 OHM minimum FULL RANGE SPEAKERS 2 OHM minimum 2 OHM minimum FULL RANGE SPEAKERS SUBWOOFER 2 OHM minimum FULL RANGE SPEAKERS 4 OHM minimum 4 OHM minimum SUBWOOFER 2 OHM minimum ...

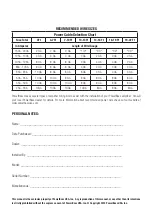
Page 20: ...dealer for details For more information about recommended power wire check out our website at www powerbassusa com PERSONAL NOTES Name ______________________________________________________________ Date Purchased ______________________________________________________ Dealer _____________________________________________________________ Installed By __________________________________________________...

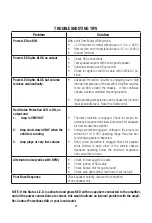
Page 21: ...mp shuts down ONLY when the vehicle is running 3 Amp plays at very low volume Thermal protection is engaged Check for proper im pedance at speaker terminals Also check for adequate air flow around the amplifier Voltage protection engaged Voltage to the amp is not within the 10 16 VDC operating range Have the bat tery charging system inspected Short circuit protection is engaged Check for speaker w...

Page 22: ...Damping Factor 200 Input Sensitivity 0 5 6 0 volts Crossover Slope 12dB High Pass Crossover Freq Hz 15Hz 250Hz Low Pass Crossover Freq Hz Sub Out only 30Hz 300Hz Variable Subwoofer Bass EQ 0 18dB Subwoofer EQ Freq 45Hz Fuses ATC Style 30A x 2 Dimension 49 x 180 x 300 6mm 1 92 x 7 08 x 11 83 Important Notes Due to continuing improvements these specifications are subject to change without any notice...

Page 23: ...quid damage or exposure to excessive heat Attempted repairs or alterations of any nature Product that has not been installed according to this owners manual Any implied warranties including warranties of fitness for use and merchantability are limited in duration to the period of the express warranty set forth above Some states do not allow limitations on the length of an implied warranty so this ...

Page 24: ...PowerBass Xtreme A division of PowerBass USA Inc 13936 Mountain Avenue Chino CA 91710 Tel 909 993 5399 Fax 909 993 5393 www powerbassusa com ...

Reviews: