background image

Leather Punch with Eyelet Pliers

7

For technical questions call: 1-800-665-8685

8308231

V 2.0

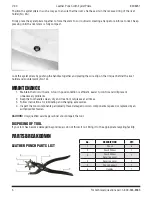
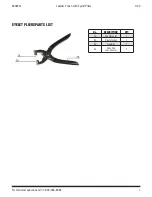
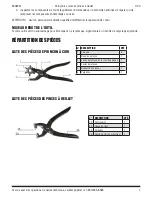
EYELET PLIERS PARTS LIST

No.

DESCRIPTION

QTY.

1A

Counterpoint

1

2A

Rivet Holder

1

3A

Handles

1

4A

Wire Clip  

(not shown)

1

Summary of Contents for 8308231

Page 1: ...User Manual 8308231 V 2 0 Leather Punch with Eyelet Pliers Please read and understand all instructions before use Retain this manual for future reference ...

Page 2: ......

Page 3: ...ing inspection and maintenance instructions WORK AREA 1 Operate in a safe work environment Keep your work area clean and well lit 2 Keep anyone not wearing the appropriate safety equipment away from the work area 3 Minimize distractions in the work environment Distractions can cause you to lose control of the tool 4 Store tools properly in a safe and dry location to prevent rust or damage 5 Always...

Page 4: ...ontrol and injury SPECIFIC SAFETY PRECAUTIONS The leather punch and eyelet pliers focus and multiply the user s physical strength on a small area Any part of the body trapped between the jaws of either tool can sustain a serious injury Keep fingers or other parts of the body clear of either tool when in use TOOL USE AND CARE 1 Use the correct tool for the job Do not force a tool or attachment to d...

Page 5: ...ensure it is the correct size Place the punch in the correct spot and squeeze the handles until the punch cuts through the material The punch is hollow and excess material will slide into the empty space Once the punch is complete this waste material can be tapped out or removed with a long thin probe pushing it through punch opening and out of the inner side wheel Lock the leather punch in the cl...

Page 6: ...CE 1 Maintain the tool with care A tool in good condition is efficient easier to control and will prevent unnecessary problems 2 Keep the tool handles clean dry and free from oil grease at all times 3 Follow instructions for lubricating and changing accessories 4 Inspect the tool components periodically Have damaged or worn components repaired or replaced by an authorized technician CAUTION Only q...

Page 7: ...her Punch with Eyelet Pliers 7 For technical questions call 1 800 665 8685 8308231 V 2 0 EYELET PLIERS PARTS LIST No DESCRIPTION QTY 1A Counterpoint 1 2A Rivet Holder 1 3A Handles 1 4A Wire Clip not shown 1 ...

Page 8: ......

Page 9: ... du Propriétaire 8308231 V 2 0 Poinçon à cuir avec pinces à oeillet Vous devez lire et comprendre toutes les instructions avant d utiliser l appareil Conservez ce manuel afin de pouvoir le consulter plus tard ...

Page 10: ......

Page 11: ...d instructions ne peuvent pas couvrir toutes les conditions et situations pouvant se produire L opérateur doit faire preuve de bon sens et prendre toutes les précautions nécessaires afin d utiliser l outil en toute sécurité REMARQUE Conservez ce manuel qui contient les avertissements de sécurité les précautions les instructions de fonctionnement d inspection et d entretien AIRE DE TRAVAIL 1 Travai...

Page 12: ... dommages à l outil Restez alerte portez attention à vos gestes et faites preuve de bon sens a Tenez les vêtements les bijoux les cheveux etc à l écart des pièces mobiles pour éviter de les faire coincer par l outil b N utilisez pas d appareils d outils si vous êtes fatigué ou sous l effet de drogues d alcool ou de médicaments c N utilisez pas l outil si vous devez étirer les bras pour le faire Un...

Page 13: ...rivets couleurs cuivre argent et or ASSEMBLAGE REMARQUE Lorsque ce manuel fait référence à un numéro de pièce il fait référence à la liste des pièces comprise Le poinçon à cuir et les pinces à oeillet sont déjà assemblés UTILISATION LE POINÇON À CUIR Tournez la roue de poinçons no 2 vers l avant jusqu à ce que vous trouviez la position de réglage désirée Le diamètre le plus étroit est de 2 5 mm al...

Page 14: ... assurant que la base plate du rivet repose dans la partie annelée enfoncée de la queue du rivet no 2A Réunir les deux pinces à oeillet en exerçant une pression ferme afin de retrousser la tige vers l extérieur pour ainsi créer une collerette qui viendra renforcer le rivet Maintenez la pression jusqu à ce que la tige du rivet soit complètement écrasée Bloquez les pinces à oeillet en poussant les p...

Page 15: ...doit effectuer la réparation de l outil MISE AU REBUT DE L OUTIL Si votre outil est trop endommagé pour être réparé ne le jetez pas Apportez le à un centre de recyclage approprié RÉPARTITION DES PIÈCES LISTE DES PIÈCES DE POINÇON À CUIR LISTE DES PIÈCES DES PINCES À OEILLET no DESCRIPTION QTÉ 1 Poinçon 6 2 Roue de poinçon 1 3 Levier de retenue de la roue de poinçon 1 4 Levier de retenue 1 5 Suppor...

Page 16: ......

Reviews: