have recommendations in the manual for the particular tool on operating PSI settings.
9. The air compressor is now ready for use. The following inflation and cleaning accessories packaged
with this unit should only be operated at maximum pressure of 20-30 PSI: blow gun, tapered nozzle,
inflation needles, wire brush adapter, blow gun adapter.
DAILY SHUT-DOWN PROCEDURES
1. Set the Auto-On/Off lever to the "Off" position.
2. Unplug the power cord from the receptacle.
3. Set the outlet pressure to zero on the regulator.
4. Remove any air tools or accessories.
5. Open the drain valve allowing air to bleed from the tank. After all of the air has bled from the tank,
close the drain valve to prevent debris buildup inside.
When draining the tank, always use ear and eye protection. Drain the tank in a suitable location; condensation will be
present in most cases of draining.
Water that remains in the tank during storage will corrode and weaken the air tank, which could cause the tank to
rupture. To avoid serious injury, be sure to drain the tank daily or after each use.
MAINTENANCE
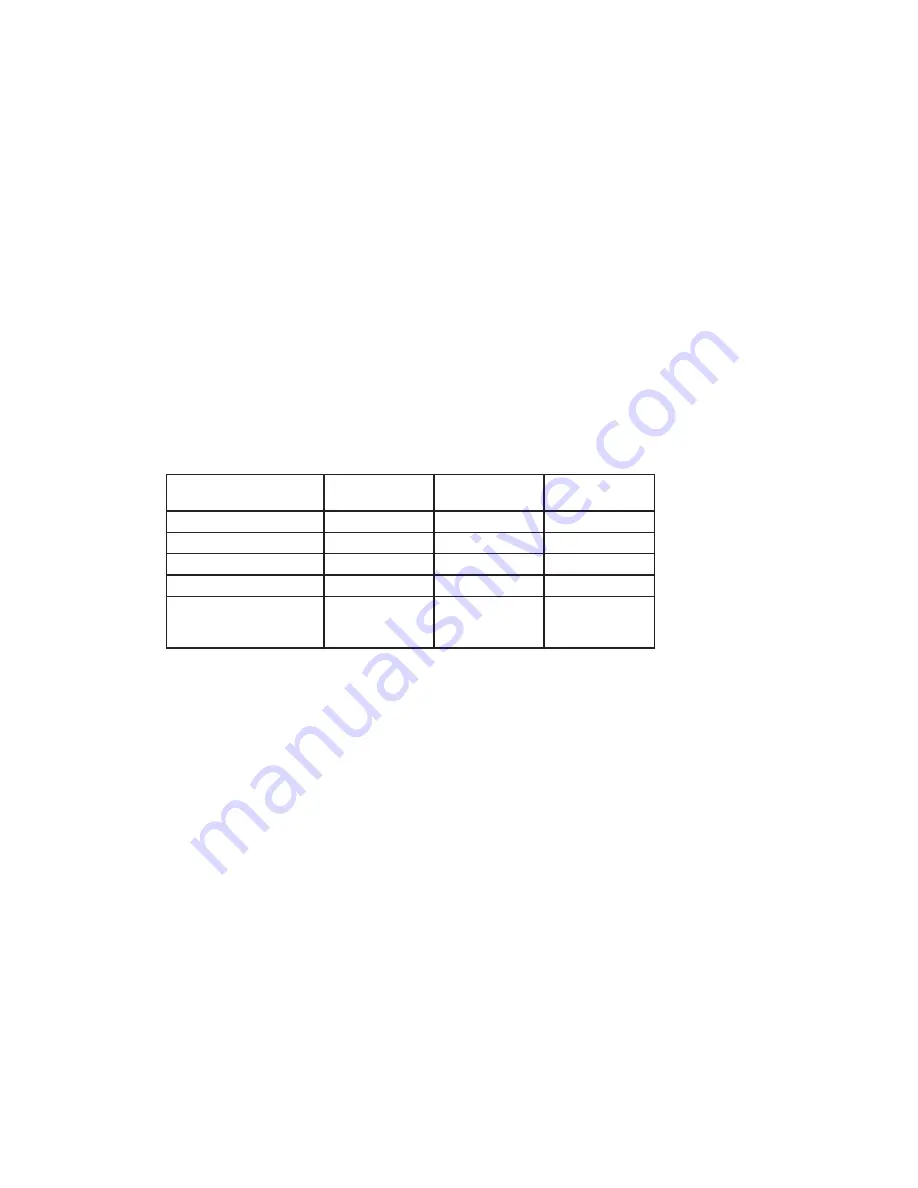
NOTE: Qualified service personnel should perform any service procedure not covered in the main¬tenance schedule
below.
ITEMS TO CHECK/
CHANGE
Before Each
Use or Daily
After First Ten
Hours
Every 100
Hours
Check Tank Safety Valve
x
Overall Unit Visual Check
x
Check Oil Level
x
Change Oil
x
x
Check Air Filter (more
frequently in dusty or
humid environments)
x
To ensure efficient operation and longer life of the air compressor unit, a routine maintenance schedule should be
followed. The following schedule is geared toward a consumer whose compressor is used in a normal working
environment on a daily basis. If neces¬sary, the schedule should be modified to suit the con¬dition under which your
compressor is used. The mod¬ifications will depend upon the hours of operation and the working environment. Air
compressors used in an extremely dirty and/or hostile environment will require a greater frequency of all maintenance
checks.
OIL CHANGING
For changing the pump oil, be sure to do the following:
1. Turn the unit off and unplug the power cord from the socket.
2. Allow the compressor time to cool if it has been in operation.
3. Open the drain valve to bleed all air from the tank.
4. Close the drain valve.
5. Remove the oil fill cap on the pump.
6. Remove the sight glass with a box end wrench or socket. Drain the oil into a suitable container and
dispose of properly. The compressor may need to be tipped slightly toward the drain to allow all of the oil
to drain.
The air compressor should be turned off and unplugged from the power source before any maintenance is
performed as well as the air bled from the tank and the unit allowed time to cool. Personal injuries could
occur from moving parts, electrical sources, compressed air or hot surfaces.
7. Re-attach the sight glass.
Note:
Torque the sight glass when re-assembling. Be sure the gasket is between the sight glass and the pump
For any technical questions, please call 1-800-665-8685
5
8132938


