background image

79 pc Rotary Tool and Accessory Kit

11

Visit www.princessauto.com for more information

8336851

V 2.7

ASSEMBLY

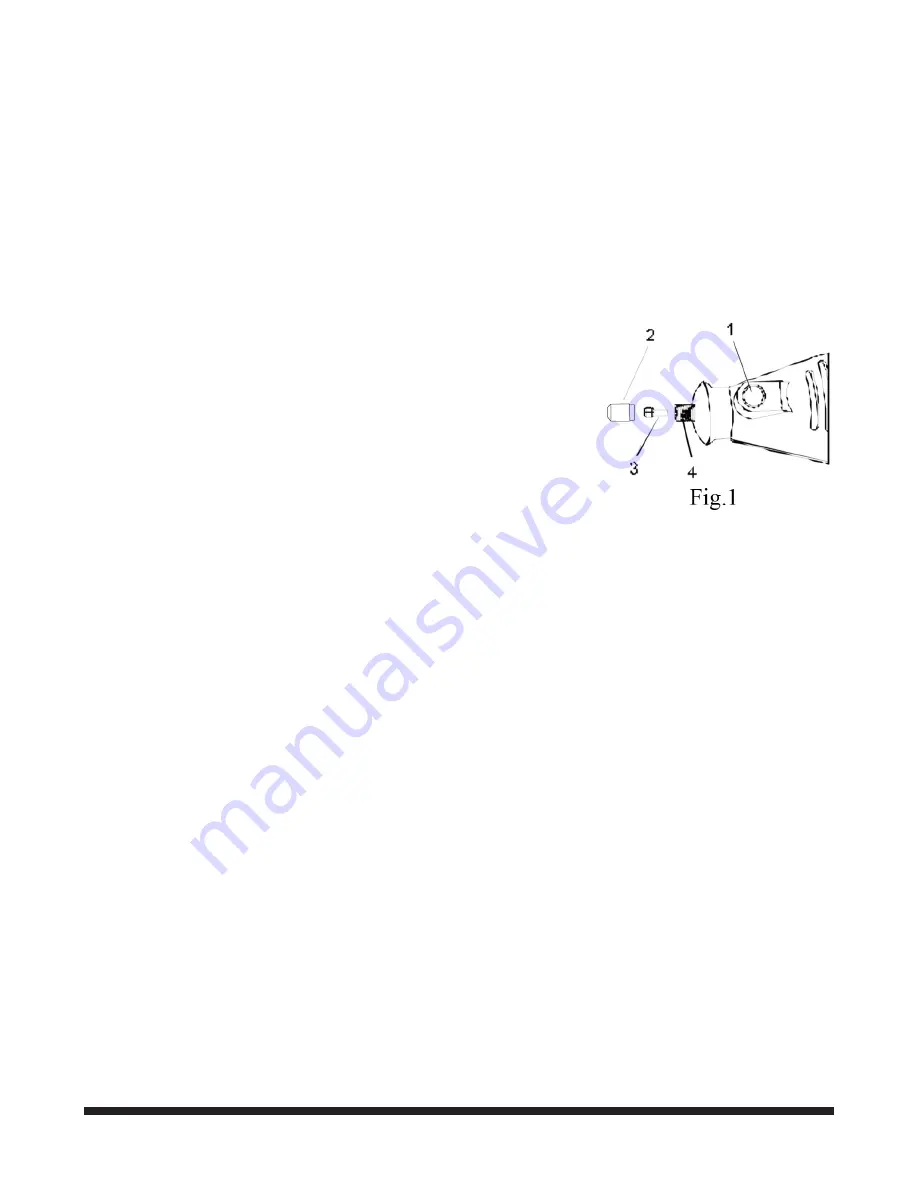
CHANGING THE COLLET

Some accessories require the use of different sized collets. Collet sizes can be 1/16 in., 3/32 in. and 

1/8 in. It is important to ensure that the collet size matches the accessory.

NOTE: This tool includes two of the most commonly used collets: 3/32 in. and 1/8 in.

WARNING! Using a collet that is tool large for the accessory will result in the accessory possibly 

being thrown from the tool causing serious injury.

1.  Turn the tool switch OFF and remove the plug from the 

power source.

2.  Depress the spindle lock button (1) and slowly turn the collet 

nut (2) until the spindle lock button locks the spindle.

3.  While holding the spindle lock button down, turn the collet nut 

counter clockwise until it is removed.

4.  Remove the collet (3) by pulling it out of the spindle (4).

5.  Insert the replacement collet into the spindle and replace the 

collet nut by turning it clockwise while holding the spindle lock 

button down.


NOTE: Do not tighten the collet nut without an accessory installed in the collet. You will damage 

the collet.

Summary of Contents for 79 pc

Page 1: ...User Manual 8336851 79 pc Rotary Tool and Accessory Kit V 2 7 Please read and understand all instructions before use Retain this manual for future reference LISTED ...

Page 2: ......

Page 3: ...d 10 000 to 35 000 Collet Size 1 8 to 3 32 in Voltage Rating 120 V CUL E213739 Airborne particle hazard Wear a safety mask Wear suitable eye protection Use of protective gloves is recommended This symbol designates that this tool is listed with both Canadian and U S requirements by Underwriter s Laboratories CUL E213739 LISTED ...

Page 4: ... by the Canadian Standards Association CSA or American National Standards Institute ANSI when using the rotary tool 1 Dress properly wear protective equipment Use breathing ear eye face foot hand and head protection Always wear ANSI approved impact safety goggles which must provide both frontal and side protection Protect your hands with suitable gloves Wear a full face shield if your work creates...

Page 5: ... the tool by the insulated gripping surfaces when performing an operation where the cutting tool may contact hidden wiring or its own cord Contact with a live wire will make exposed metal parts of the tool live and shock the operator 8 Use an appropriate dust respirator when working for an extended period of time This will help prevent breathing in the fine dust created while working 9 Always make...

Page 6: ... doubt as to whether the outlet is properly grounded If the tool should electronically malfunction or break down grounding provides a low resistance path to carry electricity away from the user 5 Do not abuse the cord Never use the cord to carry tools or pull the plug from an outlet Keep the cord away from heat oil sharp edges or moving parts Do not operate this tool if the power cord is frayed or...

Page 7: ...different processes 5 Do not use for extended periods Take frequent breaks when using this tool 6 Let the tool do the work Grip the tool as lightly as possible while still keeping safe control of it 7 To reduce vibrations maintain the tool as explained in this manual If abnormal vibrations occur stop using this tool immediately TOOL USE AND CARE WARNING Do not use the tool if the throttle does not...

Page 8: ...hat all the items in the parts list are included 3 Inspect the parts carefully to make sure the rotary tool was not damaged while shipping WARNING If any part is missing do not operate the tool until the missing parts are replaced Failure to do so could result in serious personal injury PARTS IDENTIFICATION D Hanging Loop E Variable Speed Control Dial F Brush Cap G Spindle Lock Button H Collet Nut...

Page 9: ...in 1 Aluminum oxide grinding stone Cylinder 25 32 in 1 Felt polishing wheel 1 2 in 2 Felt polishing wheel 1 in 2 Mandrel 1 8 in for felt polishing wheels 1 Bristle Brush 3 4 in radial 1 Sanding band 1 2 in 60 grit 3 Drum sander 1 2 in with 1 8 in shank 1 Sanding disc 3 4 in 60 grit 3 Heavy duty cut off wheel 15 16 in x 0 031 in 6 Regular duty cut off wheel 15 16 in x 0 025 in 6 Screw mandrel 1 8 i...

Page 10: ...sh Use for light de burring cleaning and polishing of silverware jewellery and other precious metals Can be used with polishing compound Sanding Band For rough shaping and smoothing wood and fibreglass removing rust from metal surfaces shaping rubber surfaces Sanding bands are easily replaceable on drums Sanding wheel Ideal for rough shaping and smoothing wood and fibreglass as well as removing ru...

Page 11: ...e accessory possibly being thrown from the tool causing serious injury 1 Turn the tool switch OFF and remove the plug from the power source 2 Depress the spindle lock button 1 and slowly turn the collet nut 2 until the spindle lock button locks the spindle 3 While holding the spindle lock button down turn the collet nut counter clockwise until it is removed 4 Remove the collet 3 by pulling it out ...

Page 12: ... 5 Insert the accessory 3 4 in into the collet 6 Press the spindle lock button and engage it in the spindle While holding the spindle lock button down hand tighten the collet by turning it clockwise NOTE Do not use pliers to tighten the collet nut Use the small wrench 4 supplied Over tightening will cause damage to the tool 7 Pull on the accessory to ensure that it is securely in place OPERATION O...

Page 13: ...g routing shaping or cutting wood Hardwoods metals and glass require high speed operation Drilling should also be performed at high speeds NOTE Incoming voltage greatly affects the speed of the tool Speed will drop in relation to a decrease in voltage If your tool appears to be running slowly simply increase the speed setting accordingly LOW SPEED USE Certain materials some plastics for example re...

Page 14: ...f a high speed steel cutter starts to chatter this normally means it is running too slow 5 Aluminum copper alloys lead alloys zinc alloys and tin may be cut at any speed depending on the type of cutting being done Use paraffin or other suitable lubricant on the cutter to prevent the cut material from adhering to the cutter teeth NOTE Increasing the pressure on the tool is not the key when it is no...

Page 15: ...operate properly and perform its intended functions Check for alignment and binding of moving parts for broken parts or mounting fixtures or for any other condition that may affect proper operation Any part that is damaged should be repaired or replaced by a qualified technician 6 When servicing use only identical replacement parts Only use accessories intended for use with this tool Replace damag...

Page 16: ...emove all of the brushes at the same time Make sure the brush slides freely within the brush housing 3 Run the motor for 15 minutes without load to shape the brushes so that they are properly aligned with the commutator LUBRICATION All of the bearings in this rotary tool are lubricated with a sufficient amount of high grade lubricant for the life of the unit under normal conditions Therefore no fu...

Page 17: ...79 pc Rotary Tool and Accessory Kit 17 Visit www princessauto com for more information 8336851 V 2 7 PARTS BREAKDOWN ...

Page 18: ...B 1 8 110038 Stator 1 9 321006 Bearing Sleeve 1 10 520007 Bearing 606 2Z 1 11 342003 Carbon Brush 2 12 314502 Carbon Brush Cap 2 13 222803 Brush Holder 2 14 341503 Brush Holder Support 2 15 100038 Rotor 1 16 314009 Fan 1 17 520008 Bearing 626 2Z 1 18 213016 Output Shaft 1 19 216506 Collet 1 20 215065 Collet Nut 1 21 312824 Head Nut 1 22 241506 Shaft Lock Spring 1 23 215014 Shaft Locking Pin 1 24 3...

Page 19: ...d utilisateur Vous devez lire et comprendre toutes les instructions avant d utiliser l appareil Conservez ce manuel afin de pouvoir le consulter plus tard V 2 7 Trousse d outil rotatif et accessoires 79 pièces LISTED ...

Page 20: ......

Page 21: ... po Tension nominale 120 V CUL E213739 Risque d exposition à des particules en suspension dans l air l utilisation d un masque de sécurité est recommandée Portez un équipement de protection approprié pour les yeux Le port de gants protecteurs est recommandé Ce symbole indique que cet outil est conforme aux exigences des Underwriter s Laboratories au Canada et aux États Unis SYMBOLS CUL E213739 LIS...

Page 22: ...ons au sein de l environnement de travail Les distractions peuvent causer une perte de contrôle de l outil 3 Gardez toujours les outils dans un endroit verrouillé et hors de la portée des enfants SÉCURITÉ PERSONNELLE ATTENTION Portez de l équipement de protection approuvé par l Association canadienne de normalisation CSA ou l American National Standards Institute ANSI quand vous utilisez l outil r...

Page 23: ...lessures graves Une pression excessive est utilisée si le fonctionnement de votre outil rotatif devient erratique lorsqu elle est sous charge 6 L outil ne s arrêtera pas immédiatement Ne posez pas l outil sur une surface ou ne le laissez pas sans surveillance avant qu il ne s immobilise Une pièce mobile pourrait faire sauter l outil ou s agripper à une surface et vous pourriez perdre la maîtrise d...

Page 24: ...ement installée et mise à la terre conformément à tous les codes et à tous les règlements Ne retirez jamais la broche de masse et ne modifiez jamais la fiche N utilisez pas de fiche d adaptation Consultez un électricien qualifié si vous doutez de la mise à la terre appropriée d une prise En cas de défaillance électronique ou de bris de l outil la mise à la terre procure un trajet de faible résista...

Page 25: ... N utilisez pas l outil pendant des périodes prolongées Prenez souvent des pauses lorsque vous utilisez cet outil 6 Laissez l outil faire le travail Tenez l outil le moins serré possible tout en le contrôlant de manière sécuritaire 7 Pour réduire les vibrations entretenez l outil selon les directives figurant dans ce manuel En cas de vibrations anormales cessez d utiliser cet outil immédiatement U...

Page 26: ... attentivement pour vous assurer que l outil rotatif n a pas été endommagé pendant son transport AVERTISSEMENT Si des pièces sont manquantes ne faites pas fonctionner l outil avant que les pièces manquantes soient remplacées Le non respect de cet avertissement peut entraîner de graves blessures IDENTIFICATION DES PIÈCES D Boucle de suspension E Molette de commande de vitesse variable F Capuchon de...

Page 27: ...2 po 1 Pierre de meulage en oxyde d aluminium Cylindrique 25 32 po 1 Disque à polir en feutre 1 2 po 2 Disque à polir en feutre 1 po 2 Mandrin 1 8 po pour disques à polir en feutre 1 Brosse abrasive 3 4 po radiale 1 Bande abrasive 1 2 po 60 grains 3 Ponceuse à tambour 1 2 po avec tige de 1 8 po 1 Disque abrasif 3 4 po 60 grains 3 Meule à découper robuste 15 16 x 0 031 po 6 Meule à découper réguliè...

Page 28: ... abrasive Utilisez afin de procéder à l ébavurage léger au nettoyage et au polissage de l argenterie des bijoux et autres métaux précieux Peut également s utiliser avec la pâte à polir Bande abrasive Pour former approximativement et lisser le bois et la fibre de verre éliminer la rouille des surfaces de métal former les surfaces de caoutchouc Les bandes de ponçage sont faciles à remplacer sur les ...

Page 29: ...e serrage les plus fréquemment utilisées 3 32 et 1 8 po AVERTISSEMENT L utilisation d une pince de serrage trop grosse pour l accessoire risque de faire en sorte que l accessoire soit expulsé de l outil entraînant ainsi des blessures graves 1 Mettez l outil à la position arrêt OFF et retirez la fiche de la source d énergie 2 Enfoncez le bouton de verrouillage de la broche 1 et tournez doucement l ...

Page 30: ...outon de verrouillage de la tige et engagez le dans la tige Tout en retenant le bouton de verrouillage de la tige enfoncé serrez la pince de serrage à la main en la tournant dans le sens horaire REMARQUE Ne vous servez PAS de pinces pour serrer l écrou de pince de serrage Utilisez la petite clé 4 fournie Un serrage excessif risque d endommager l outil 7 Tirez sur l accessoire pour vous assurer qu ...

Page 31: ...ge du bois Le bois franc les métaux et le verre demandent un fonctionnement à haute vitesse Le perçage devrait également s effectuer à hautes vitesses REMARQUE La tension d entrée influence grandement la vitesse de l outil La vitesse diminuera si on réduit la tension Si votre outil semble fonctionner lentement augmentez simplement la vitesse de réglage en conséquence UTILISATION À BASSE VITESSE Ce...

Page 32: ...ez des couteaux d acier à haute vitesse Si un couteau d acier à haute vitesse se met à vibrer cela signifie normalement que sa vitesse de fonctionnement est trop lente 5 La vitesse de coupe de l aluminium des alliages de cuivre des alliages de plomb des alliages de zinc et de l étain dépend du type de coupe effectuée Appliquez de la paraffine ou tout autre lubrifiant approprié sur le couteau pour ...

Page 33: ...l alignement et le coincement des pièces mobiles les composants ou dispositifs de fixation brisés ou toute autre situation pouvant perturber le bon fonctionnement Toute pièce endommagée doit être réparée ou remplacée par un technicien qualifié 6 Lors de l entretien utilisez seulement des pièces de rechange identiques Utilisez seulement des accessoires conçus pour être utilisés avec cet outil Rempl...

Page 34: ...es balais en même temps Assurez vous que les balais glissent aisément dans le porte balais 3 Faites tourner le moteur pendant 15 minutes sans charge pour former les balais de façon à ce qu ils soient correctement alignés sur le commutateur LUBRIFICATION Tous les roulements de cet outil rotatif sont lubrifiés d une quantité suffisante de lubrifiant de haute qualité pour toute la durée de service de...

Page 35: ...Trousse d outil rotatif et accessoires 79 pièces 17 Visitez www princessauto com pour plus d informations 8336851 V 2 7 RÉPARTITION DES PIÈCES ...

Page 36: ...ator 1 9 321006 Manchon de roulement 1 10 520007 Roulement 606 2Z 1 11 342003 Balai de carbone 2 12 314502 Capuchon de balai de carbone 2 13 222803 Porte balais 2 14 341503 Support de porte balais 2 15 100038 Rotor 1 16 314009 Ventilateur 1 17 520008 Roulement 626 2Z 1 18 213016 Arbre de sortie 1 19 216506 Pince de serrage 1 20 215065 Écrou de pince de serrage 1 21 312824 Écrou à tête 1 22 241506 ...

Reviews: