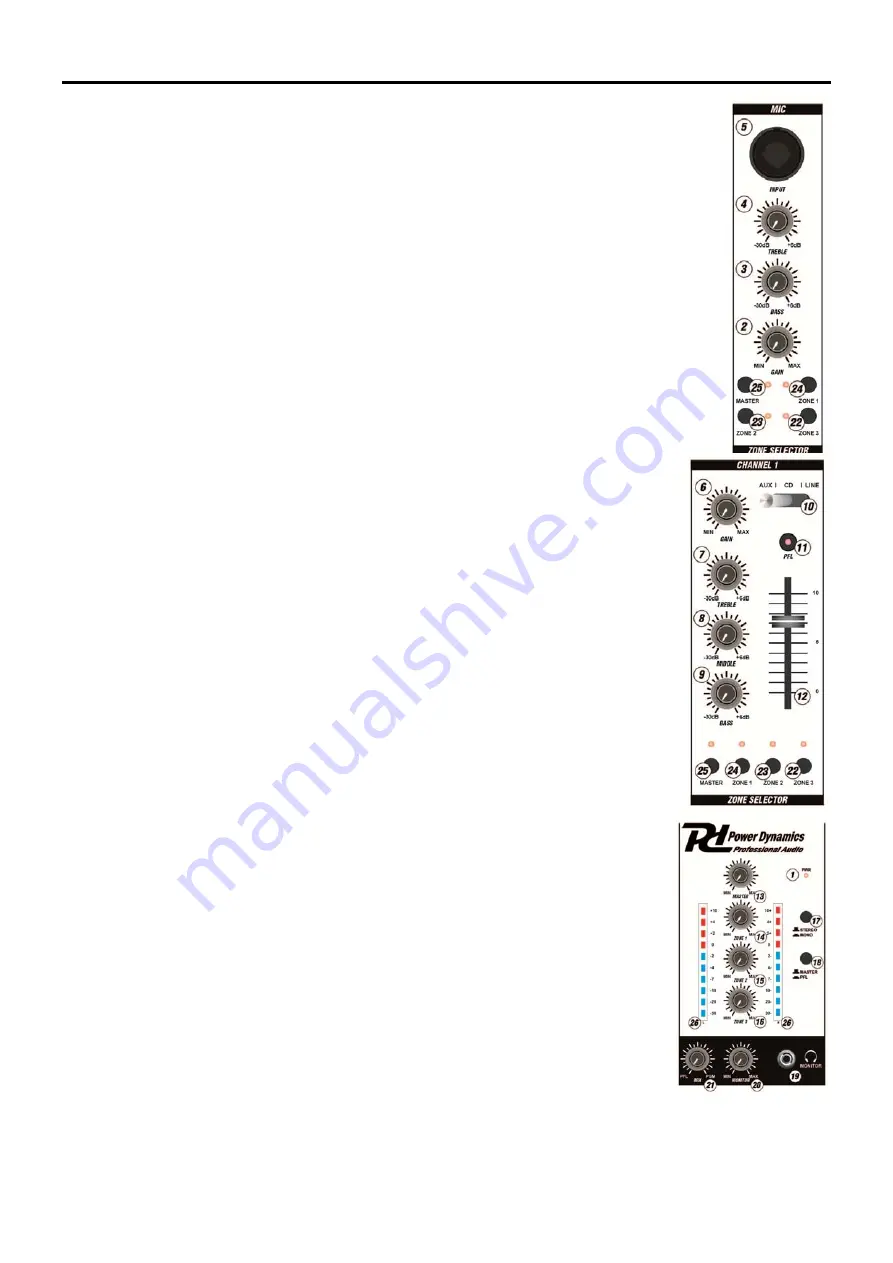
Power Dynamics 172.750 Instruction Manual Download Page 4


FRONT VIEW 


1. Power 

LED 

This LED lights up when the mixer is turned on. 

2. MIC 

Gain 

Adjustable level of the microphone. 

3. MIC 

Bass 

Adjustable low (bass) frequencies of the microphone input. 

4. MIC 

Treble 

Adjustable high (treble) frequencies of the microphone input. 

5. MIC 

input 

Connect a microphone to this combo connector. You can use even a XLR connector and a 6.35mm 
jack. 

6. Gain 

control 

Adjustable preamp of the input level of the corresponding channel. 

7. Treble 

control 

Adjustable high frequencies of the corresponding channel. 

8. Mid 

control 

Adjustable mid frequencies of the corresponding channel. 

9. Bass 

control 

Adjustable low frequencies of the corresponding channel. 

10. Input selector 

Selects the input source to be routed to the corresponding channel. The connections for the 
different sources are on the back of the mixer. 

11. PFL 

The PFL button (Pre Fade Listening) is designed to route the corresponding channel input to 
the headphone/monitor section. 

12. Channel Fader 

Adjustable output level of the corresponding channel. 

13. Master 

Adjustable output level of the master volume. 

14. Zone 1 

Adjustable output level of the master volume Zone 1. 

15. Zone 2 

Adjustable output level of the master volume Zone 2. 

16. Zone 3 

Adjustable output level of the master volume Zone 3. 

17. Stereo/Mono 

When press this button the output signal of the master is mono. 

18. Master/PFL 

If this button is pressed you can read out the pre-fader signal of the channels where PFL is 
activated on the VU meters. If this button is not pressed you can read out the master signal 
on the VU-meters. 

19. Monitor/Headphones 

Connect your headphones for monitoring. 

20. Monitor control 

Adjustable output level of your headphones. 

21. MIX 

Slide this to mix the PFL channel and program mix in the headphones. When all the way to 
the left you hear the channel PFL input selection(s), when turned to the right you hear the 
master program mix output. 

22. Zone 3 

Select, when pressed the stereo signal of the selected channel will go to stereo Zone 3 
output and the red LED is on. 

23. Zone 2 

Select, when pressed the stereo signal of the selected channel will go to stereo Zone 2 
output and the red LED is on. 

24. Zone 1 

Select, when pressed the stereo signal of the selected channel will go to stereo Zone 1 
output and the red LED is on. 

25. Master 

Select, when pressed the stereo signal of the selected channel will go to stereo Master 
output and the red LED is on. 

26.  LED VU Meters 

Can indicate either the master output or cue channel input levels, depending on the 
position of the MASTER/PFL switch (18.) 


Summary of Contents for 172.750

Page 1: ...PDZM700 6 Channel installation mixer Ref nr 172 750 INSTRUCTION MANUAL GEBRUIKSAANWIJZING BEDIENUNGSANLEITUNG MANUAL DE INSTRUCCIONES MANUEL D INSTRUCTIONS V1 0...

Page 2: ...2...

Page 3: ...ys seek advice from a specialist Do not force the controls This unit is with speaker inside which can cause magnetic field Keep this unit at least 60cm away from computer or TV This unit is with built...

Page 4: ...el of the master volume Zone 2 16 Zone 3 Adjustable output level of the master volume Zone 3 17 Stereo Mono When press this button the output signal of the master is mono 18 Master PFL If this button...

Page 5: ...2 Use a USB cable to connect on or both ports of the PDZM700 to your computer 3 Windows will immediately recognize the mixer as a USB Audio Device or USB Audio CODEC and will automatically install any...

Page 6: ...t multiple sound cards However if you don t have software like that you can use two separate software media players instead To do this you need to start the first media player and then change the pref...

Page 7: ...ichtlijnen en moeten de aanwijzingen waarschuwingen worden gevolgd Het apparaat buiten bereik van kinderen houden Bovendien mag het apparaat nooit onbeheerd gelaten worden Gebruik geen schoonmaakspray...

Page 8: ...one 3 Instelbaar uitgangsniveau van het hoofdvolume Zone 3 17 Stereo Mono Druk op deze toets om te schakelen tussen stereo of mono geluidskwaliteit voor masterkanaal 18 Master PFL Als deze knop wordt...

Page 9: ...1 Zet de computer en de PDZM700 aan 2 Gebruik een USB kabel om de PDZM700 met de USB poort van de computer te verbinden 3 Windows zal onmiddellijk uw mengpaneel herkennen als een USB Audio Device of U...

Page 10: ...n het mengpaneel zal verschijnen als een aparte USB audio apparaat op uw computer U kunt twee audio bestanden tegelijk te spelen en stuur deze beide audiostreams naar afzonderlijke kanalen van uw meng...

Page 11: ...hintereinander ein und ausschalten Dadurch verk rzt sich die Lebensdauer erheblich Das Ger t au erhalb der Reichweite von Kindern halten Das Ger t niemals unbeaufsichtigt lassen Die Regler nicht mit...

Page 12: ...Mit diesem Regler wird der Ausgangspegel der Zone 1 eingestellt 15 Zone 2 Mit diesem Regler wird der Ausgangspegel der Zone 2 eingestellt 16 Zone 3 Mit diesem Regler wird der Ausgangspegel der Zone 3...

Page 13: ...chl sse k nnen Audiosignale von PCs empfangen 19 Ein Aus Schalter 20 Netzanschluss Stecken Sie hier die Netzleitung ein WINDOWS KONFIGURATION 1 Schalten sie Ihren Computer und das PDZM700 ein 2 Nutzen...

Page 14: ...USB Kabel nutzen Bei dieser Anwendung empfehlen wir Ihnen eine Software die mehrere Soundkarten unterst tzt zu nutzen Sollten Sie eine solche Software nicht besitzen k nnen Sie auch unterschiedliche...

Page 15: ...ectrices aplicables y seguir las instrucciones No lo apague y encienda repetidamente Esto acorta su tiempo de vida Mantenga el aparato fuera del alcance de los ni os No deje el aparato sin vigilancia...

Page 16: ...de salida ajustable de la Zona 3 17 Stereo Mono Cuando se pulsa este bot n la se al de salida del maestro es mono 18 Master PFL Si se pulsa este bot n el usuario puede leer la se al pre fader de los c...

Page 17: ...lador PDZM700 2 Use un cable USB o dos para conectar el mezclador en cualquier Puerto USB del ordenador 3 Windows inmediatamente reconocer el mezclador como un USB Audio Device o USB Audio CODEC e ins...

Page 18: ...reproductores de medios de software independientes en su lugar Para ello tiene que empezar el primer reproductor de medios y luego cambiar el dispositivo de audio preferido al segundo puerto USB a co...

Page 19: ...r glages L appareil contient un haut parleur pouvant engendrer des champs magn tiques Tenez cet appareil 60 cm au moins d un t l viseur ou ordinateur Cet appareil contient un accumulateur rechargeable...

Page 20: ...au de sortie r glable du volume master Zone 2 16 Zone 3 Niveau de sortie r glable du volume master Zone 3 17 St r o Mono En appuyant sur la touche le signal de sortie du master devient mono 18 Master...

Page 21: ...RATION WINDOWS 1 Allumez votre ordinateur et le PDZM700 2 Utilisez un cordon USB pour relier un ou deux ports du PDZM700 votre ordinateur 3 Windows reconna t imm diatement la table de mixage comme app...

Page 22: ...fonctionnement nous vous conseillons d utiliser un des nombreux programmes logiciels disponibles dans le commerce qui accepte plusieurs cartes sons Si vous n avez pas ce type de logiciel vous pouvez u...

Page 23: ...ct Description PDZM700 4 zone mixer Trade Name POWER DYNAMICS Regulatory Requirement EN55013 2013 EN61000 3 2 2014 EN61000 3 3 2013 EN55020 2007 A11 2011 EN 60065 2014 I hereby declare that the produc...

Page 24: ...Specifications and design are subject to change without prior notice www tronios com Copyright 2016 by TRONIOS the Netherlands...

Reviews: