background image


Page -8


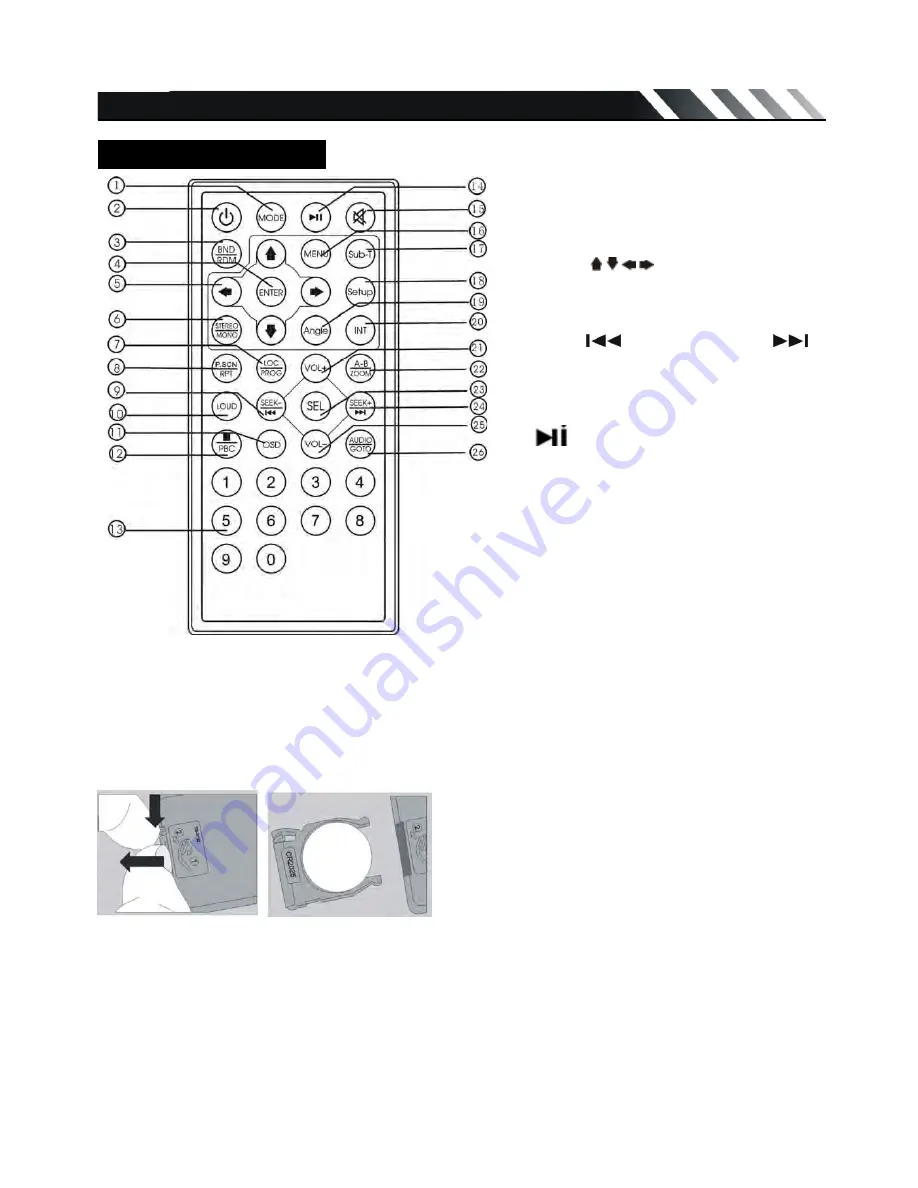
IR Remote Control   


REPLACING THE BATTERY 

Remote Control comes with a CR-2025 Lithium Battery included. 
 
1. Remove the Battery Holder from the back of the Remote Control. 
2. Insert a CR-2025 Lithium battery with the positive (+) mark upward. Insert the Battery Holder into 
the back of the Remote Control. 


Warning: 

Store the battery where children cannot reach. If a child accidentally swallows the battery, 

consult a doctor immediately. 
Do not re-charge, short, disassemble or heat the battery or dispose it in fire. 
Do not expose or bring into contact the battery with other metallic materials. Doing this may cause the 
battery to give off heat, crack or start a fire. 
When throwing away or saving the battery, wrap it in tape and insulate; otherwise, the battery may 
give off heat, crack or start a fire.

+3V 
(CR 2025) 

1.  MODE 
2.  POWER 
3.  BND/RDM 
4.  ENTER 
5.  Cursor  / / /  
6.  STEREO/MONO 
7.  LOC/ PROG 
8.  P.SCN/RPT 
9.  SEEK-/


10. LOUD   
11. OSD 
12. STOP/ PBC   
13. Digit 0-9 
14. 


15. MUTE 

16. MENU 
17. SUB-T   
18. SETUP 
19. ANGLE 
20. INT 
21. VOL+ 
22. A-B/ZOOM 
23. SEL 
24. SEEK+/




25. VOL- 
26. AUDIO/ GOTO


Summary of Contents for PTID-3200

Page 1: ...uch Sensor DVD MP4 CD MW FM Radio Built in NTSC tuner Owner s Manual Take the time to read through this owner s manual Familiarity with installation and operation procedures will help you obtain the b...

Page 2: ...tions 5 Detachable Control Panel 6 Panel Controls 6 IR Remote Controls 8 General Operations 9 Digital Tuner 11 Memory Card USB Operations 12 Disc operations 14 MP3 overview 17 TV Operations 18 Compati...

Page 3: ...z If you have parked the car for a long time in hot or cold weather wait until the temperature in the car becomes normal before operating the unit z DO NOT open covers and do not repair yourself Consu...

Page 4: ...accessories for installation and operation of the unit 1 Washer Spring Washer M5 Nut 1 each 2 Mounting Strap 1 3 Screw 1 4 Bolt 4 5 Mounting Collar 1 6 Release Key 2 7 Rubber Cushion 1 AV in Cable Pan...

Page 5: ...mounting tabs out with a screwdriver Make sure that lock lever is flush with the mounting collar not projecting outward 2 Secure the rear of the unit After fixing mounting bolt and power connector fix...

Page 6: ...talling this unit Using the ISO Connector 1 If your car is equipped with the ISO connector then connect the ISO connectors as illustrated 2 For connections without the ISO connectors check the wiring...

Page 7: ...e the control panel The control panel can easily be damaged by shocks After removing it place it in a protective case and be careful not to drop it or subject it to strong shocks The rear connector th...

Page 8: ...Memory Card slot 18 Flash LED 19 RESET 1 POWER MUTE 2 MODE 3 MENU 4 AS PS 5 Volume Up 6 NEXT 7 IR sensor 8 PREVIOUS 9 LCD 10 AV in jack 11 MEM 12 OK 13 OPEN 14 USB jack 15 BAND 16 Volume Down 20 Ejec...

Page 9: ...immediately Do not re charge short disassemble or heat the battery or dispose it in fire Do not expose or bring into contact the battery with other metallic materials Doing this may cause the battery...

Page 10: ...sor right side long press to move cursor downside OK button In playing DVD mode short press to enter and confirm In playing Radio mode short press to enter and confirm MEM button In playing DVD mode s...

Page 11: ...list In Radio mode short and repeat press the OK button to select these settings AUDIO EXPERT CLOCK In USB Memory Card mode short and repeatedly press the OK button to select these settings AUDIO PIC...

Page 12: ...e To watch video the parking wire should be connected to break signal Caution The parking wire is connected with brake signal for driving safety the video programs should only be viewed after the car...

Page 13: ...CARD insert the card into the card slot you should press the OPEN button on the panel to flip down front panel and insert the card into card slot The unit will start playing MP3 MP4 WMA files on the M...

Page 14: ...peating starts 3 Press A B button again to cancel the A B repeat function Random Press the RDM button on remote to play all song tracks in random order Note This function is only for audio files Intro...

Page 15: ...an playback interactive software with the menu displayed on TV And if the disc contains still images it can playback high definition of still image Title The title is the important part of DVD disc Th...

Page 16: ...sing the MODE button Playing pausing To ensure good system performance wait until the unit finishes reading the disc information before proceeding Press the PLAY PAUSE button to start pause the playba...

Page 17: ...play the beginning of every track for 10 seconds in sequence Press the INT button on remote control to start intro play of whole disc Press again to cancel PBC Playback Control function for VCD only I...

Page 18: ...ontrol or OK button on front panel to confirm the selected item and start playing Note Menu function is only available if the disc with this function MP3 overview Notes on MP3 z MP3 is short for MPEG...

Page 19: ...ter TV menu setting 3 Press the buttons to select one of the setup pages Auto program Manual program 4 Press OK button on front panel or ENTER button on remote control to enter the page 5 Press the bu...

Page 20: ...al Press cursor buttons to choose a setting or return to the Setup Page Press cursor button to enter the highlighted setting Press ENTER button on remote control or OK button on front panel to confirm...

Page 21: ...r your On Screen Display OSD Audio language setting With this menu item you can select the preferred language for the audio output this function requires MP4 file support When the selected audio langu...

Page 22: ...the type of Left and Right channel audio output Stereo is normal Stereo Mono L is all sound on the Left Audio output Mono R is all sound on the Right channel The Mix Mono function only works when a D...

Page 23: ...mpedance may damage the unit Do not use 3 cable loudspeakers and do not connect the loudspeakers minus to the car body GND using a BTL circuit and each loudspeaker must be connected with insulated cab...

Page 24: ...one Cool off until the ambient temperature returns to normal No sound Volume is in minimum Wiring is not properly connected Adjust volume to a desired level Check wiring connection The operation keys...

Page 25: ...ast ratio 400 1 Brightness 250 cd m2 FM Stereo Radio Frequency range 87 5 107 9 MHz Usable sensitivity 15dB Preset memory stations 18 MW section Frequency range 530 kHz 1710 kHz Preset memory stations...

Reviews: