Power Acoustik KSD9100 Owner'S Manual Download Page 4


4

ACCESSORIES 
 

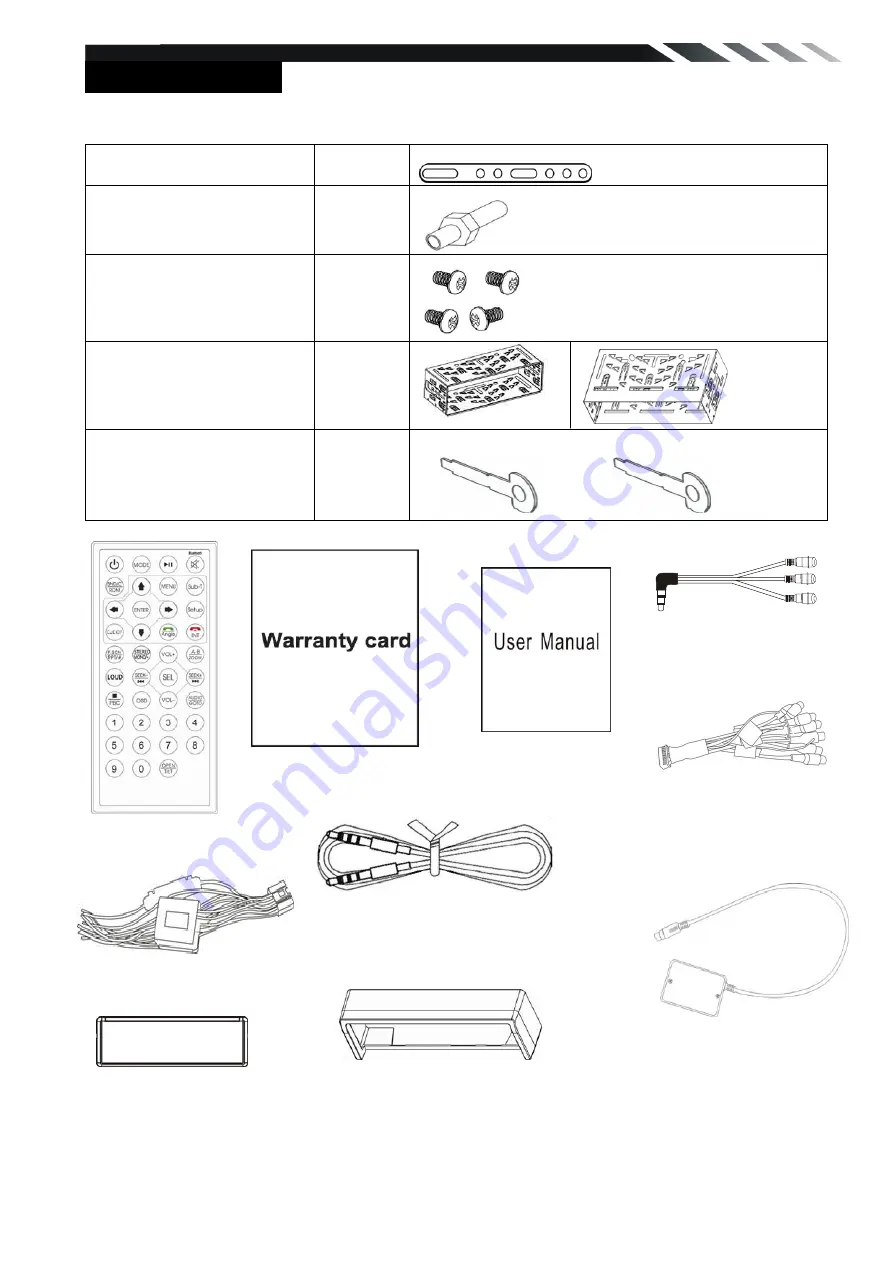
Package contains the following accessories for installation and operation of the unit. 

(1) Mounting Strap 


(2) Bolt  

(3) Screw  

(4) Mounting Collar 


(5) Release Key 


Remote Control                                                                                   


Power Cable                                                          


Trim ring 1                                                                                       


Note:  
Product image may vary from the actual delivery. 

(Optional)

AV in cable 

   Warranty card 

Trim ring 2 (optional) 

User Manual 

RCA Cable 

Smart control cable (only for 

W/O Bluetooth model)

TV box (only for TV 
model 

Summary of Contents for KSD9100

Page 1: ...onitor Touch Screen DVD CD MP3 MP4 AM FM Radio Owner s Manual Take the time to read through this owner s manual Familiarity with installation and operation procedures will help you obtain the best Per...

Page 2: ...car interior by means of ventilation or air conditioning Operate in well ventilated areas Do not turn on or off the product in short intervals When turning the unit off wait for at least 10 seconds pr...

Page 3: ...INTERFACE OPERATION 16 AV IN MODE 16 SETTING CONTROL 17 SOUND CONTROL 17 DISPLAY CONTROL 18 GENERAL CONTROL 18 RADIO CONTROL 18 DVD SET UP MENU 19 SYSTEM INFORMATION 20 CALIBRATION 20 TV SECTION ONLY...

Page 4: ...g Strap 1 2 Bolt 1 3 Screw 4 4 Mounting Collar 2 5 Release Key 2 Remote Control Power Cable Trim ring 1 Note Product image may vary from the actual delivery Optional AV in cable Warranty card Trim rin...

Page 5: ...the mounting sleeve 5 Install the panel to the unit 7 Press the panel make sure the gear locked to the mounting hole 2 Bend the tabs into place to secure the sleeve 4 Install the trim bezel onto the...

Page 6: ...parts provided with the unit to ensure proper installation The use of unauthorized parts may cause malfunction Install the unit where it does not get in the driver s way and will not injure the passe...

Page 7: ...brown cable for steering wheel control connected to the steering wheel we can use the steering wheel to control some unit Note To watch video the parking wire should be connected to break signal 2 cab...

Page 8: ...unit Do not use 3 cable loudspeakers and do not connect the loudspeakers minus to the car body GND The unit is using a BTL circuit and each loudspeaker must be connected with insulated cables accordi...

Page 9: ...turn to the main menu quickly 4 SETUP EQ button Press it to turn to setting menu quickly Long press the button to enter into EQ setting 5 EJECT button Press to eject a disc If the disc is not removed...

Page 10: ...ted Music File Format MP3 WMA Files 8 AV in Jack Put the AV plug into the AV IN jack which was marked on front panel 9 USB slot 10 TFT display 11 RESET button Press it with a thin sharp object The dev...

Page 11: ...about 5 seconds AS Auto Save Long press to save the stations with good reception automatically In BLUETOOTH mode press it to make a symbol 9 SEEK button In DVD mode Press button to skip to the previo...

Page 12: ...he A B repeat function Press it and hold for two seconds in DVD mode to zoom the image in or out in the sequence of ZOOM 2 ZOOM 3 ZOOM 4 ZOOM 1 2 ZOOM 1 3 ZOOM 1 4 23 SEL button Press it to enter the...

Page 13: ...emote control is used If the remote control unit isn t working even when it is operated near the unit replace the battery with a new battery of the same make and use only a lithium cell battery type C...

Page 14: ...button can scan the stations from 1 6 long touch it to save the stations with good reception automatically and scan each station for about 5 seconds Touch this button to search stations backward auto...

Page 15: ...yback Press it again to continue playback Press it to Stop playback from the current position press it again to final stop to the very beginning Start fast rewind or fast forward Press one of the keys...

Page 16: ...ss it button to skip to the next track FF 2 4 8 20 play will be display Press it to skip to the previous track Press it to skip to the next track Press it to activate the intro function You can play t...

Page 17: ...ngs to suit your personal needs Once you change settings your new settings will remain until you change it again To start SETTING tap it on main menu screen SOUND CONTROL Tap SOUND button to show SOUN...

Page 18: ...LOW MID HIGH TILT ANGLE Adjust monitor tilt angle CLOCK DISPLAY Set clock display time on or off CLOCK HOUR Set 24hour format or 12hour format CLOCK SETTING display time AUTO CONNECT Automatic Bluetoo...

Page 19: ...d 4 MP4 Language With this option you can select the preferred language for the MP4 menu 5 Password The password for this unit is initially set to factory default 0000 If you want to change your passw...

Page 20: ...e of the touch screen is described as below When the target moves to another position tap and hold at the center of the new target Repeat each time to complete the calibration process When the calibra...

Page 21: ...tting NTSC press button to automatic skip search term z Search Select this menu item is to start searching and storing stations automatically Manual program manual seek mode z Storage Select this menu...

Page 22: ...he panel According to mobile pairing device manual after searching new device select it input password 0000 and confirm ok device paring is finished The text Enter Number will shows on the panel after...

Page 23: ...e Dialed Received Missed calls are saved In History mode Tap Up Down arrow load previous next history record The calls in each category are orderly saved from the latest one to the final one Select a...

Page 24: ...sily enabled from the head unit touch screen Your mobile device can be kept in a secure location ensuring safest driving practices Activating Smart Control After connecting the provided Smart Control...

Page 25: ...ile devices Press and hold icon to activate voice command functions Press icon to exit voice command and continue music playback Press icon again to activate voice command choices on the mobile device...

Page 26: ...edance may damage the unit Do not use 3 cable loudspeakers and do not connect the loudspeakers minus to the car body GND Using a BTL circuit and each loudspeaker must be connected with insulated cable...

Page 27: ...one If the amplifiers turn off before all wires are attached use an external replay to provide remote on voltage excessive current required Nothing happens when buttons are pressed Display is not Accu...

Page 28: ...THE AMBIENT TEMPERATURE RETURNS TO NORMAL NO SOUND VOLUME IS IN MINIMUM ADJUST VOLUME TO A DESIRED LEVEL WIRING IS NOT PROPERLY CONNECTED CHECK WIRING CONNECTION THE OPERATION KEYS DO NOT WORK THE BU...

Page 29: ...adio Frequency range EUROPE AREA 87 5 108MHz Step 50KHz Frequency range SOUTH AMERICA AREA 87 5 108MHz Step 100KHz Frequency range RUSSIA AREA 87 5 108MHz Step 50KHz 65 74MHz Step 10KHz Frequency rang...

Page 30: ...evice may not cause harmful interference and 2 this device must accept any interference received including interference that may cause undesired operation NOTE 1 Any changes or modifications to this u...

Reviews: