background image

6

3

.

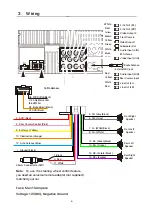
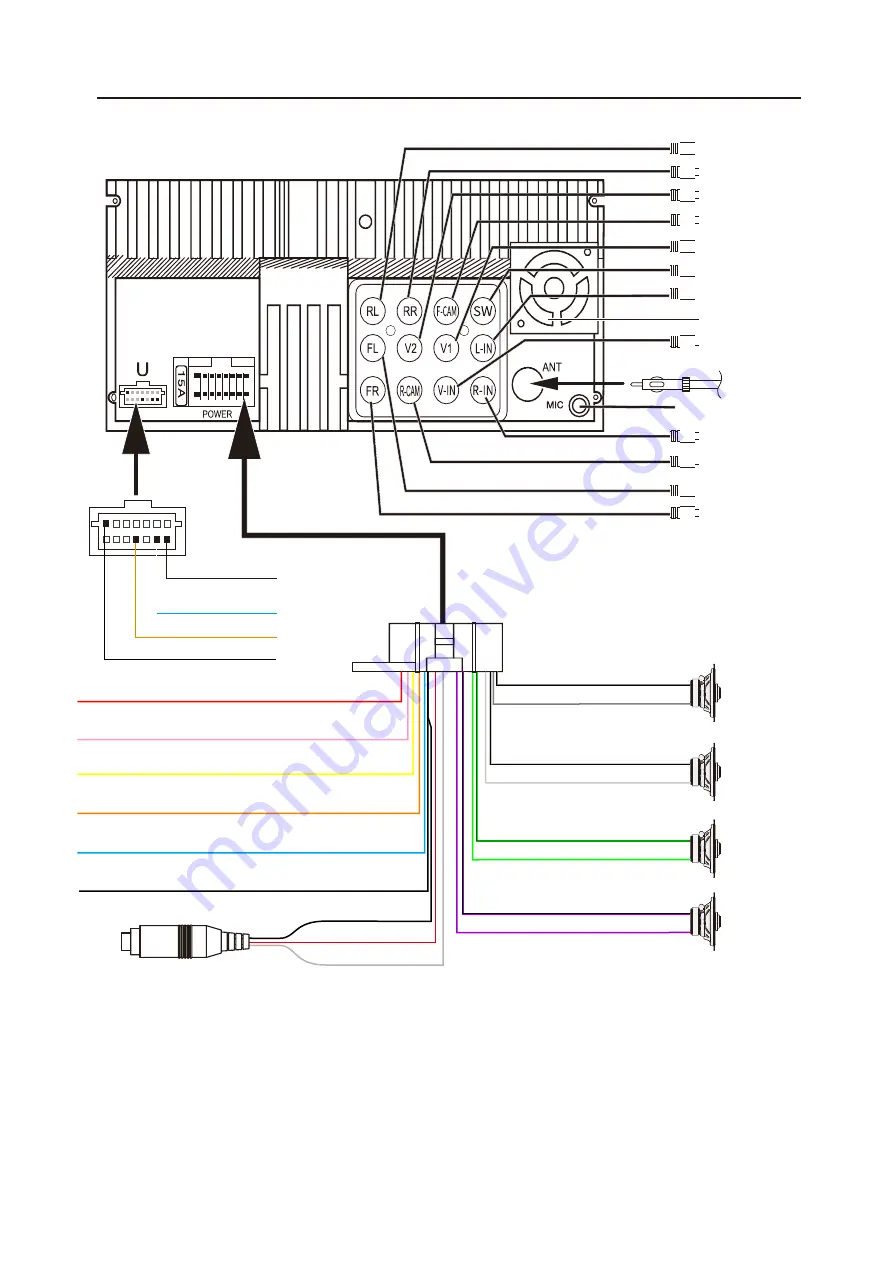
     Wiring

Subwoofer Out 

Brown
Yellow

Yellow

External MIC jack

Red

White

Line Out (FL)

Video Input (V-IN)

Line Out (RL)
Line Out (RR)

Video Output 2 
Front Camera 

Video Output1 

Audio Input (L-IN)

Audio Input (R-IN)

White

Yellow

Green

White

Red

Black

BT Antenna

Red

Yellow

Rear Camera input

Line Out (FR)

U1. GND (Black)

U2. Brake detect (Brown)


U3. Amplifier control 

(Blue/White)

U4. FCCD (Pink/Black) 

16


Pin Harness

5. FR- (Gray/Black)
6. FR+ (Gray)

Front Right
   Speaker

7. FL- (White/Black)
8. FL+ (White)

Front Left
   Speaker

13. RL- (Green/Black)
14. RL+ (Green)

16. RR- (Purple /Black)
15. RR+ (Purple)

Rear Right
 Speaker

Rear Left
 Speaker

1.  Ground (Black)

2.  ACC  (Red)

3.  Rear Camera Control (Pink)

9.  B (Yellow)

10.  Illumination (Orange)

12.  Auto Antenna (Blue)

1.  Black
4.  Red
11.  White

3.5mm Connector for SWC

Note:


To  use  the steering  whee

l control feature,

you need an universal remote adapter (not supplied) 
matched your car. 

Fuse: Max 15 Ampere

Voltage: 12V(DC); Negative Ground

1 2 3 4 5 6 7 8

9 10111213141516

Radio An

te

nna

Summary of Contents for CPAA-70D10M

Page 1: ...2 DIN 10 6 Monitor Touch screen MP3 MP4 USB SD AM FM Radio Support Apple CarPlay Support Android Auto Support Bluetooth CPAA 70D10M AV Center 2 DIN Headunit TM TM...

Page 2: ...Wiring Connection 4 Front panel Description 5 Remote Control 6 Main Menu 7 Settings 8 Apple CarPlay Android auto 9 Radio 10 USB 11 BT Audio 12 BT Phone 13 AV IN 14 Specification FCC Notes Warranty 3...

Page 3: ...nce 2 Accessories Installation 2 Screw 8 1 Mounting bracket 2 3 Remote 1 1 2 3 4 5 6 7 8 9 0 EJECT EQ DISC BT USB CP AA SXM Radio 4 Trim Ring 1 5 User Manual 1 8 4 Pin Connector 1 9 USB cable 1 7 Wire...

Page 4: ...receiver with screws as shown as the installation drawing Please buy from your dealer according to the drilling of holes size 4 Consult with your nearest dealer if installation requires the drilling...

Page 5: ...n the monitor after braking the car Connecting the reversing line to taillight on the car After connecting when you start up the reverse gear the unit will receive the picture from car rear view camer...

Page 6: ...6 Pin Harness 5 FR Gray Black 6 FR Gray Front Right Speaker 7 FL White Black 8 FL White Front Left Speaker 13 RL Green Black 14 RL Green 16 RR Purple Black 15 RR Purple Rear Right Speaker Rear Left Sp...

Page 7: ...button to start the voice control function 8 button Radio Press to select previous next preset radio station for broadcasting 9 USB SD Music Press repeatedly to shift track previous or next for playba...

Page 8: ...h to USB mode USB 8 Press it to increase or decrease the volume level 10 VOL Note 1 SXM just for include SiriusXM function models 2 these functions for Bluetooth Press it to eject the disc 14 EJECT 15...

Page 9: ...icon to enter the Setup menu The Setup menu is included Time Settings Audio Setting s General Settings Wallpaper Settings Time Settings The Time Settings allow the user to set Date Time Audio Setting...

Page 10: ...Subwoofer Output On Off Subwoofer Frequency 50Hz 80Hz 120Hz 160Hz Subwoofer Level 10 10 Volume Control Set the Main BT Talking Navi Voice default volume value Illumination Detect On Off Brightness Adj...

Page 11: ...e CarPlay interface 11 RDS On Off Rear Camera Rear Camera View Normal Reverse Parking Assist Guide On Off Parking Assist Guide Adjustment Touch to enter Parking Assist Guide Adjustment interface to sh...

Page 12: ...ch Android Auto icon in the head unit screen You can perform the operations of the Apps of the connected Android device 4 In Android Auto model touch to the head unit main menu 8 CarPlay Android Auto...

Page 13: ...Select Picture files Video 13 Press to list Audio Video Picture files in USB Short press to skip previous track Long press to fast reverse Play or pause button Short press to skip next track Long pre...

Page 14: ...On or Off Press to select Repeat All Repeat 1 Repeat Directory Press to select Audio setting or set the prefer EQ of each band in custom mode Bluetooth Connect If the Bluetooth is not connected press...

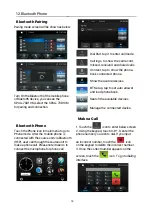
Page 15: ...eds to connect the microphone for phone call Dial Pad tap it to enter call mode Call logs to show the call record missed received and dialed calls Contact tap to show the phone book connected phone Sh...

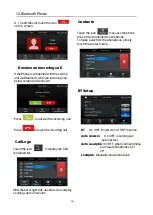
Page 16: ...Logs Touch the icon to display the Call combined list Slide the bar at right side up and down to display a call logs up to 20 records Touch the icon to access the phone book of the connected mobile p...

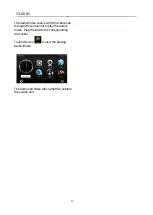
Page 17: ...urce with RCA cable can through the source unit to play the Audio Video Plug the RCA to the corresponding A Vsocket Touch the icon to view the playing Audio Video The Audio and Video will via the RCA...

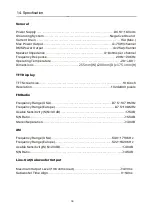
Page 18: ...Dimensions 255mm W x200mm D x175 1mm H TFT Display TFT Screen size 10 6inch Resolution 1024x600 pixels FM Radio Frequency Range USA 87 5 107 9MHz Frequency Range Europe 87 5 108MHz Usable Sensitivity...

Page 19: ...nd used in accordance with the instructions may cause harmful interference to radio communications However there is no guarantee that interference will not occur in a particular installation If this e...

Page 20: ...to improper connection to equipment of another manufacturer modification of existing equipment or Product which has been opened or tampered for any reason Units which are found to be damaged by abuse...

Reviews: