background image

12

FELLING LARGE TREES

(6 inches (15 cm) in diameter or larger)

The notch method is used to fell large trees.

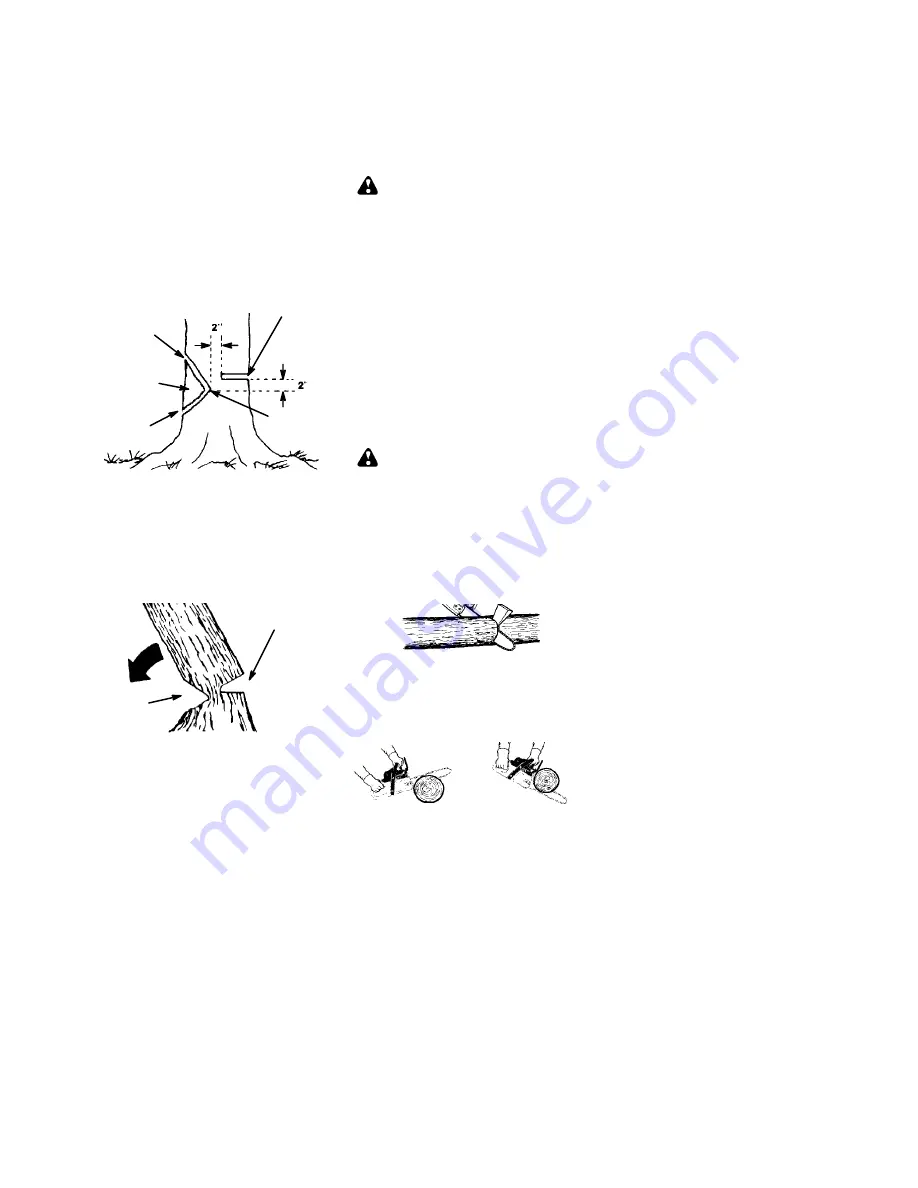
A notch is cut on the side of the tree in the de-

sired direction of fall. After a felling cut is

made on the opposite side of tree, the tree

will tend to fall into the notch.

NOTE:

If the tree has large buttress roots,

remove them before making the notch. If us-

ing saw to remove buttress roots, keep saw

chain from contacting ground to prevent dull-

ing of the chain.

NOTCH CUT AND FELLING THE

TREE

S

Make notch cut by cutting the top of the

notch first. Cut through

1/3

of the diameter

of the tree. Next complete the notch by cut-

ting the bottom of the notch. See illustra-

tion. Once the notch is cut remove the

notch of wood from the tree.

Notch

First cut

Second cut

Final (felling) cut here, 2 inches

(5 cm) above center of notch.

Hinge

S

After removing the wood from the notch,

make the felling cut on the opposite side of

the notch. This is done by making a cut about

two inches (5 cm) higher than the center of

the notch. This will leave enough uncut wood

between the felling cut and the notch to form

a hinge. This hinge will help prevent the tree

from falling in the wrong direction.

Opening

of felling

cut

Closing of

notch

Hinge holds tree on stump and helps

control fall

NOTE:

Before felling cut is complete, use

wedges to open the cut if necessary to

control the direction of fall. To avoid kickback

and chain damage, use wood or plastic

wedges, but never steel or iron wedges.

S

Be alert to signs that the tree is ready to

fall: cracking sounds, widening of the fell-

ing cut, or movement in the upper

branches.

S

As tree starts to fall, stop saw, put it down,

and get away quickly on your planned re-

treat path.

S

DO NOT cut down a partially fallen tree

with your saw. Be extremely cautious with

partially fallen trees that may be poorly

supported. When a tree doesn’t fall com-

pletely, set the saw aside and pull down the

tree with a cable winch, block and tackle,

or tractor.

CUTTING A FALLEN TREE

(BUCKING)

Bucking is the term used for cutting a fallen

tree to the desired log size.

WARNING:

Do not stand on the log

being cut. Any portion can roll causing loss

of footing and control. Do not stand downhill

of the log being cut.

IMPORTANT POINTS

S

Cut only one log at a time.

S

Cut shattered wood very carefully; sharp

pieces of wood could be flung toward opera-

tor.

S

Use a sawhorse to cut small logs. Never

allow another person to hold the log while

cutting and never hold the log with your leg

or foot.

S

Do not cut in an area where logs, limbs,

and roots are tangled such as in a blown

down area. Drag the logs into a clear area

before cutting by pulling out exposed and

cleared logs first.

TYPES OF CUTTING USED FOR

BUCKING

WARNING:

If saw becomes

pinched or hung in a log, don’t try to force it

out. You can lose control of the saw resulting

in injury and/or damage to the saw. Stop the

saw, drive a wedge of plastic or wood into the

cut until the saw can be removed easily. Re-

start the saw and carefully reenter the cut. To

avoid kickback and chain damage, do not

use a metal wedge. Do not attempt to restart

your saw when it is pinched or hung in a log.

Use a wedge to remove pinched saw

Turn saw OFF and use a plastic or

wooden wedge to force cut open.

Overcutting

begins on the top side of the log

with the bottom of the saw against the log.

When overcutting use light downward pres-

sure.

Overcutting

Undercutting

Undercutting

involves cutting on the under-

side of the log with top of saw against the log.

When undercutting use light upward pres-

sure. Hold saw firmly and maintain control.

The saw will tend to push back toward you.

Summary of Contents for 545137224

Page 1: ...al Manual de Instrucciones Manuel d Instructions WARNING Read and follow all Safety Rules and Operating Instructions before using this product Failure to do so can result in serious injury ADVERTENCIA...

Page 2: ...st idle lever out to the full extent to the FULL CHOKE posi tion Push the choke fast idle lever in to the HALF CHOKE position Starting Reminder SAFETY RULES WARNING Always disconnect spark plug wire a...

Page 3: ...ur body and the guide bar and chain to the rear preferably covered with a scabbard MAINTAIN YOUR SAW IN GOOD WORKING ORDER S Have all chain saw service performed by a qualified service dealer with the...

Page 4: ...chain sharp and properly tensioned A loose or dull chain can in crease the chance of kickback occurring Follow manufacturer s chain sharpening and maintenance instructions Check ten sion at regular in...

Page 5: ...be caused by allowing contact of the bar tip in the danger zone with any hard object Kickback can also be caused by pinching the saw chain along the top of the guide bar This action may push the guide...

Page 6: ...ingscreen If you operate a chain saw in a state or locale where such regulations exist you are legally responsible for maintaining the operating condition of these parts Failure to do so is a violatio...

Page 7: ...orward and back ward as the screw is turned Clutch Cover Lower Hole Guide Bar Adjusting Pin 12 Install bar nuts and finger tighten only Once the chain is tensioned you will need to tighten bar nuts CH...

Page 8: ...WARNING If the saw is operated with a loose chain the chain could jump off the guide bar and result in serious injury OPERATION KNOW YOUR CHAIN SAW READ THIS INSTRUCTION MANUAL AND SAFETY RULES BEFOR...

Page 9: ...tents of this container into 1 gallon 4 liters of gasoline to achieve the proper fuel mixture DO NOT USE automotive or marineoil Theseoils willcause enginedam age When mixing fuel follow the instructi...

Page 10: ...d re lease the throttle trigger to allow engine to return to idle speed STARTING A WARM ENGINE 1 Move ON STOP switch to the ON posi tion 2 Slowly press primer bulb 6 times 3 To set the fast idle pull...

Page 11: ...ng S Allow thechaintocutfor you Exertonly light downward pressure If you force the cut damage to the bar chain oren gine can result S Release the throttle trigger as soon as the cut is completed allow...

Page 12: ...NOT cut down a partially fallen tree with your saw Be extremely cautious with partially fallen trees that may be poorly supported When a tree doesn t fall com pletely setthesaw asideandpull downthe t...

Page 13: ...lt in serious injury WARNING Neverclimb intoa treeto limb or prune Do not stand on ladders plat forms a log or inany positionwhich cancause you to lose your balance or control of the saw IMPORTANT POI...

Page 14: ...items that have been subjected to operator abuse or negligence To receive full value from the warranty the operator must main tain unit as instructed in this manual Various adjustments will need to be...

Page 15: ...ful emissions Always clean your air filter after 10 tanks of fuel or 5 hours of operation whichever comes first Clean more frequently in dusty conditions A used air filter can never be completely clea...

Page 16: ...chain movement idle too fast or stalling idle too slow The idle speed screw is located in the area above the primer bulb and is labeled T S Turn idle screw T clockwise to increase engine speed S Turn...

Page 17: ...ON 2 See Difficult Starting in Operation Section 3 Fill tank with correct fuel mixture 4 Install new spark plug 5 Check for dirty fuel filter replace Check for kinked or split fuel line repair or repl...

Page 18: ...issions control system warranty on your year 2007 and later small off road engine In California all small off road engines must be designed built and equipped to meet the State s stringent anti smog s...

Page 19: ...ing a warranty claim Poulan is not liable to cover failures of warranted parts caused by the use of add on or modified parts HOW TO FILE A CLAIM If you have any questions regarding your warranty right...

Reviews: